
Lab 9: How to Build a Simple Home Networking Lab for Network+ Practice
Lab Goal
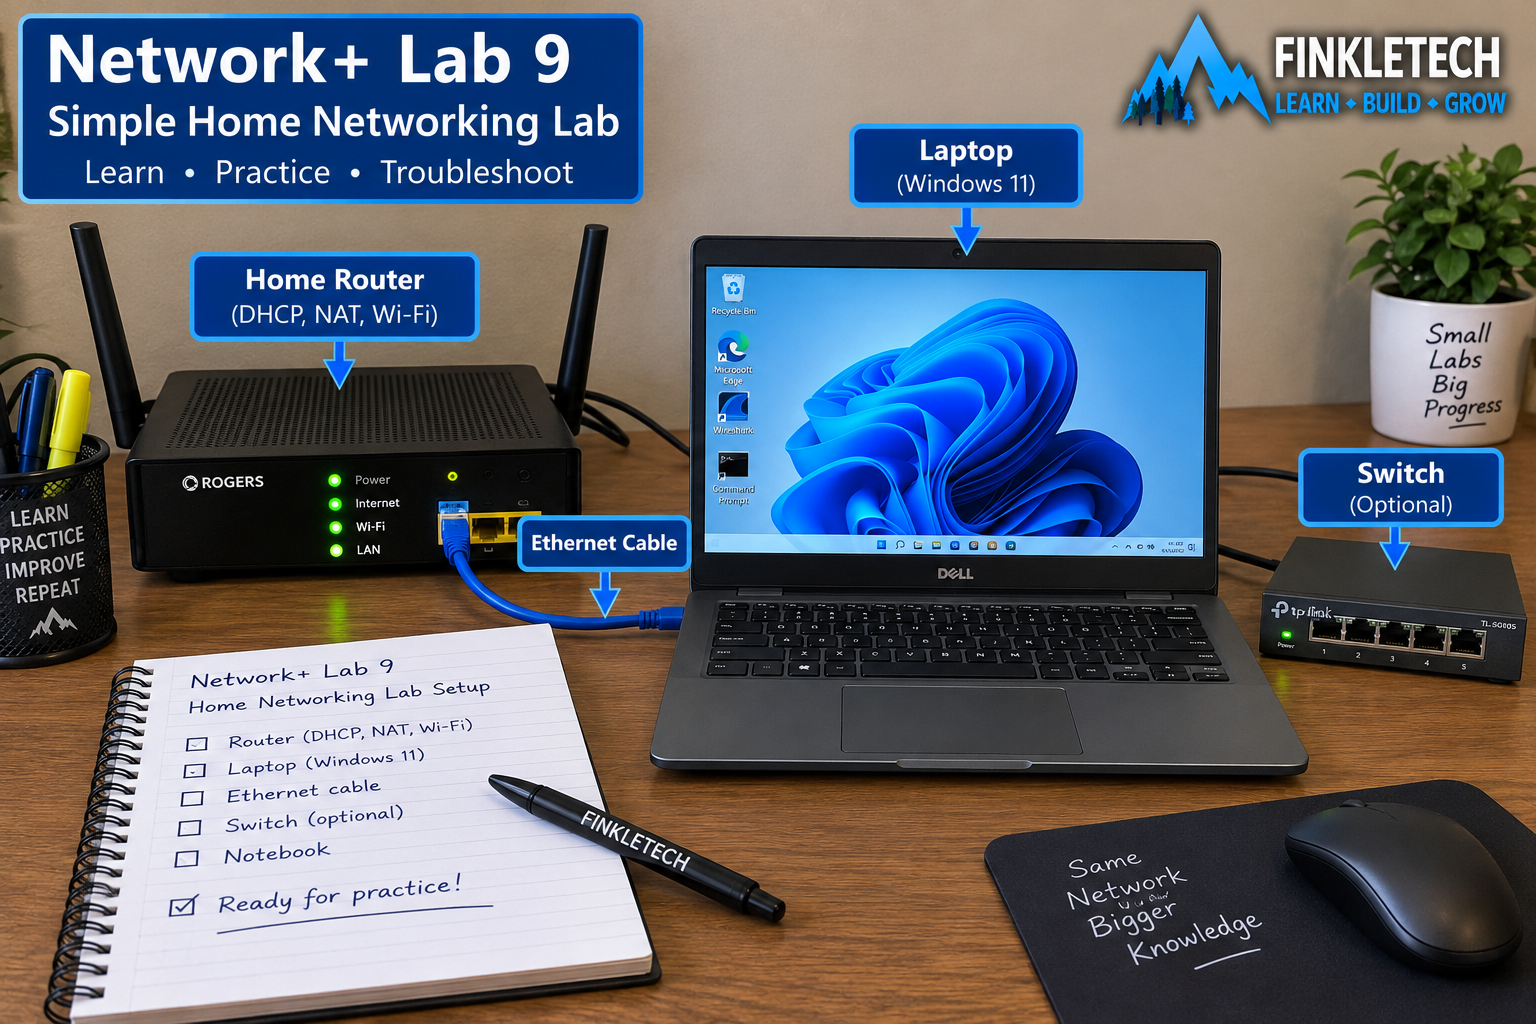
In this lab, you will build a simple home networking lab that you can reuse for future practice. The goal is to create a small, safe setup where you can test basic networking concepts such as IP addressing, DHCP, DNS, Ethernet, Wi-Fi, ports, packet captures, and troubleshooting commands.
A home networking lab does not need to be expensive or complicated. You do not need a rack full of enterprise gear to start learning. For beginner Network+ practice, a laptop, your existing router, an Ethernet cable, a notebook, and a few built-in Windows tools can already teach you a lot.
By the end of this lab, you should have a basic practice setup documented in your networking notebook. You should know what devices are part of the lab, how they connect, what IP information they use, and what tests you can repeat when you want to study.
Before You Start: Use Your Networking Notebook
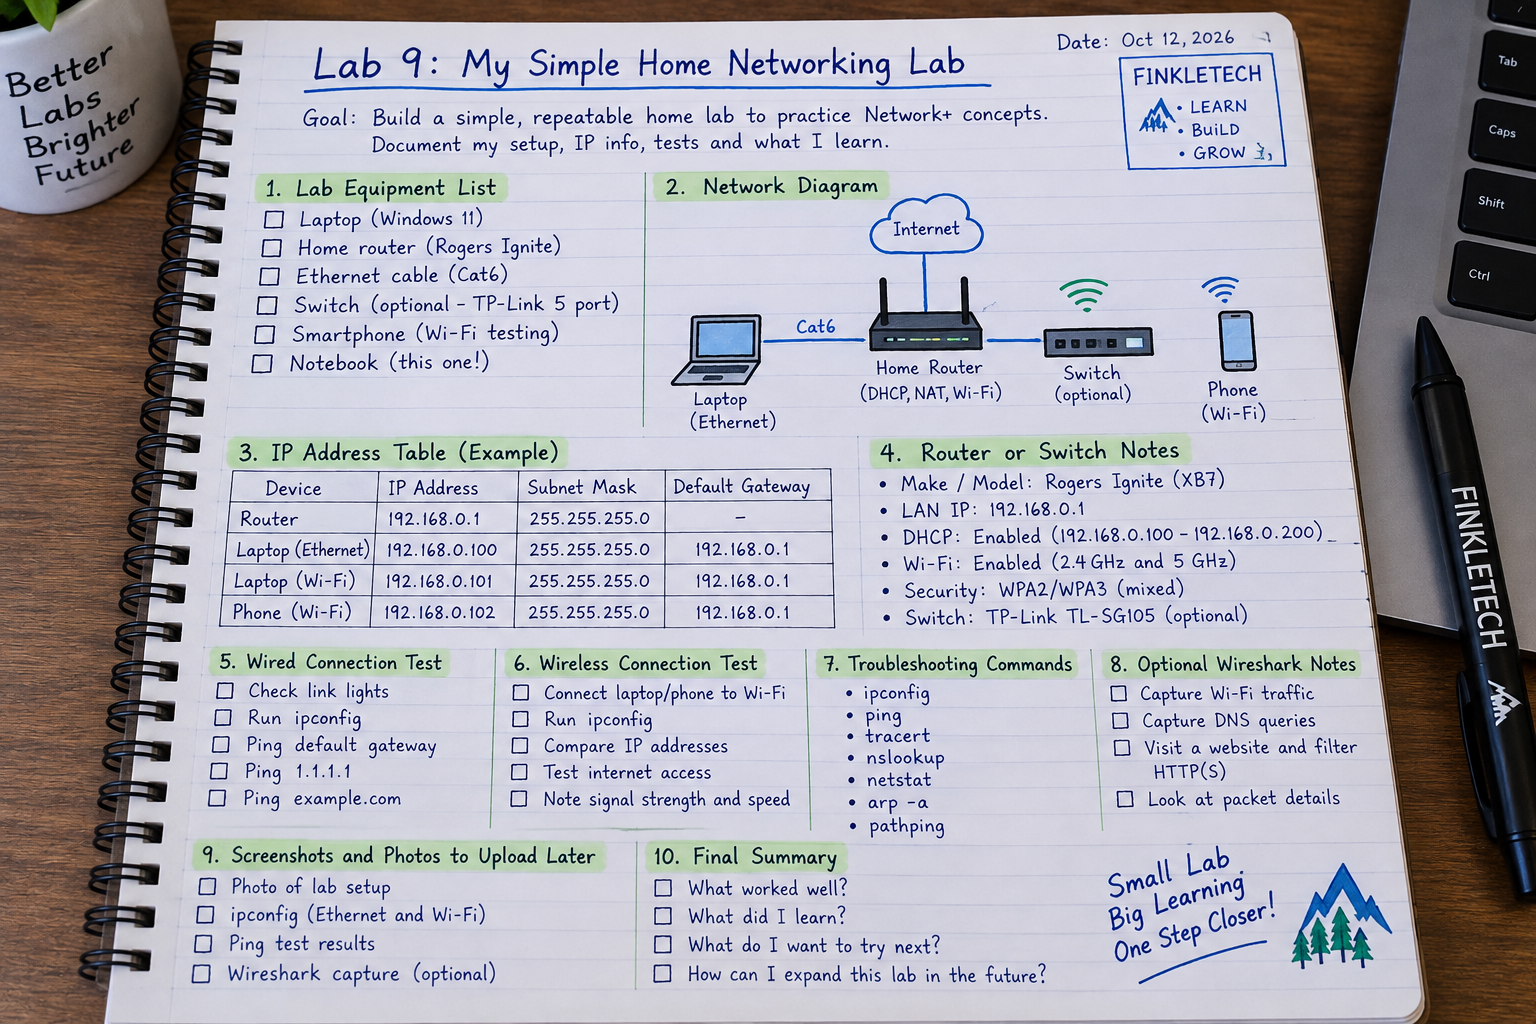
Open your networking notebook to a fresh page and write:
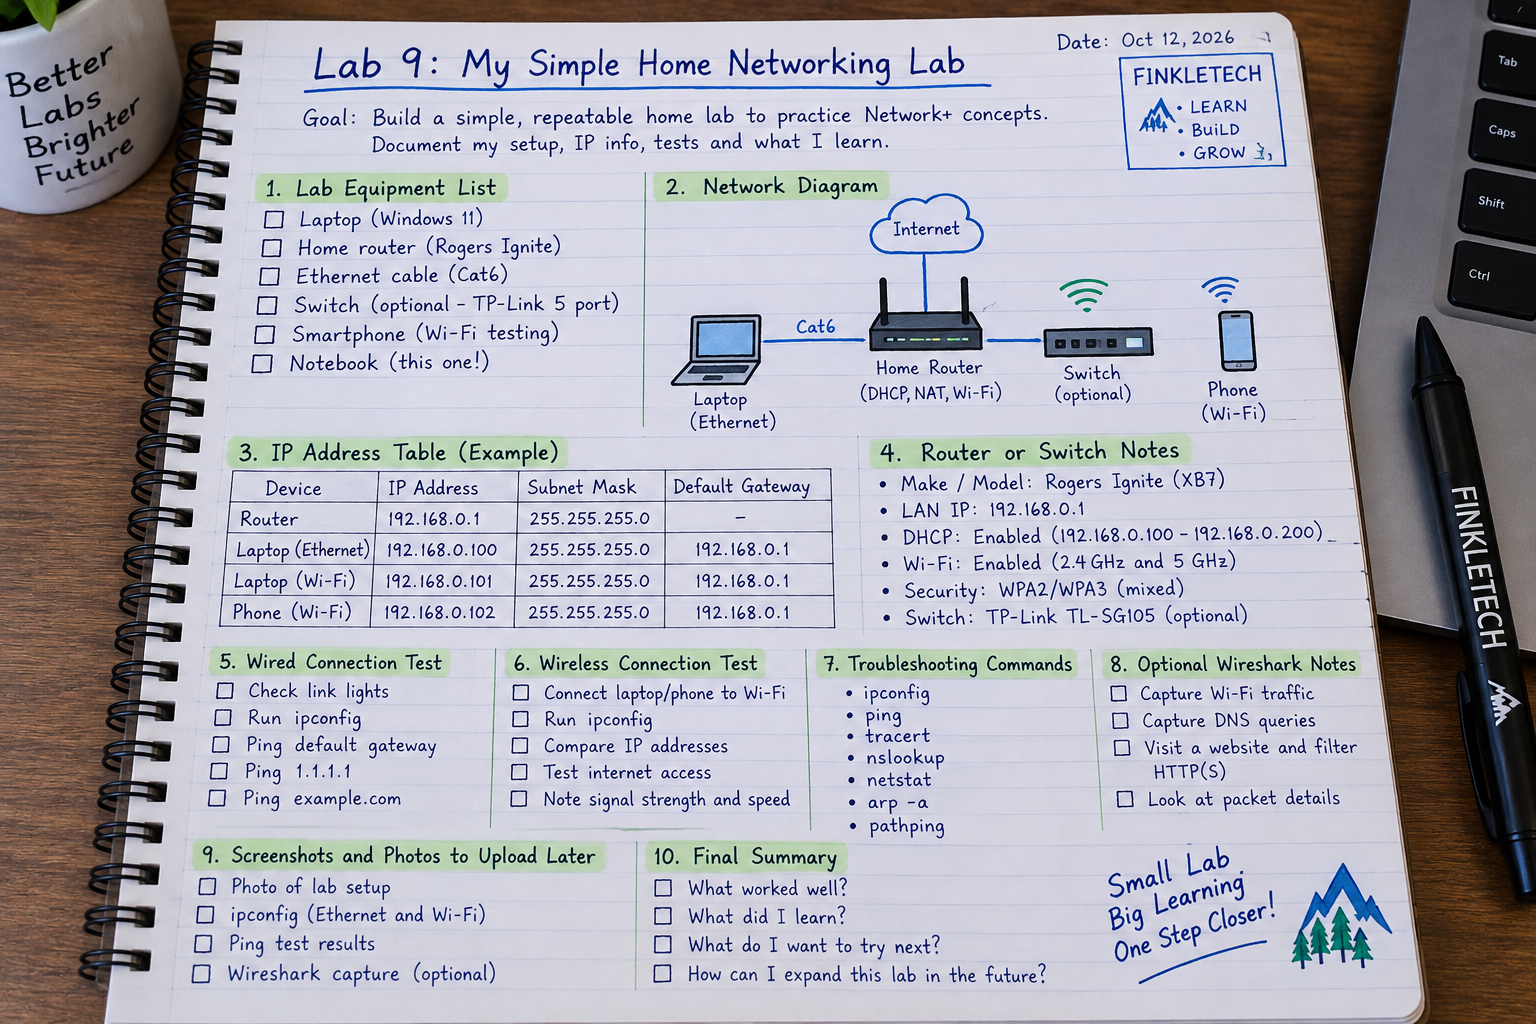
Lab 9: My Simple Home Networking Lab
This notebook is now becoming the backbone of your learning system. Instead of having random screenshots scattered across your desktop, you are building a record of what you tested, what you observed, and what you learned.
For this lab, create sections for:
- lab equipment list
- network diagram
- IP address table
- router or switch notes
- wired connection test
- wireless connection test
- troubleshooting command checklist
- optional Wireshark notes
- screenshots and photos to upload later
- final summary
Your goal is to make your networking notebook feel like your own small field manual. When you forget what command to run or what setting means, you should be able to flip back and find your own examples.
Why This Lab Matters
A lot of people study Network+ by reading chapters, watching videos, and memorizing definitions. That helps, but it can still leave a gap between “I recognize the term” and “I know what to do with it.”
A home lab closes that gap.
When you build even a tiny practice network, the concepts become real. DHCP is no longer just a definition. It is the thing giving your laptop an IP address. DNS is no longer just “name resolution.” It is the thing that lets your computer turn a domain name into an address. Ethernet is no longer just a cable type. It is the physical link between your computer and router. Wireshark is no longer just a tool name. It is a window into the packets your computer is sending and receiving.
This lab is important because it gives you a repeatable environment. You can come back to it whenever you study a new topic. Instead of asking, “How do I practice this?” you can use the lab setup you already built.
Quick Concept Refresher: What Is a Home Lab?
A home lab is a small practice environment used for learning technical skills. It can be as simple as one laptop and one router, or as complex as a rack of servers, switches, firewalls, virtual machines, and cloud services.
For this beginner lab, keep it simple.
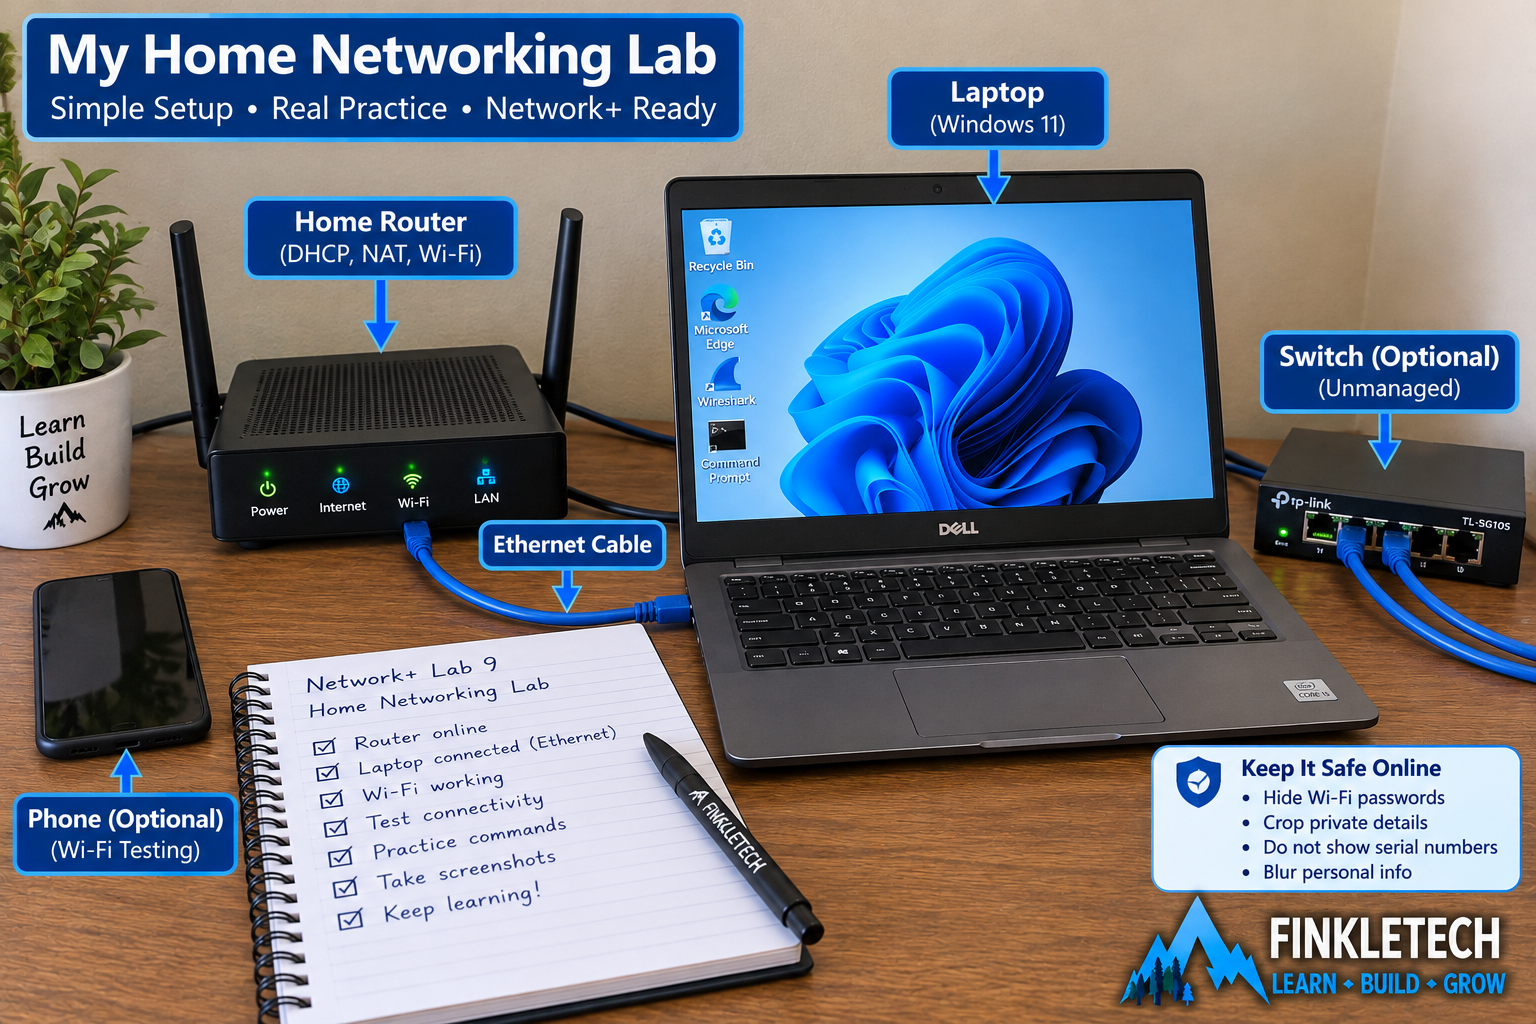
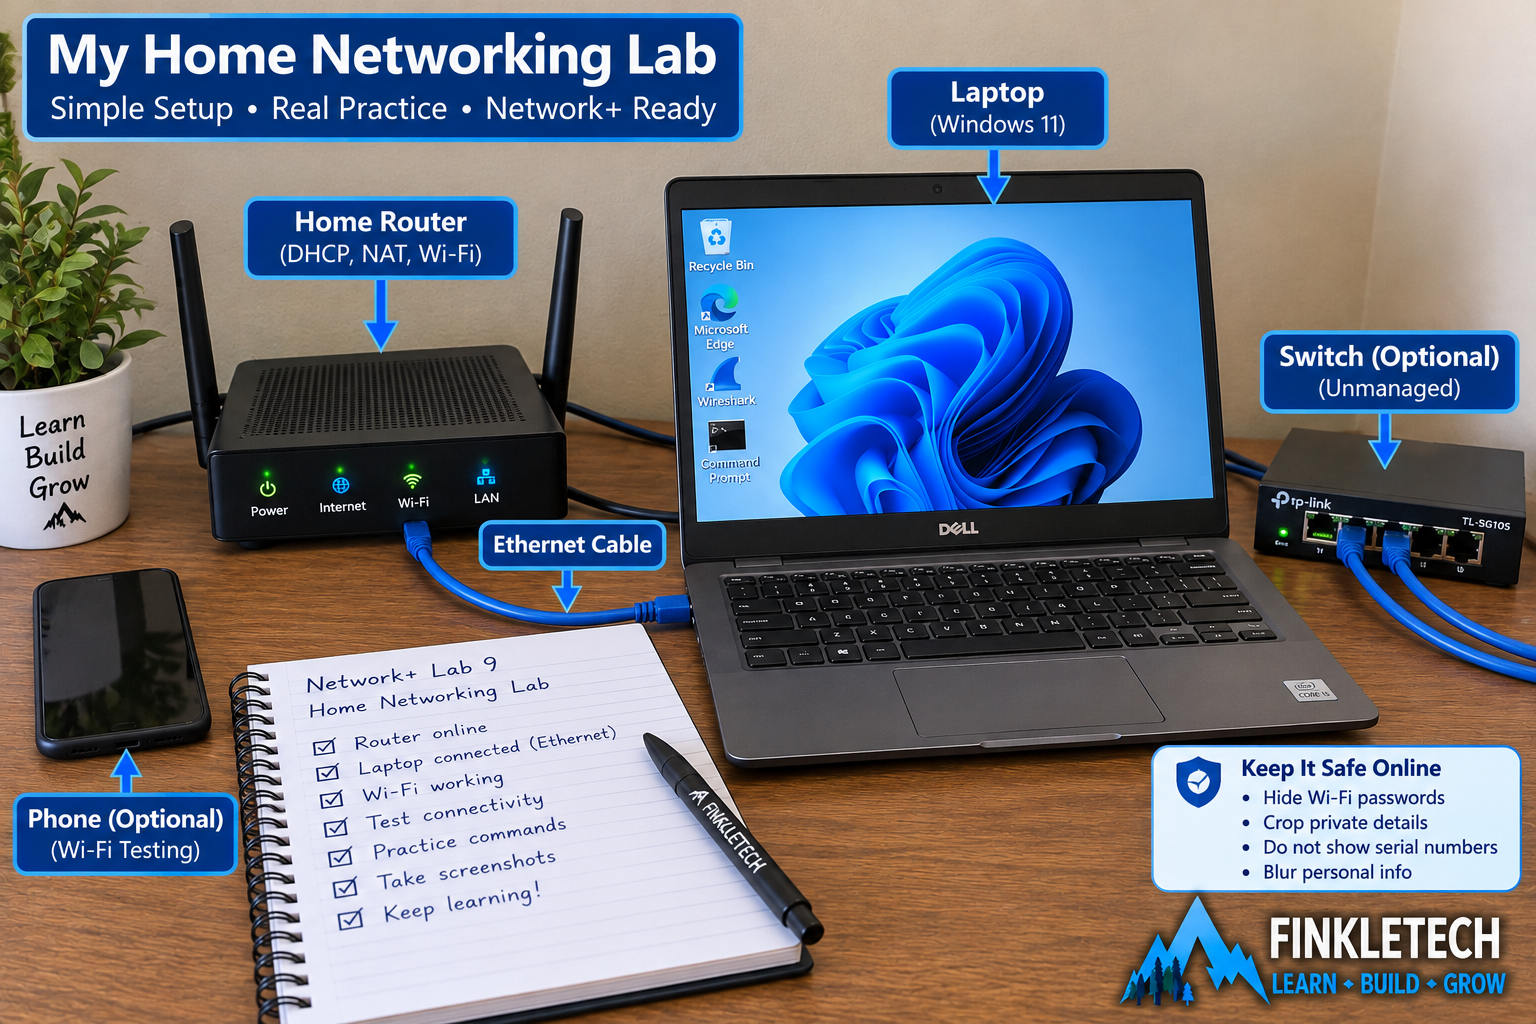
A useful starter home networking lab might include:
- one main laptop or desktop
- your home router
- one Ethernet cable
- one Wi-Fi connection
- one optional unmanaged switch
- one optional second device, such as another laptop, phone, Raspberry Pi, or printer
- your networking notebook
- basic tools like Command Prompt, PowerShell, and Wireshark
The purpose is not to show off expensive gear. The purpose is to create a controlled place to practice real networking ideas.
Tools Needed
You can complete the basic version of this lab with very little equipment.
You will need:
- Windows laptop or desktop
- home router
- Wi-Fi connection
- Ethernet cable
- your networking notebook
- Command Prompt
- PowerShell
- screenshot tool such as Snipping Tool
- phone or camera for photos
Optional but useful:
- unmanaged Ethernet switch
- second Ethernet cable
- USB-to-Ethernet adapter
- Raspberry Pi
- old laptop
- basic Ethernet cable tester
- Wireshark
If you do not have the optional tools, do not stop. Start with what you have. A simple working lab beats an imaginary perfect lab.
Safety and Privacy Note Before Publishing Photos and Screenshots
A home lab can reveal private details if you are not careful. Before posting images online, check every screenshot and photo.
Do not publish:
- router labels with Wi-Fi passwords
- QR codes from your router
- serial numbers
- full MAC addresses
- public IP addresses
- personal device names
- private browsing or DNS activity
- login screens
- admin passwords
- exact home network details you do not need to show
For the public version of the page, use cropped screenshots and clean examples. You can still make the lab useful without exposing sensitive information.
Step 1: Choose Your Main Lab Device
Start with one main device. This will be the computer you use for most of your tests.
Ideally, use a Windows laptop or desktop because many Network+ beginner commands are easy to practice in Command Prompt and PowerShell. If your laptop has both Wi-Fi and Ethernet, even better. If it does not have Ethernet, a USB-to-Ethernet adapter is a useful addition.
In your notebook, record:
| Main Lab Device | My Result |
|---|---|
| Device Type | [Laptop/Desktop] |
| Operating System | [Windows version] |
| Wi-Fi Available? | [Yes/No] |
| Ethernet Available? | [Yes/No] |
| USB-to-Ethernet Adapter? | [Yes/No] |
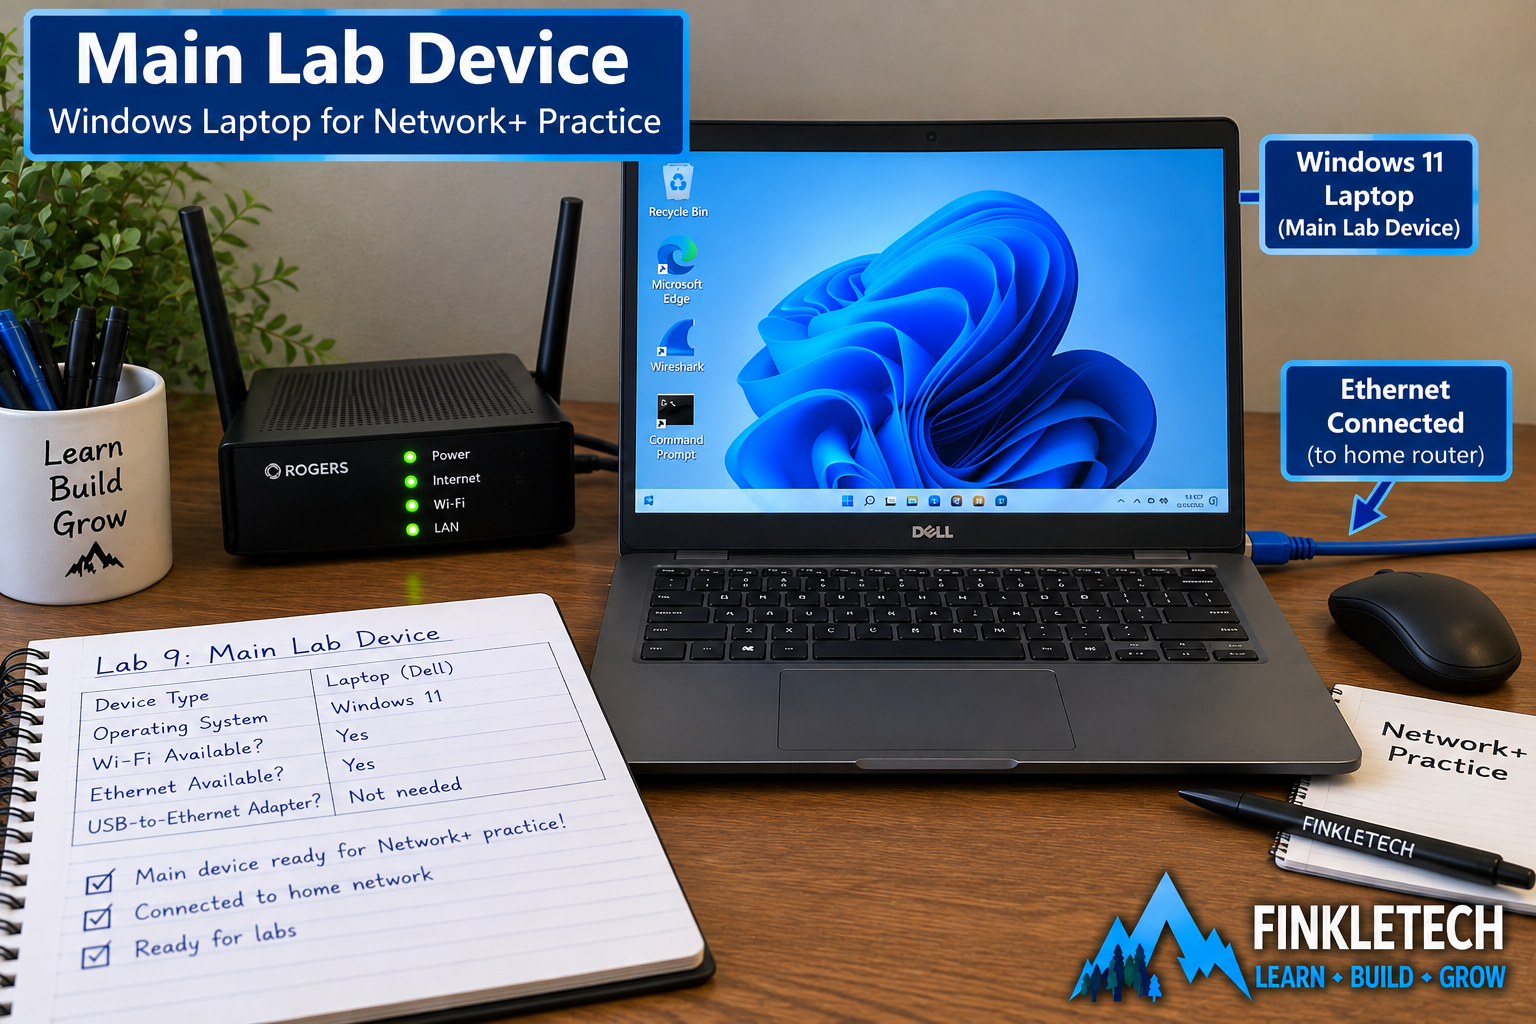
This device will be your command center for running ipconfig, ping, tracert, nslookup, netstat, Test-NetConnection, and Wireshark captures.
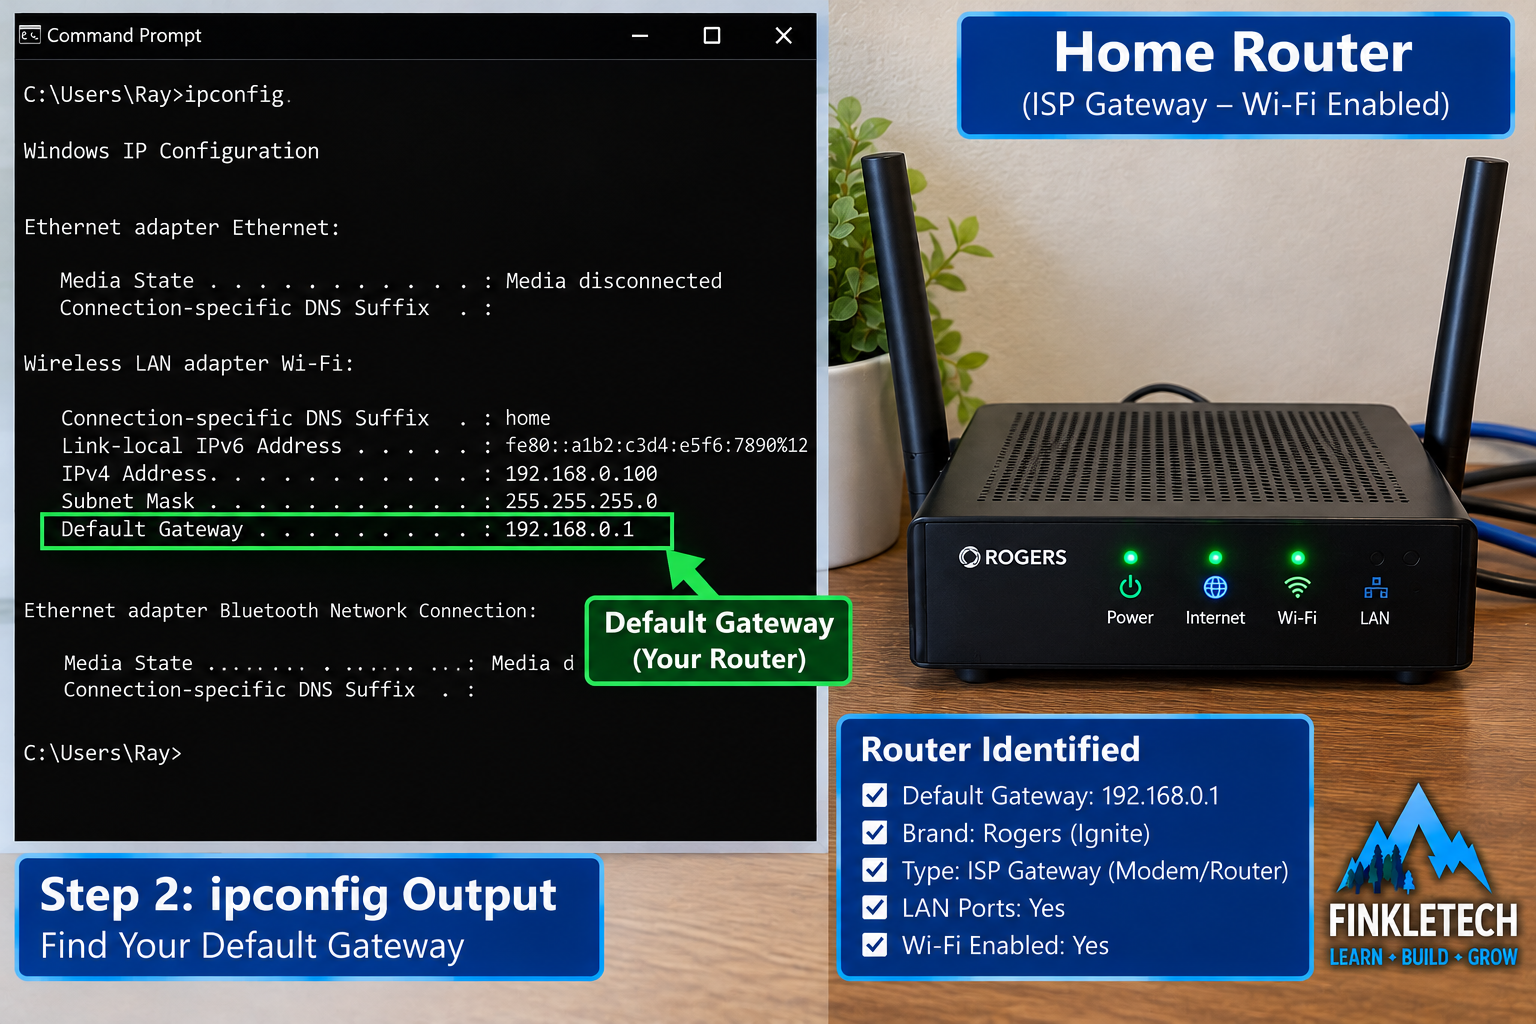
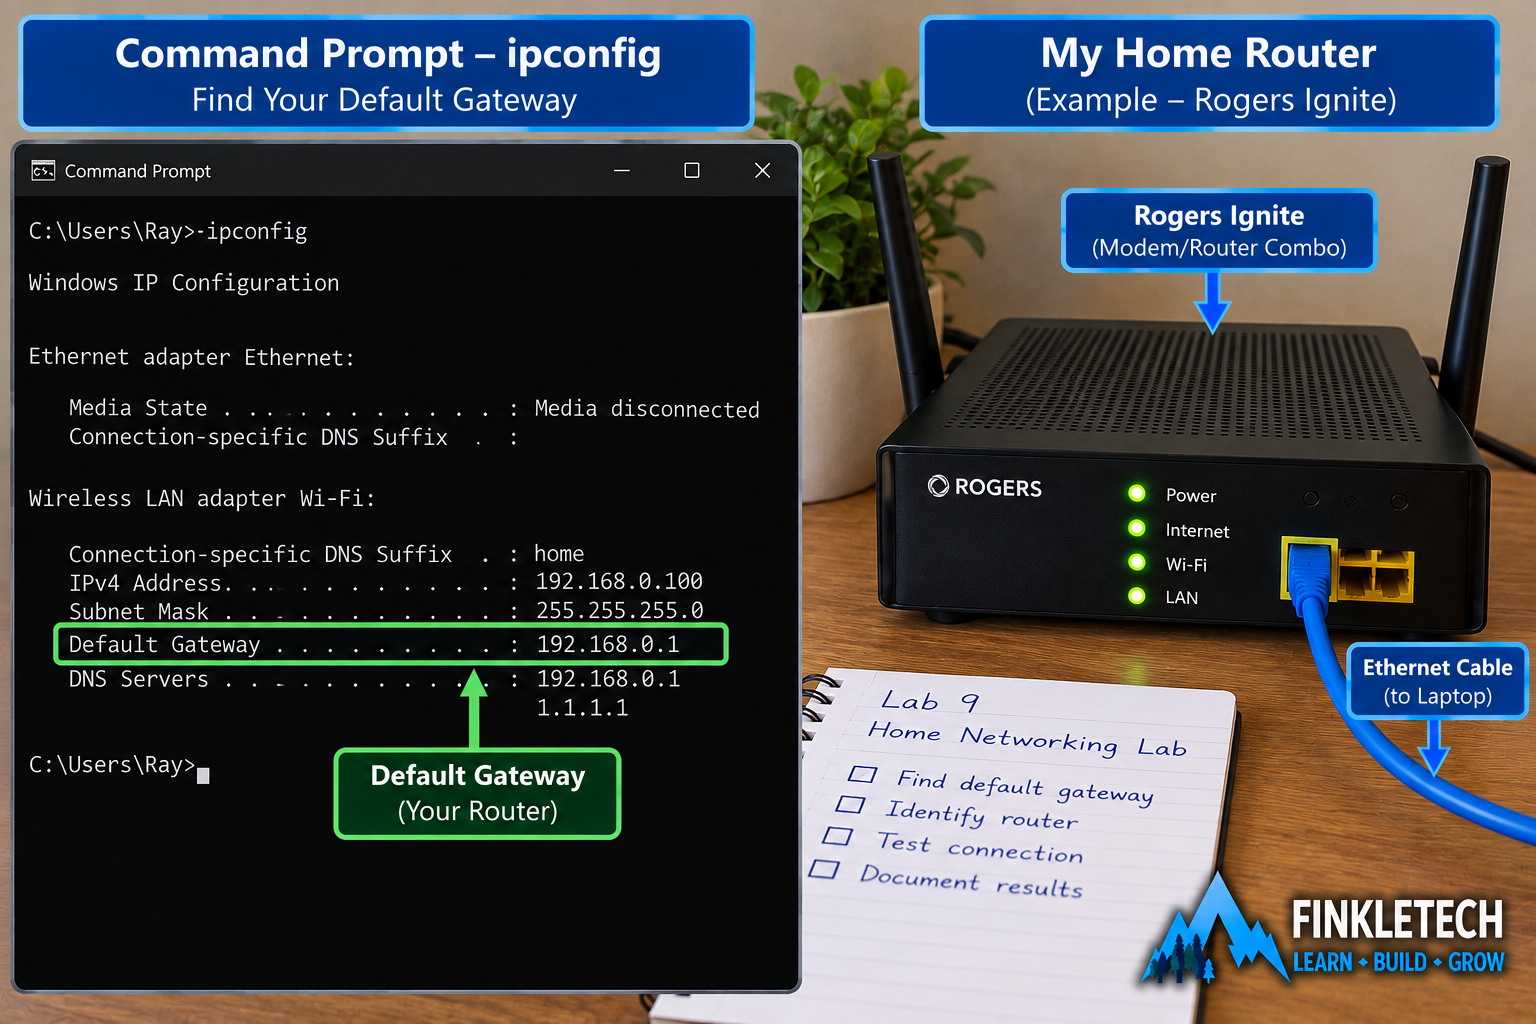
Step 2: Identify Your Router
Your router is usually the center of your home network. It may be a standalone router, a modem/router combo from your internet provider, or part of a mesh Wi-Fi system.
Do not worry if your setup is not fancy. The goal is to understand what device is acting as the gateway for your network.
Run:
ipconfig
Look for:
Default Gateway
That address usually points to your router.
In your notebook, record:
| Router Detail | My Result |
|---|---|
| Default Gateway | [Insert result] |
| Router Brand / Model | [Insert if known] |
| Router Type | [Standalone / ISP gateway / Mesh / Unknown] |
| LAN Ports Available? | [Yes/No] |
| Wi-Fi Enabled? | [Yes/No] |
Step 3: Add an Ethernet Cable to the Lab
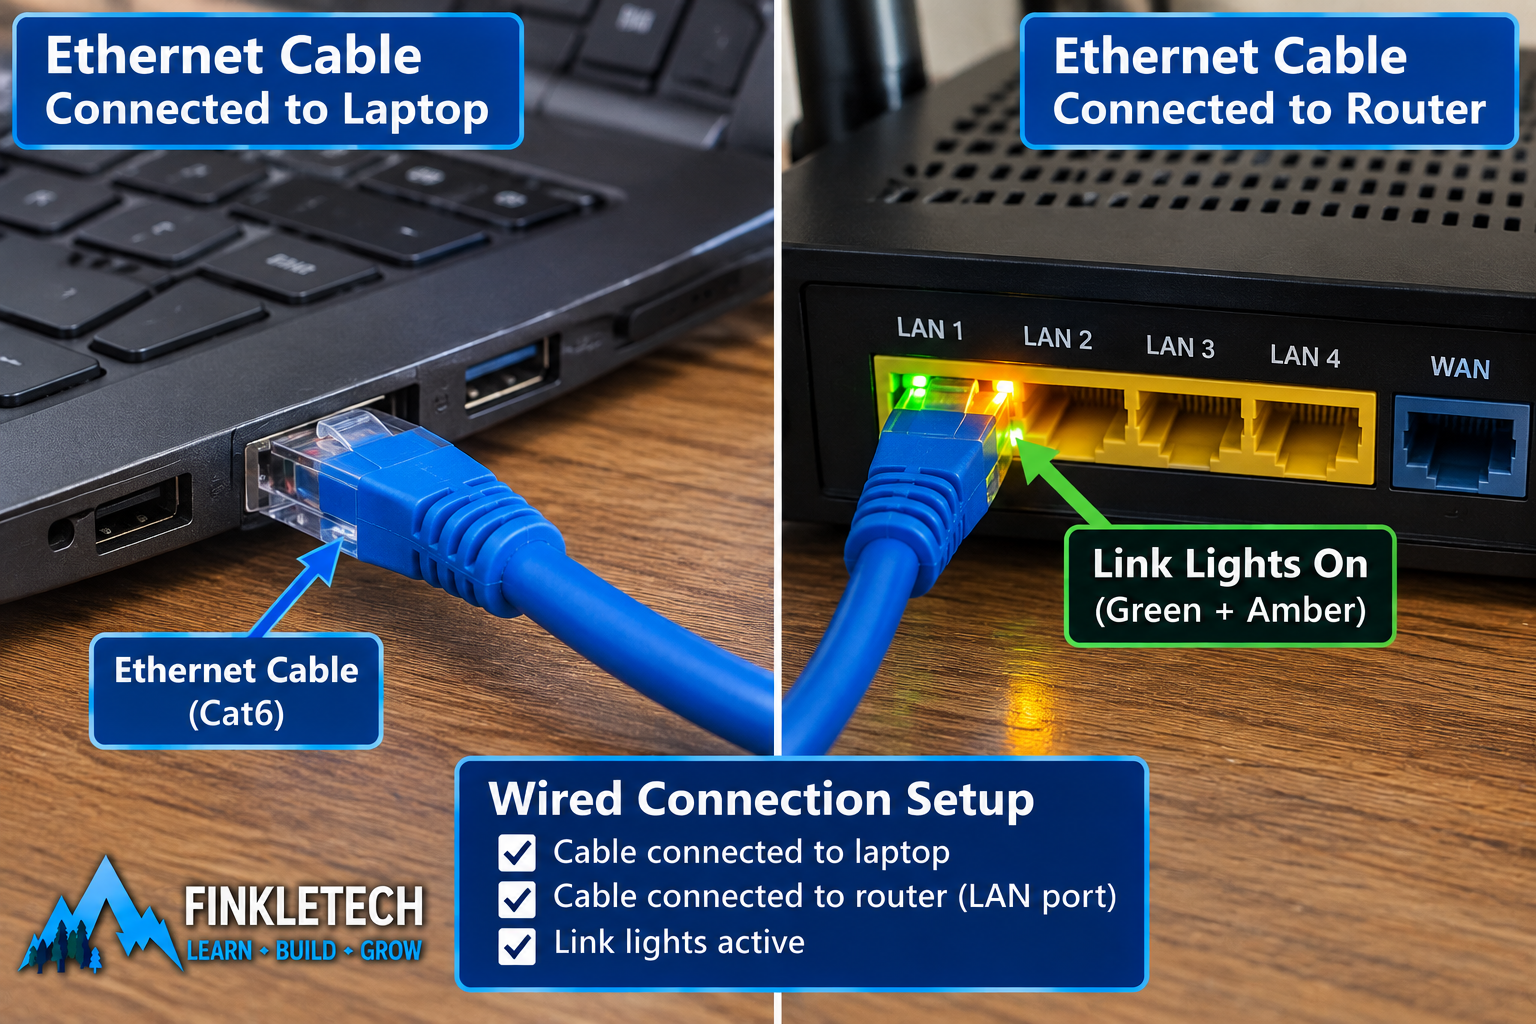
Next, add one Ethernet cable.
This lets you practice wired networking, physical connections, link lights, and adapter differences. Even if you mostly use Wi-Fi, you should understand Ethernet because wired connections are still common in IT work.
Plug the Ethernet cable into your computer or adapter, then plug the other end into a LAN port on your router.
Check for link lights.
Run:
ipconfig
Look for the Ethernet adapter.
In your notebook, record:
| Ethernet Lab Detail | My Result |
|---|---|
| Cable Category | [Cat5e/Cat6/Unknown] |
| Link Light On? | [Yes/No] |
| Ethernet Adapter Has IP? | [Yes/No] |
| Ethernet IPv4 Address | [Insert or simplify] |
| Default Gateway | [Insert result] |
Step 4: Optional — Add a Small Switch
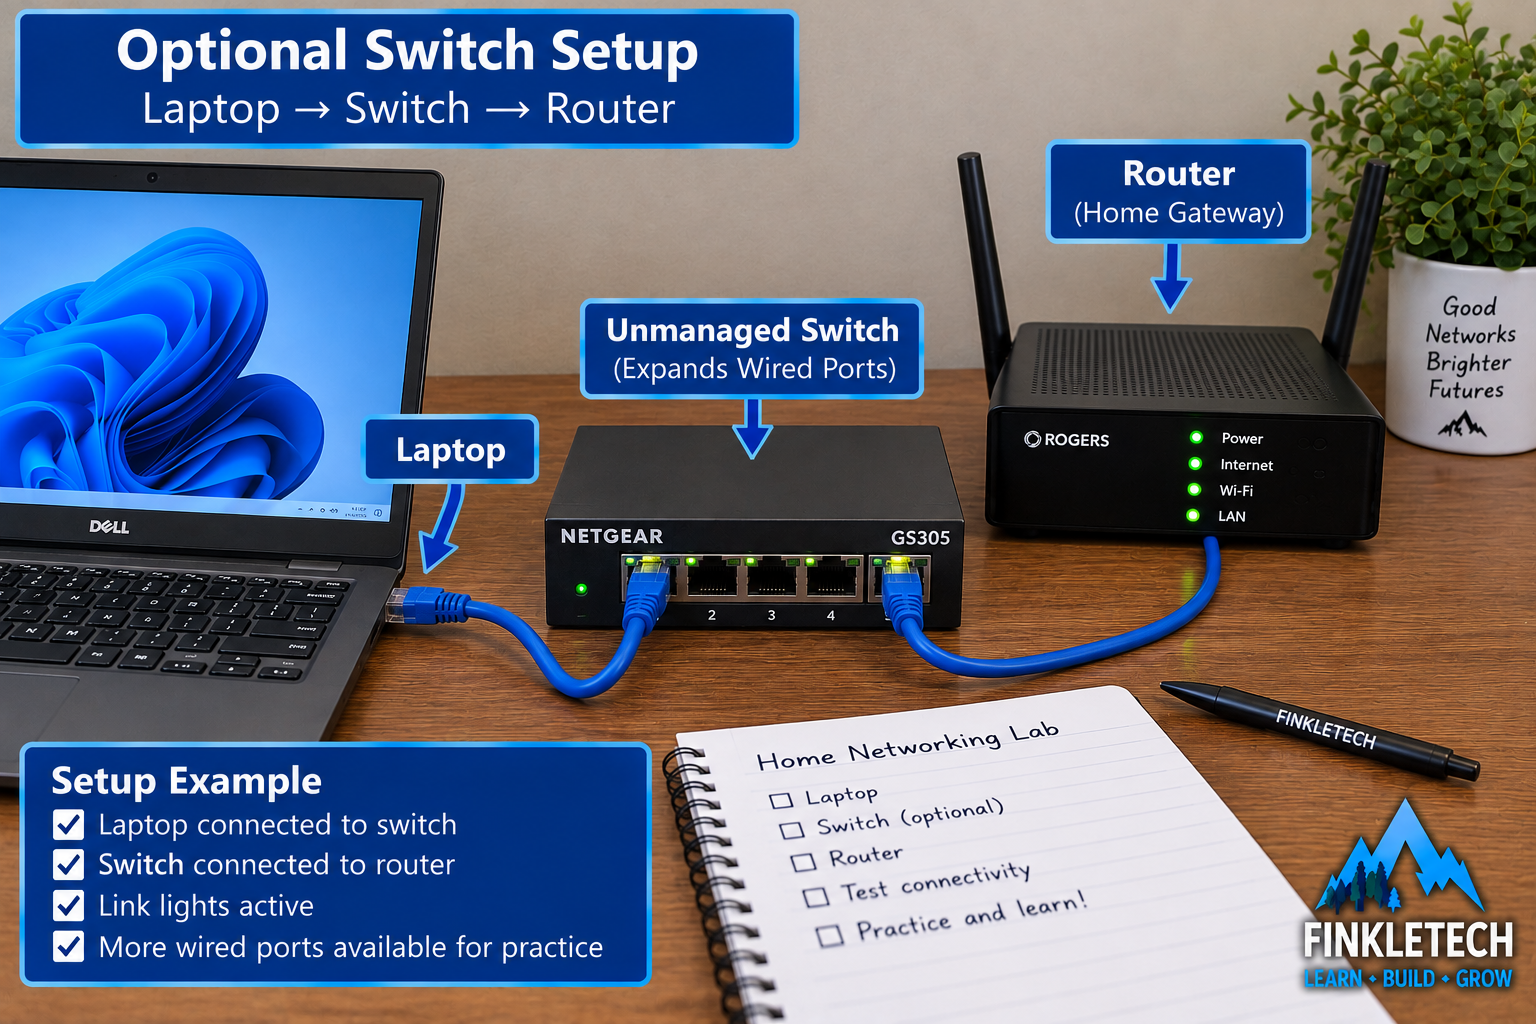
If you have an unmanaged Ethernet switch, add it to the lab.
A simple setup might look like this:
Laptop → Ethernet Cable → Switch → Router
Or:
Router → Switch → Laptop and another device
A switch expands the number of wired ports available on your network. It forwards traffic within the local network based on MAC addresses. For beginner practice, an unmanaged switch is simple because it does not require configuration.
In your notebook, record:
| Switch Detail | My Result |
|---|---|
| Switch Used? | [Yes/No] |
| Number of Ports | [Insert result] |
| Link Lights Active? | [Yes/No] |
| Devices Connected | [Insert devices] |
If you do not have a switch, skip this step. The lab still works.
Step 5: Add a Second Device if Available
A second device makes the lab more useful. This could be another laptop, phone, printer, Raspberry Pi, smart TV, or old desktop.
The point is to practice seeing more than one client on the network. You can compare IP addresses, connection types, and device behavior.
For example, you can compare your laptop on Ethernet with your phone on Wi-Fi.
In your notebook, create this table:
| Device | Connection Type | IPv4 Address | Notes |
|---|---|---|---|
| Main Laptop | Ethernet/Wi-Fi | [Insert result] | Main lab device |
| Phone | Wi-Fi | [Insert result] | Second test device |
| Optional Device | [Insert result] | [Insert result] | [Insert notes] |
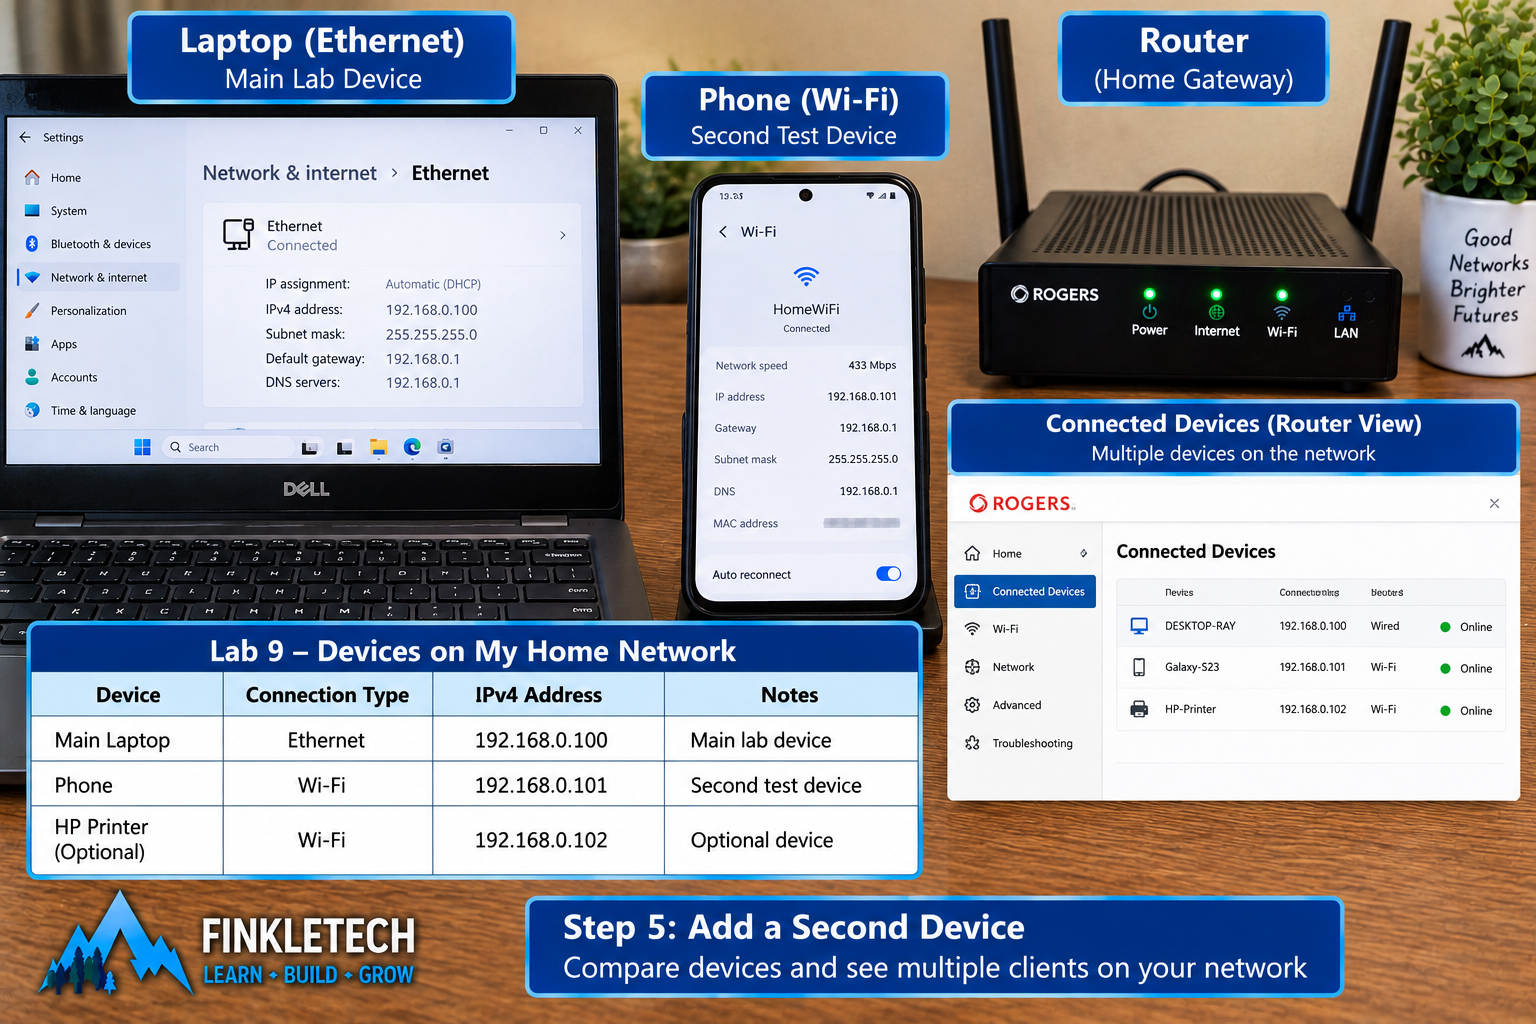
This simple comparison reinforces a major concept: each device needs its own network identity.
Step 6: Draw Your Home Lab Diagram
Now draw the lab.
Do this in your notebook first. Then you can later make a cleaner version for the page if you want.
Basic version:
Internet
↓
Modem / ISP Gateway
↓
Router / Wi-Fi
↓
Laptop, phone, optional switch, optional second device
If you have a switch, show where it sits.
If your modem and router are combined, label it as “modem/router combo.”
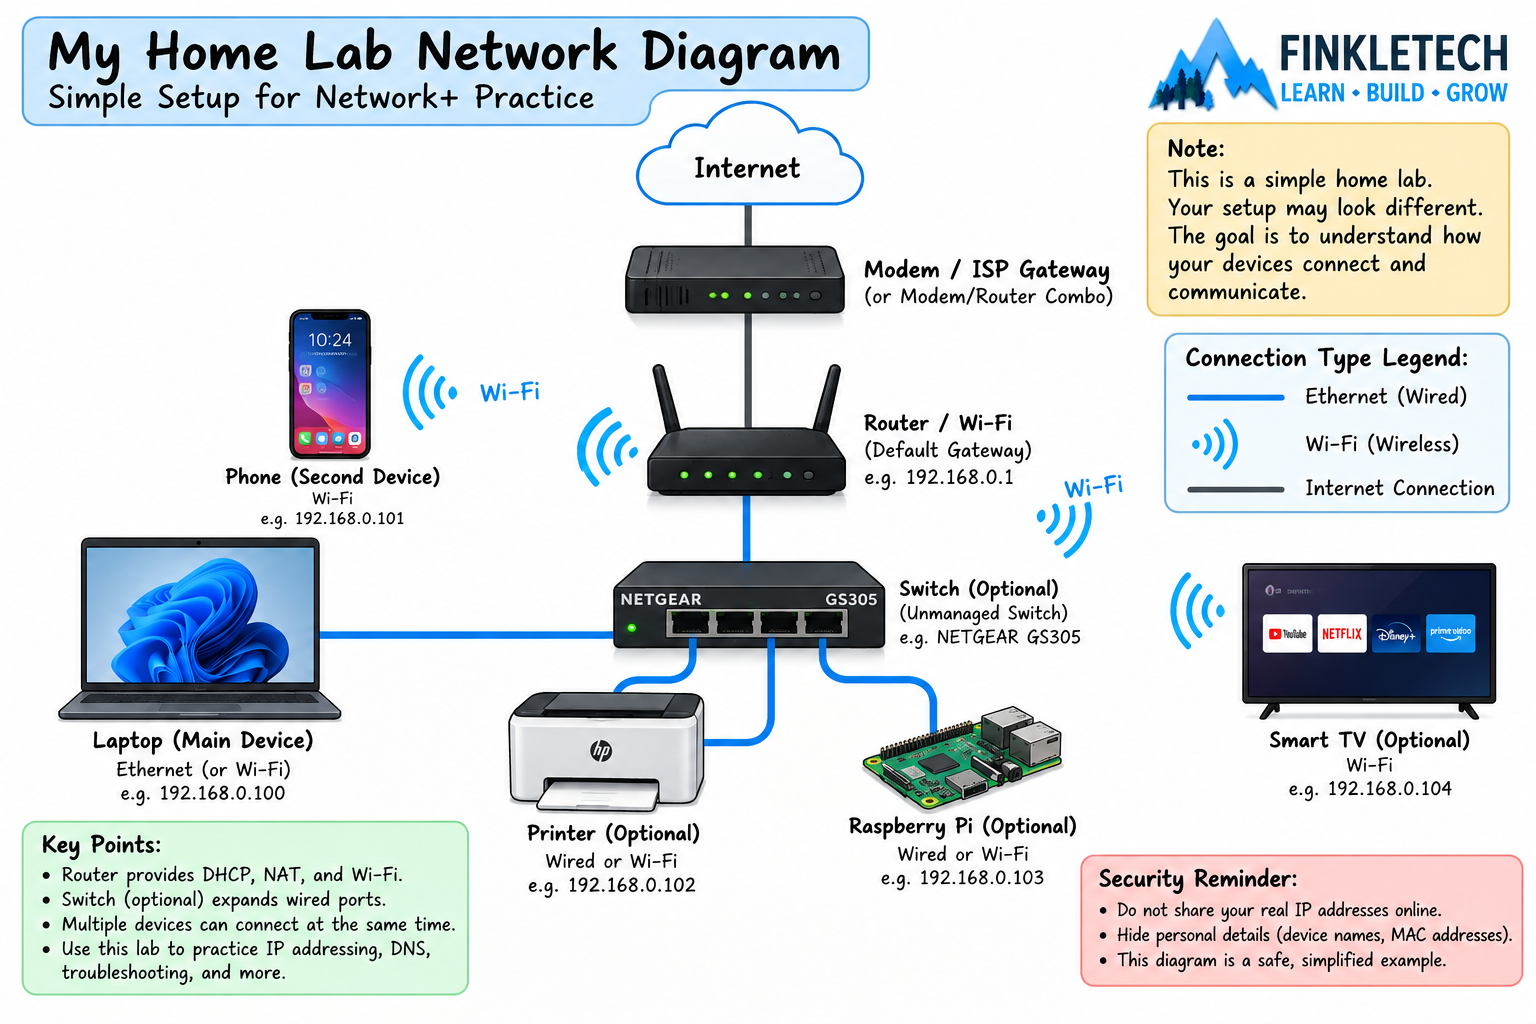
The diagram does not need to be beautiful. It needs to be accurate enough to help you troubleshoot.
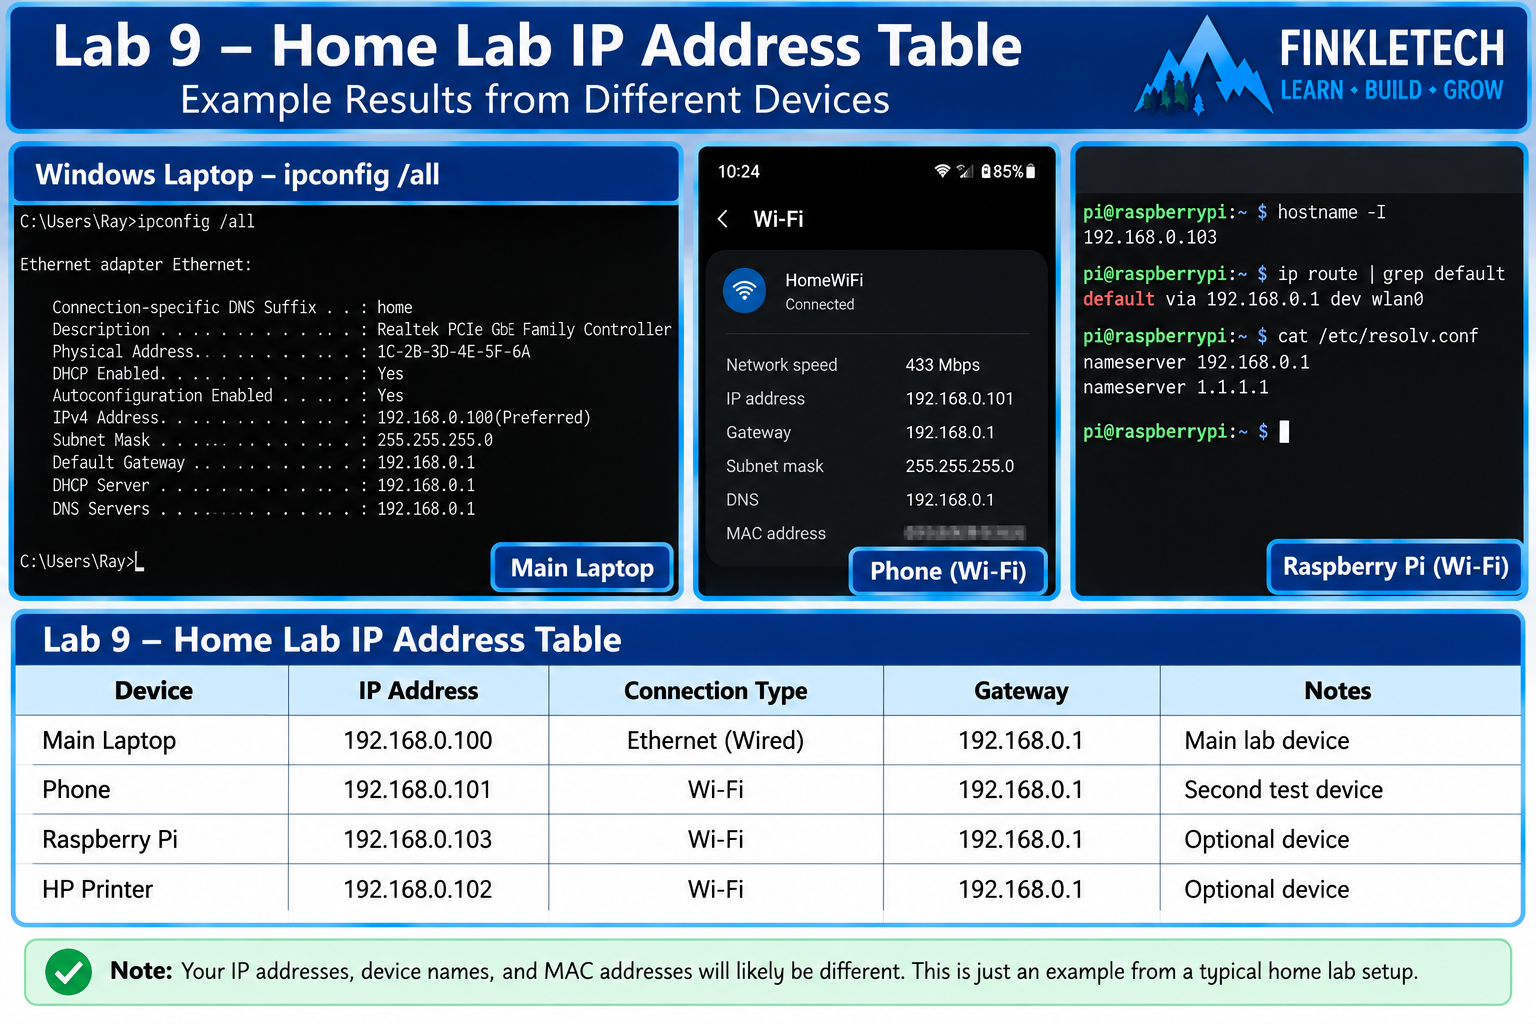
Step 7: Create an IP Address Table
Now record the basic IP information for your lab devices.
On the main Windows computer, run:
ipconfig /all
For phones or other devices, check the Wi-Fi details in the device settings.
Create a table:
| Device | IP Address | Connection Type | Gateway | Notes |
|---|---|---|---|---|
| Main Laptop | [Insert result] | [Wi-Fi/Ethernet] | [Insert result] | Main lab device |
| Phone | [Insert result] | Wi-Fi | [Insert result] | Optional |
| Raspberry Pi / Other | [Insert result] | [Insert result] | [Insert result] | Optional |
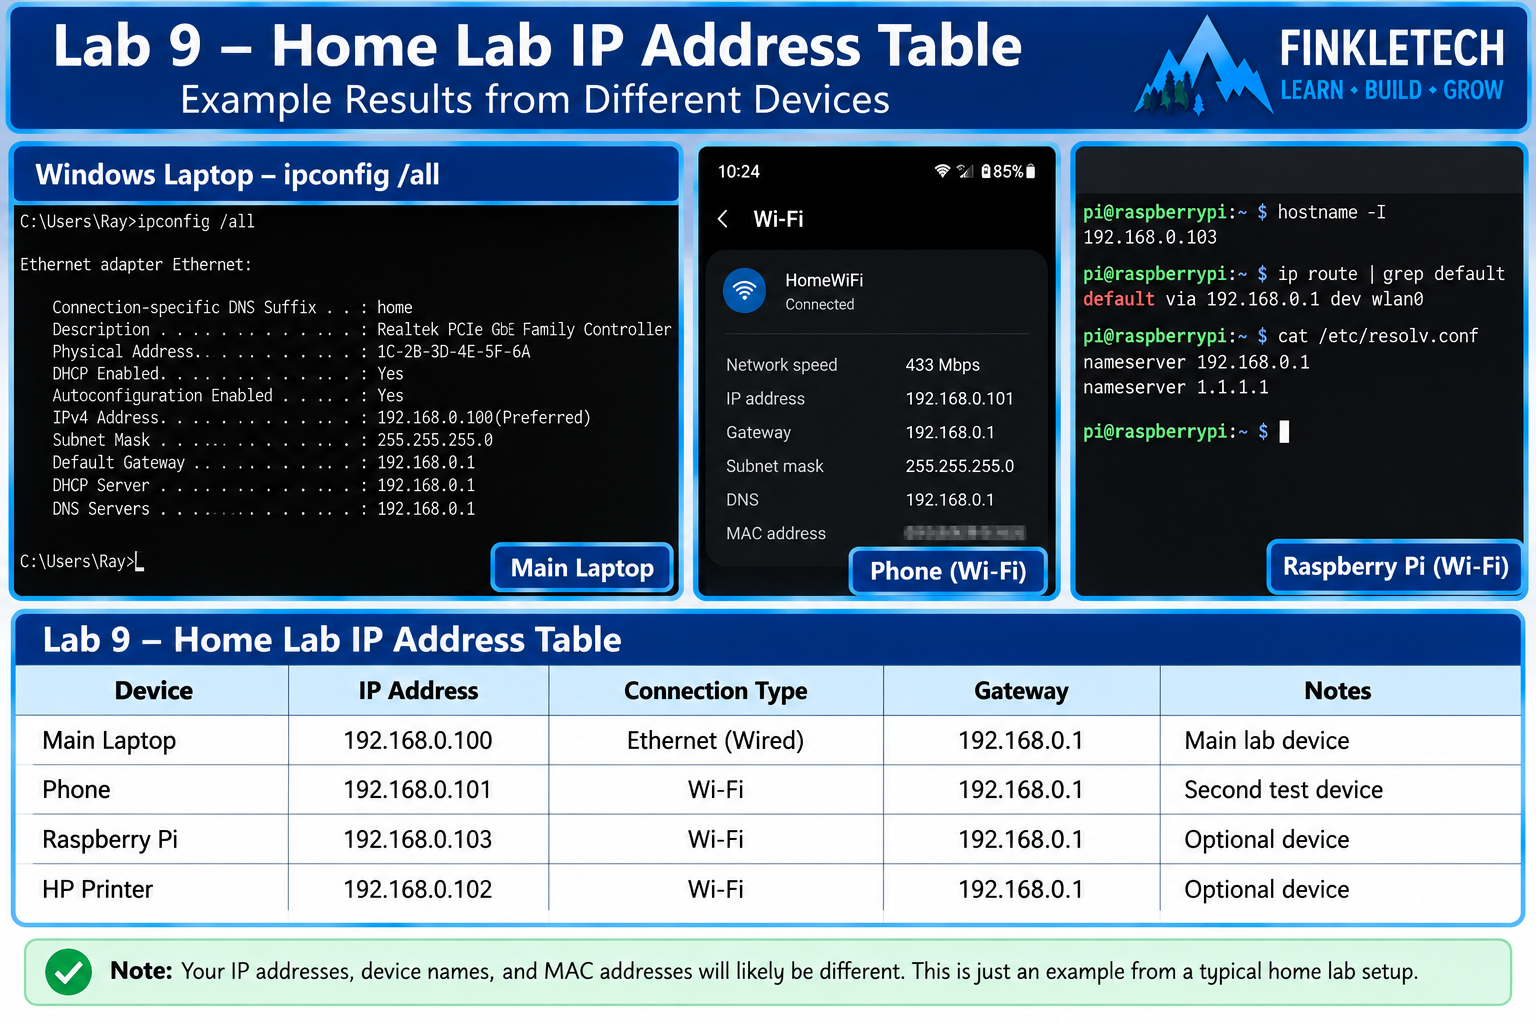
This table turns your home lab into a documented network. That is a real technician habit.
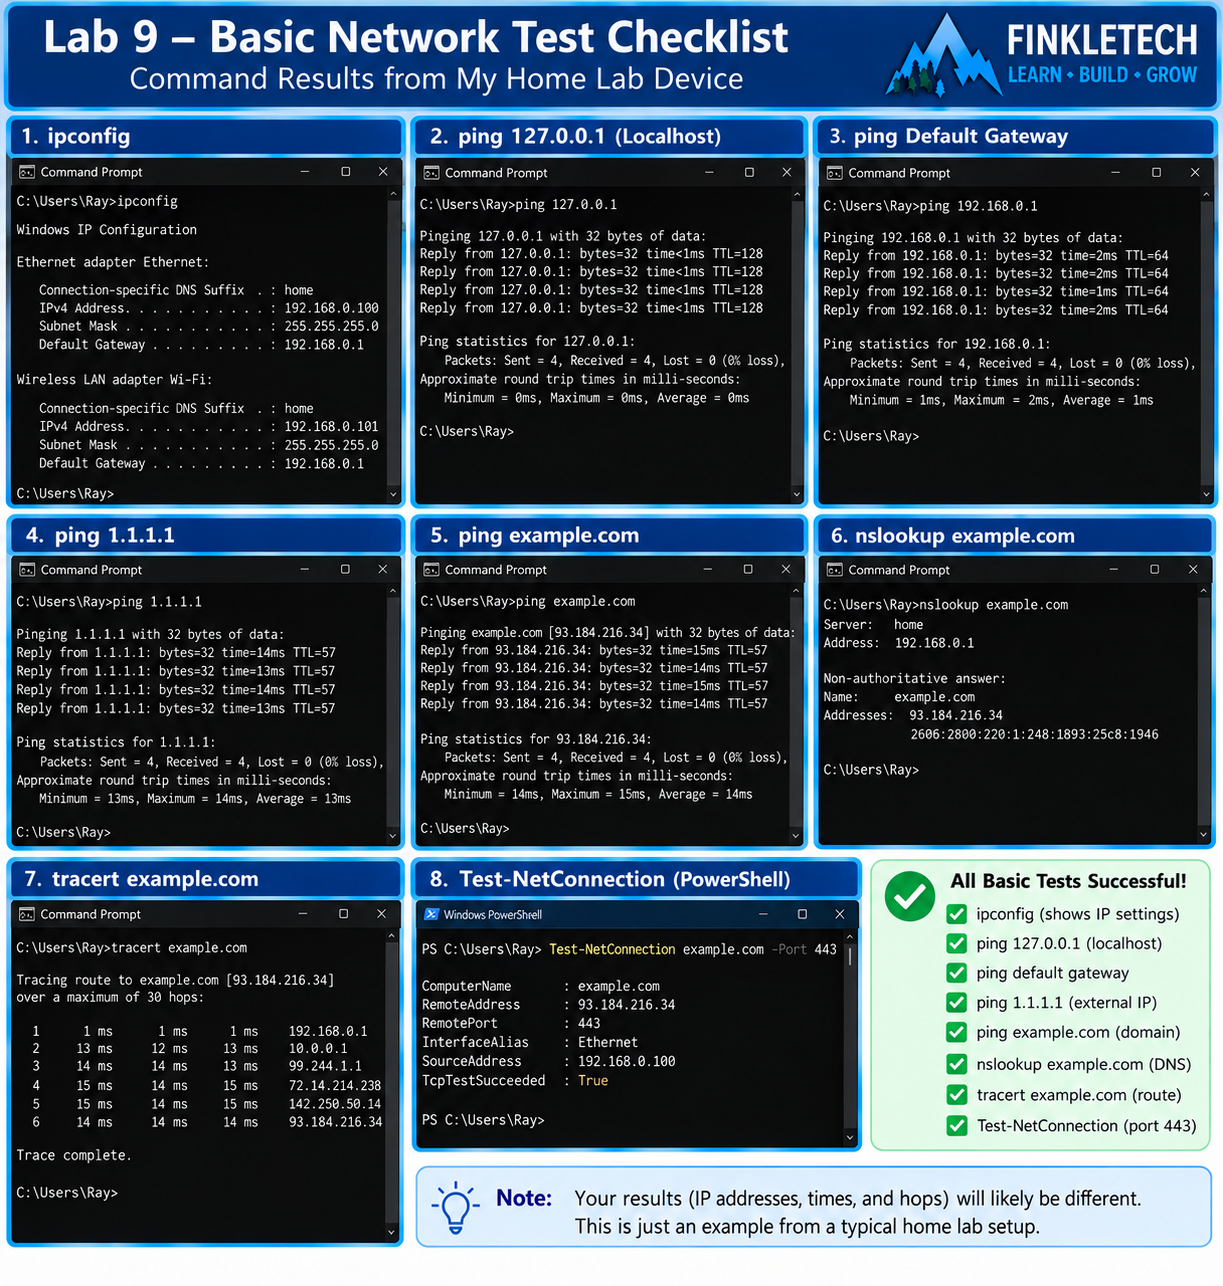
Step 8: Run Your Basic Lab Test Checklist
Now run a basic test checklist from the main lab device.
Open Command Prompt and run:
ipconfig
ping 127.0.0.1
ping [your default gateway]
ping 1.1.1.1
ping example.com
nslookup example.com
tracert example.com
Then open PowerShell and run:
Test-NetConnection example.com -Port 443
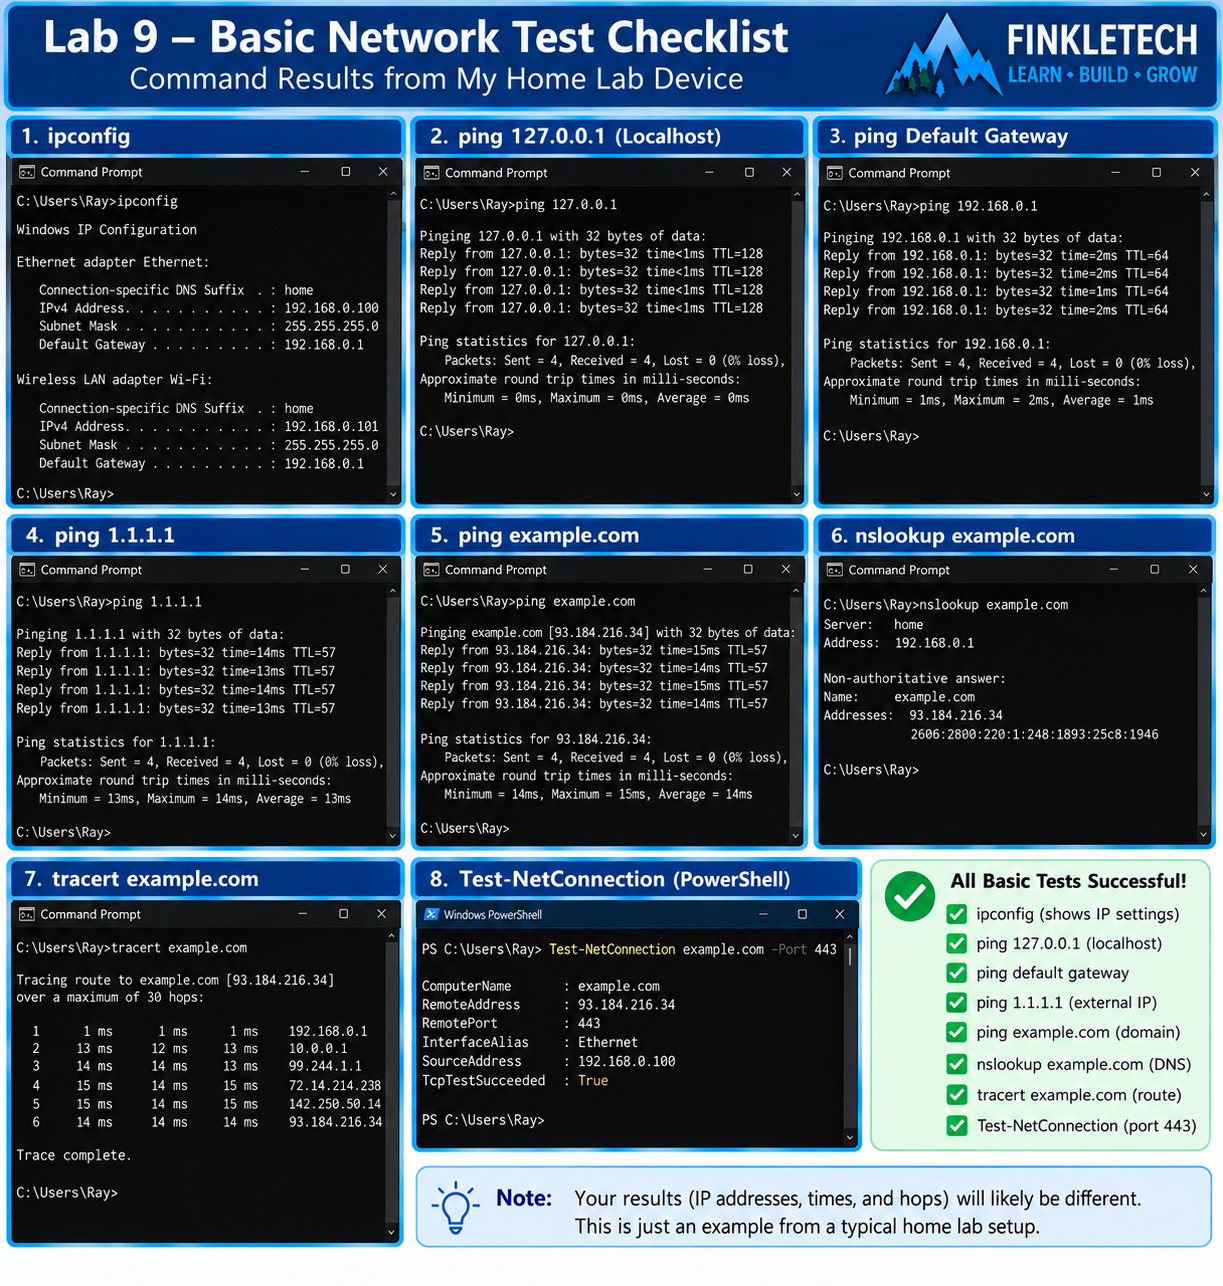
In your notebook, record:
| Test | Result |
|---|---|
| IP settings found | [Success/Fail] |
| Loopback ping | [Success/Fail] |
| Gateway ping | [Success/Fail] |
| Public IP ping | [Success/Fail] |
| Domain ping | [Success/Fail] |
| NSLookup | [Success/Fail] |
| Tracert | [Success/Fail] |
| Port 443 test | [Success/Fail] |
This checklist becomes your standard “is my lab working?” test.
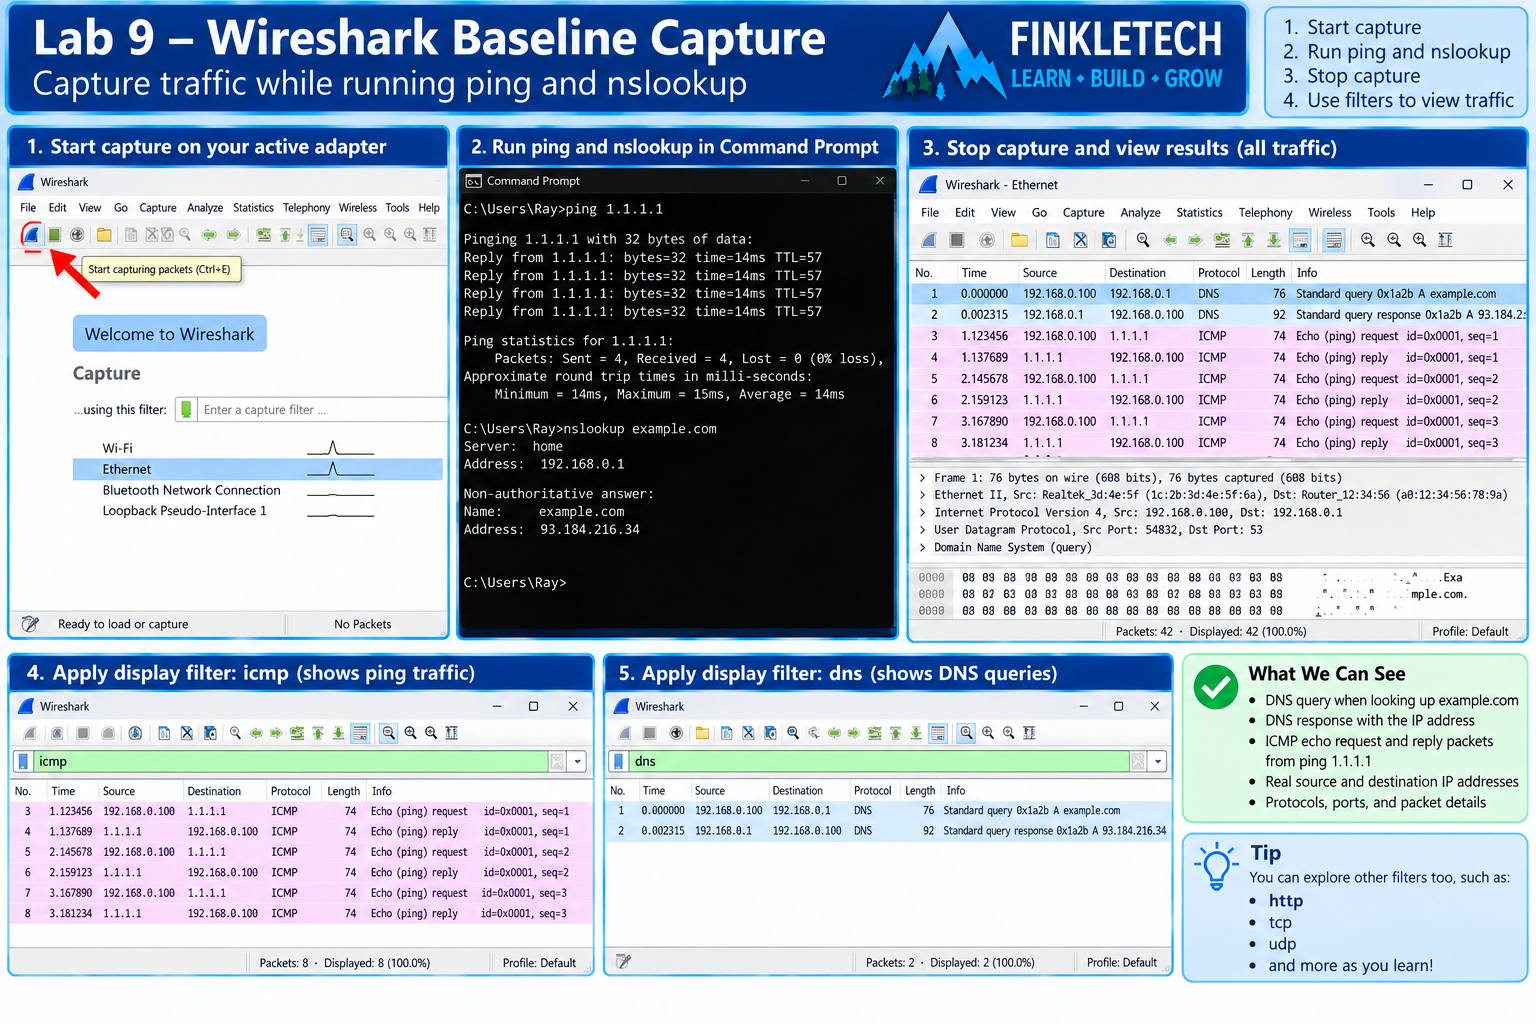
Step 9: Optional Wireshark Baseline Capture
If you have Wireshark installed, take a baseline capture.
Start a capture on your active adapter. Then run:
ping 1.1.1.1
nslookup example.com
Stop the capture.
Use filters:
icmp
dns
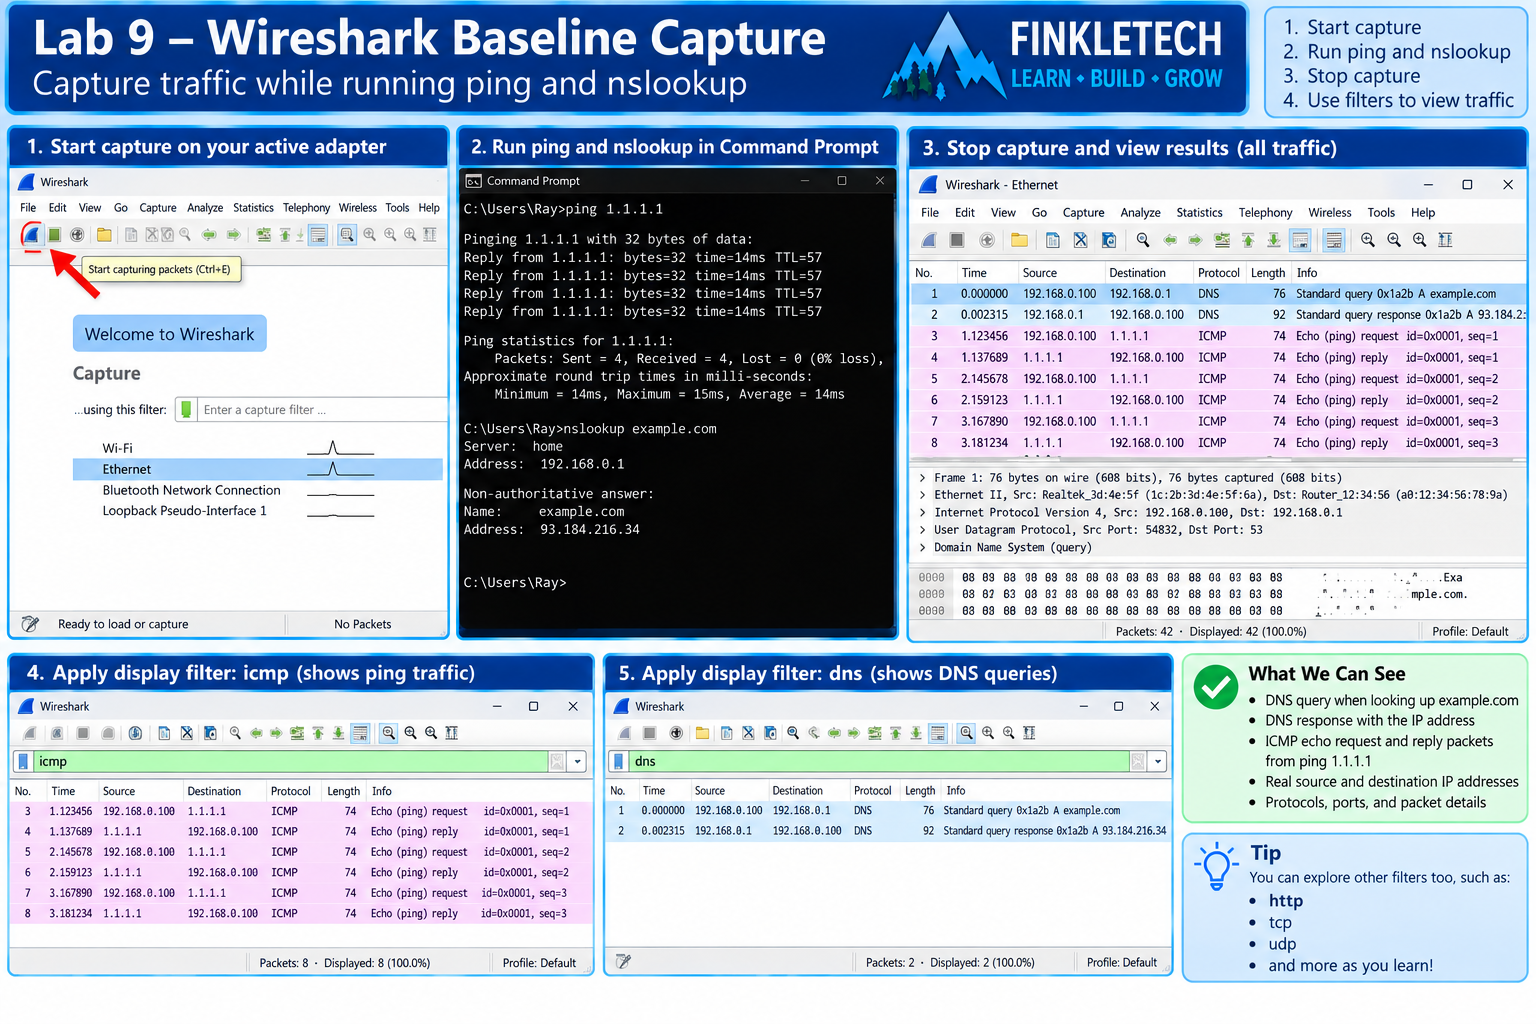
In your notebook, record:
| Capture Detail | My Result |
|---|---|
| Adapter Captured | [Wi-Fi/Ethernet] |
| DNS Packets Seen? | [Yes/No] |
| ICMP Packets Seen? | [Yes/No] |
| Screenshot Saved? | [Yes/No] |
This gives you a baseline packet capture for your lab. Later, when you troubleshoot, you can compare what normal traffic looked like.
Step 10: Create Your Personal Home Lab Rules
This step sounds simple, but it matters.
Write a few rules for your lab so you do not accidentally make a mess of your real home network.
Example rules:
- I will write down original settings before changing anything.
- I will not publish private IP details, MAC addresses, passwords, or router labels without blurring them.
- I will not scan networks I do not own.
- I will only test safe commands I understand.
- I will keep screenshots organized by lab number.
- I will use my notebook to document changes and results.
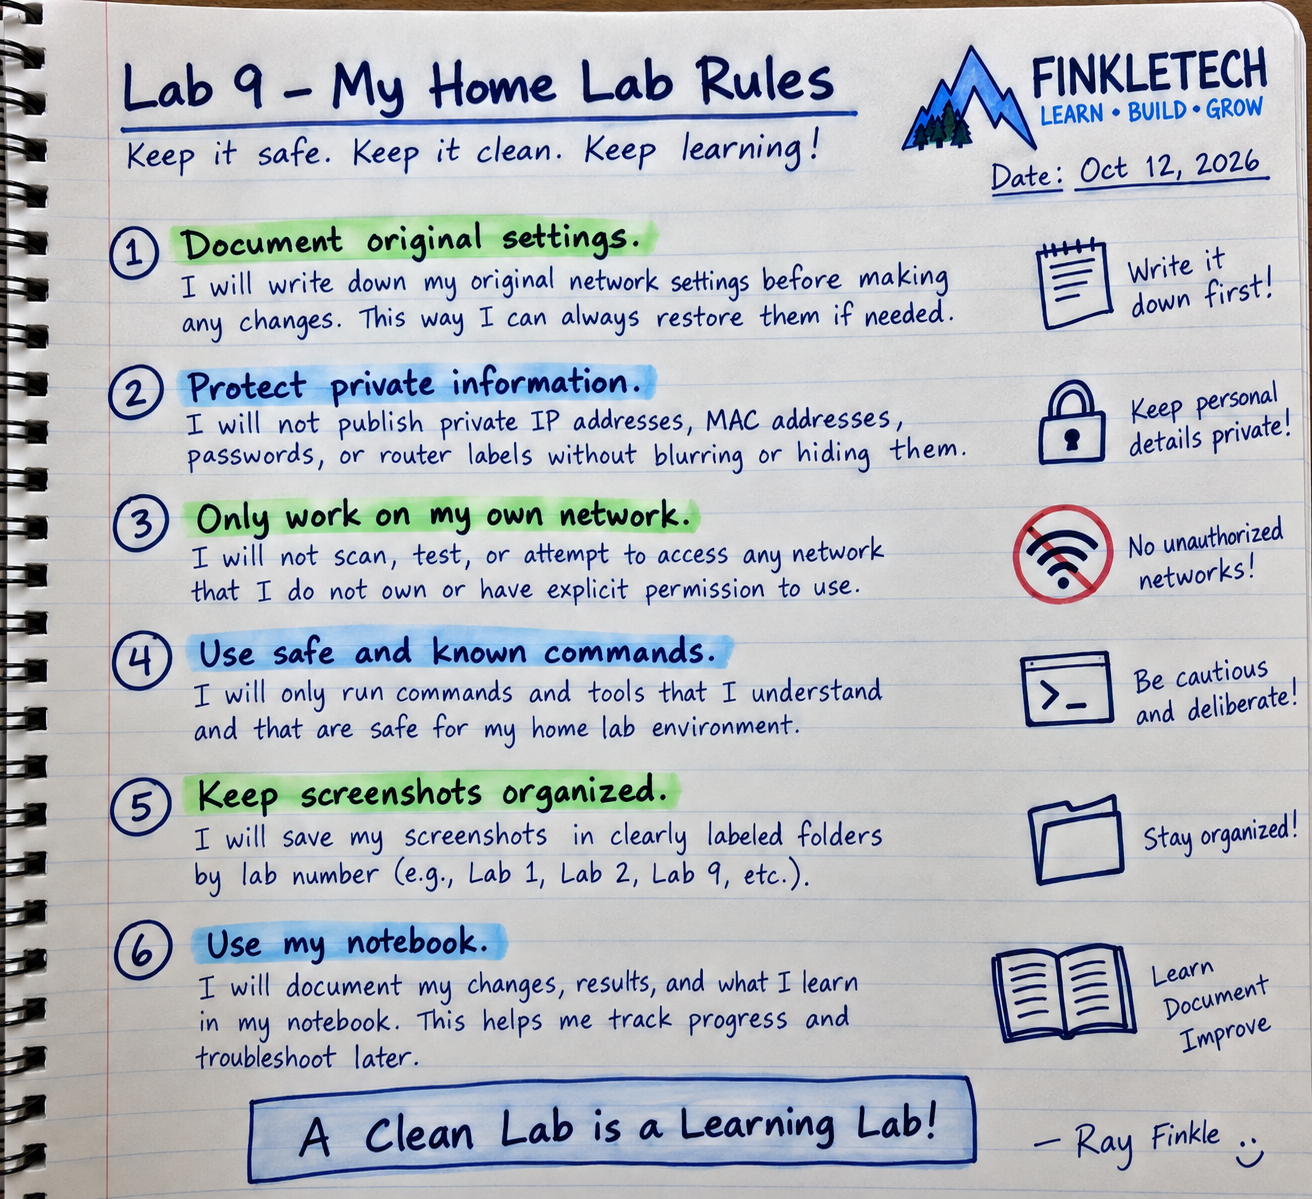
These rules make the lab safer and more professional.
Step 11: Organize Your Screenshots
Create a folder on your computer for this lab series.
Suggested folder structure:
Networking Labs
→ Lab 01 – Map Your Home Network
→ Lab 02 – IP Gateway DNS MAC
→ Lab 03 – DHCP
→ Lab 04 – Troubleshooting Commands
→ Lab 05 – Wireshark
→ Lab 06 – DNS
→ Lab 07 – Ports and Protocols
→ Lab 08 – Ethernet Cable
→ Lab 09 – Home Networking Lab
For Lab 9, save screenshots like:
lab-09-home-lab-setup.jpglab-09-router-default-gateway.pnglab-09-ip-address-table.pnglab-09-command-checklist.pnglab-09-wireshark-baseline.pnglab-09-notebook-notes.jpg
This is not busywork. Organized screenshots make it much easier to publish clean lab pages later.
Step 12: Write Your Lab Notes
Use this section after completing the lab.
My FinkleTech Lab Notes
For this lab, I built a simple home networking practice setup using my [laptop/desktop], home router, Ethernet cable, and [optional switch/second device]. I documented the physical setup, drew a simple network diagram, recorded my IP address information, and ran a basic troubleshooting checklist.
The main device in my lab was connected using [Wi-Fi/Ethernet]. My default gateway was [insert simplified result], which pointed to my router. I also tested basic connectivity using ping, nslookup, tracert, and a PowerShell port test.
One thing I noticed during this lab was [insert what stood out]. This helped me understand that a home lab does not need to be complicated to be useful. Even a small setup can help practice real Network+ concepts.
What Your Results Mean
If your lab device has a valid IP address, can reach the default gateway, can reach a public IP, can resolve a domain name, and can connect to port 443, your basic lab setup is working.
That does not mean every possible network service is perfect. It means your practice environment is functional enough for beginner labs.
If something failed, that is not automatically bad. A failure gives you something to troubleshoot. Just document it carefully. Some of the best learning happens when a lab does not work perfectly the first time.
The main lesson is that practical networking skill comes from repetition. A simple lab gives you a place to repeat the same tests until the concepts become familiar.
Common Problems
If you do not have Ethernet, start with Wi-Fi and add a USB-to-Ethernet adapter later.
If you cannot log into your router, you can still complete most of the lab using ipconfig, device settings, and basic command-line tools.
If your screenshots show too much private information, crop them tightly or blur details before uploading.
If you only have one device, that is enough to start. Add a second device later.
If your lab feels too simple, that is okay. Simple labs are easier to repeat and easier to understand.
If you are tempted to buy expensive equipment right away, slow down. Use what you have first. Buy gear only when a specific lab requires it.
Network+ Concepts Practiced
This lab practices several important Network+ concepts:
- home lab setup
- network documentation
- router and gateway identification
- wired vs wireless connections
- IP addressing
- DHCP
- DNS
- ICMP and ping
- traceroute / tracert
- port testing
- basic packet capture
- physical topology
- logical documentation
- troubleshooting methodology
- safe lab habits
The main skill is building a repeatable practice environment. Once you have that, every future networking topic becomes easier to test.
Mini Review Questions
Use these questions after the lab to check your understanding.
- What is the purpose of a home networking lab?
- Why should you document your lab setup?
- What device usually acts as the default gateway in a home network?
- Why is an Ethernet cable useful in a networking lab?
- Why should you create a basic command checklist?
- What does a successful ping to the default gateway prove?
- Why should screenshots be organized by lab number?
- Why should you avoid buying too much equipment before using what you already have?
Short Answers
- A home networking lab gives you a safe place to practice and observe networking concepts.
- Documentation helps you understand the setup, troubleshoot problems, and repeat tests later.
- The router usually acts as the default gateway.
- Ethernet lets you practice wired connections, link lights, adapters, and physical-layer troubleshooting.
- A checklist helps confirm whether the lab is working and gives you a repeatable troubleshooting process.
- It proves your computer can communicate with the router at a basic level.
- Organized screenshots make it easier to build clean lab pages and review your work.
- Beginner networking can be practiced with simple equipment first; extra gear should serve a specific purpose.