
Lab 6: How DNS Works on a Home Network
Lab Goal
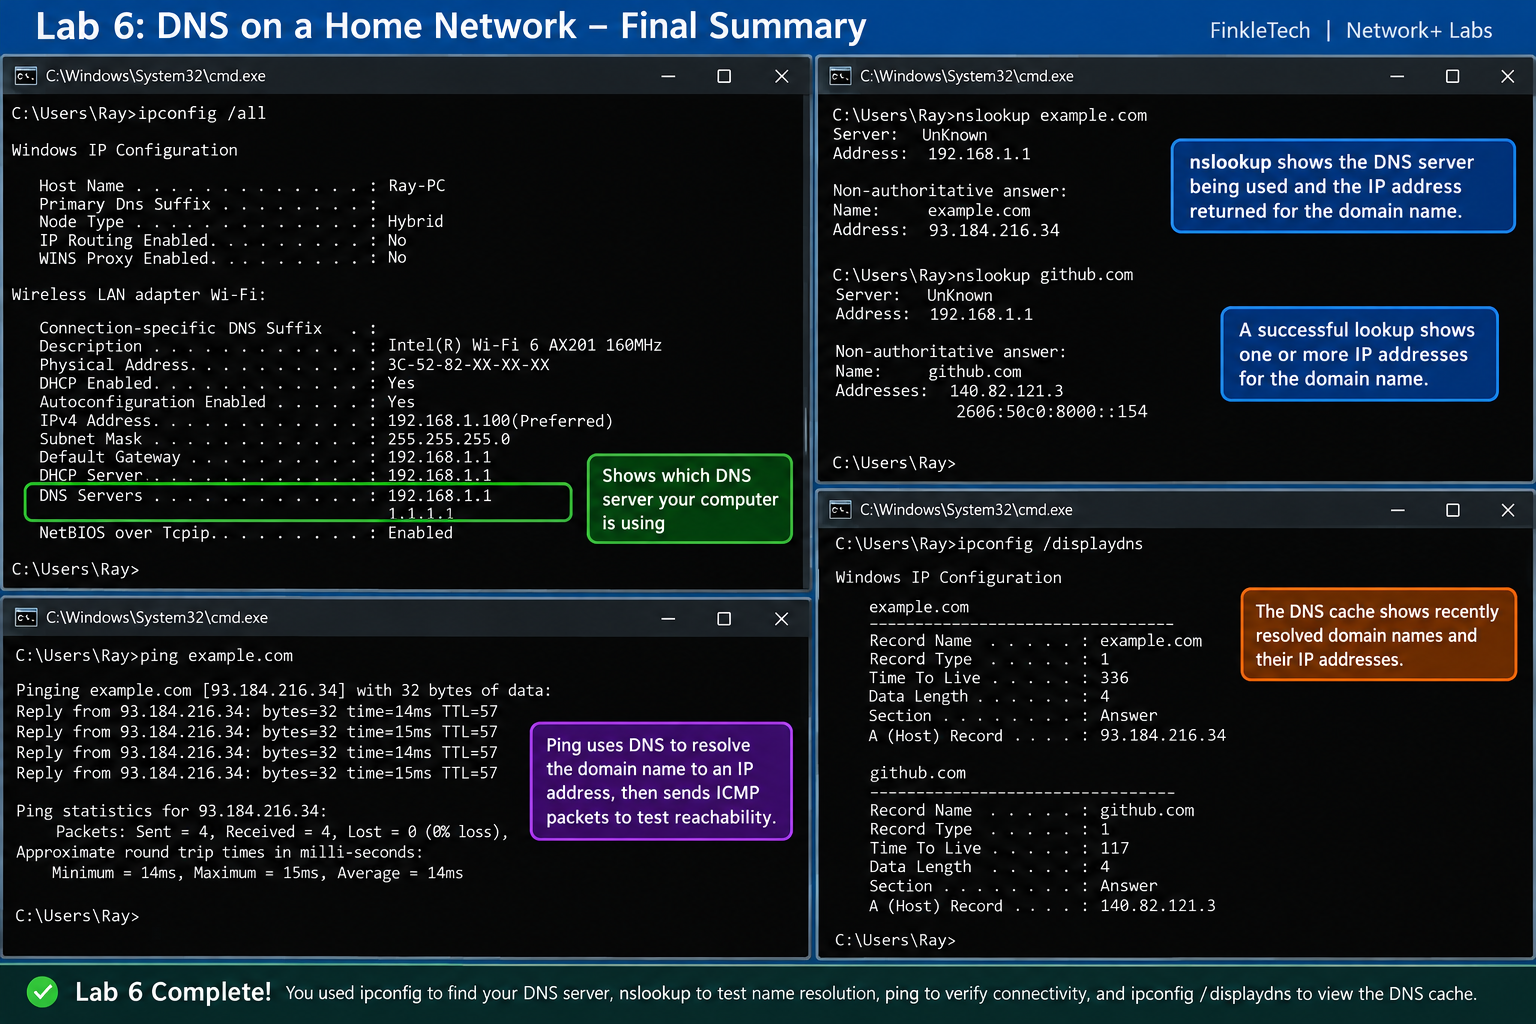
In this lab, you will learn how DNS works by testing name resolution on your own computer. You will use command-line tools to see which DNS server your computer uses, test domain lookups, view cached DNS entries, and understand what happens when DNS works or fails.
DNS stands for Domain Name System. It translates human-friendly names like website domains into IP addresses that computers can use. Without DNS, you would need to remember numerical IP addresses instead of normal website names.
By the end of this lab, you should understand why DNS matters, how to test it, how to recognize a DNS problem, and how DNS connects to real-world troubleshooting.
Before You Start: Use Your Networking Notebook
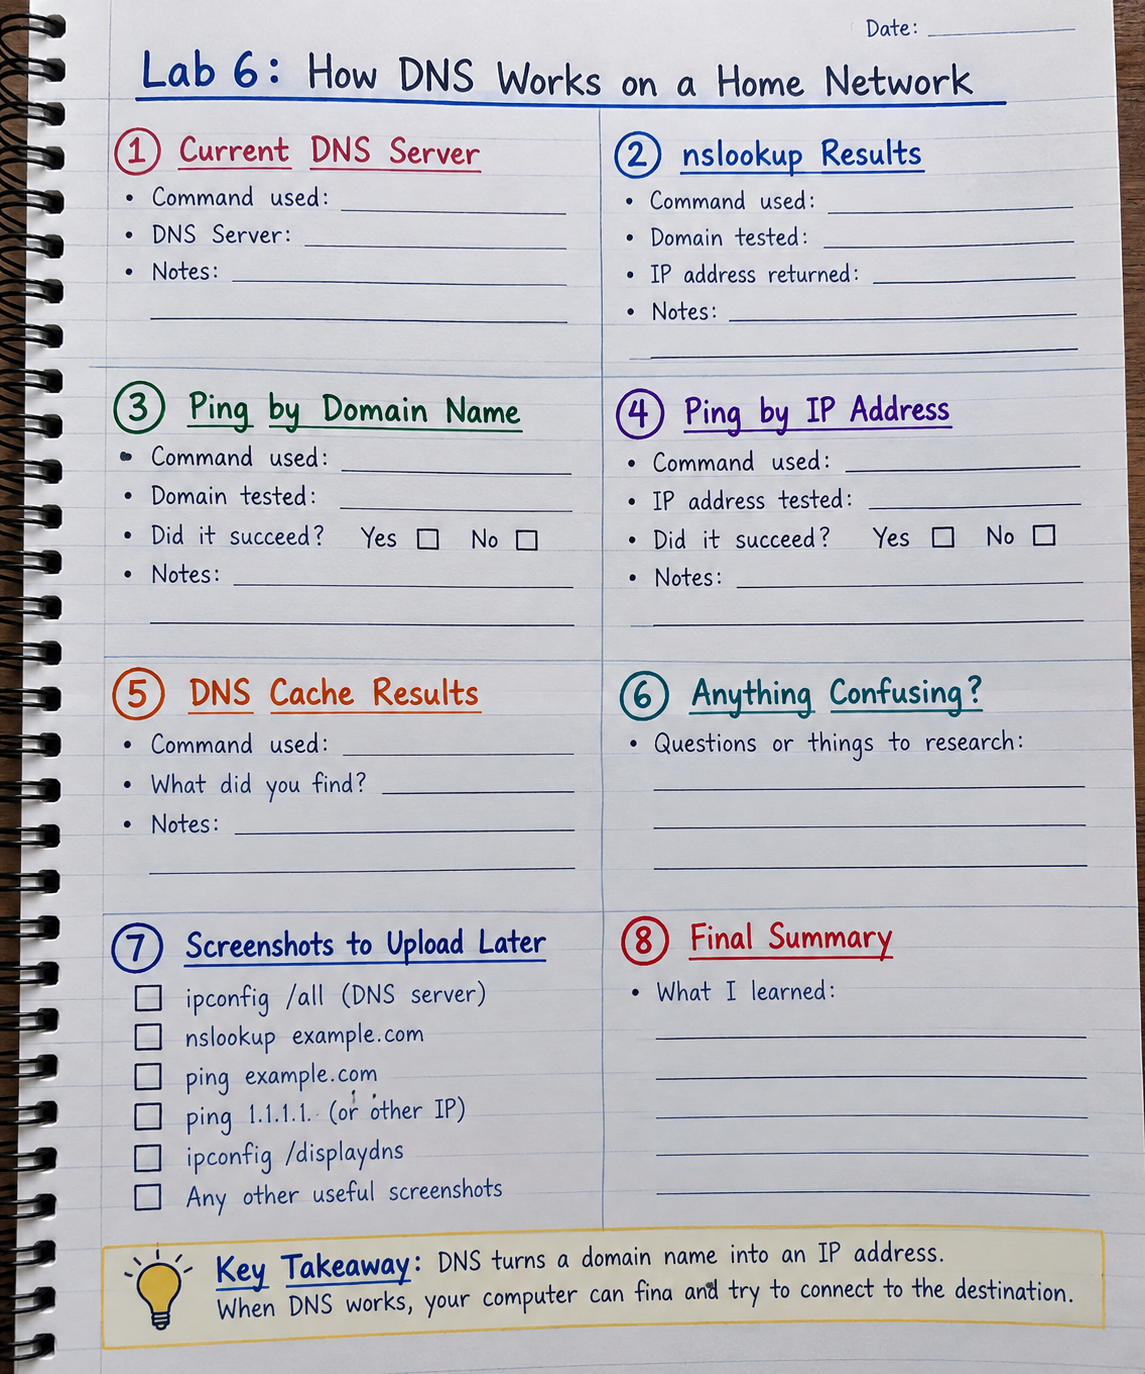
Open your networking notebook to a fresh page and write:
Lab 6: How DNS Works on a Home Network
Under the title, create sections for:
- current DNS server
- nslookup results
- ping by domain name
- ping by IP address
- DNS cache results
- anything confusing
- screenshots to upload later
- final summary
This lab is a good one to write out by hand because DNS can feel invisible. When you record each step, you start seeing the pattern. Your computer asks a DNS server for an address, the DNS server answers, and then your computer can try to connect to that destination.
Your notebook should not just contain command output. Add short explanations in your own words. For example: “DNS turned the website name into an IP address.” That one sentence is more useful than copying ten lines of output without understanding them.
Why This Lab Matters
DNS is one of the most important services in networking because it sits between humans and the technical addressing system computers actually use. People remember names. Computers use addresses. DNS connects those two worlds.
When DNS fails, users often think the whole internet is down. But that is not always true. A computer may still be able to reach the internet by IP address while failing to reach websites by name. That difference is a major troubleshooting clue.
For Network+ study, DNS connects to many topics: name resolution, troubleshooting, client settings, DNS servers, command-line tools, caching, records, and network services. You do not need to become a DNS administrator in this lab, but you do need to understand the basic flow.
This lab helps you move past the shallow definition. DNS is not just “the phonebook of the internet.” It is a real service your computer depends on every day.
Quick Concept Refresher: What DNS Does
When you type a website name into a browser, your computer needs to find the IP address connected to that name. DNS performs that lookup.
A simplified version looks like this:
- You type a domain name.
- Your computer checks whether it already knows the answer.
- If not, it asks a DNS server.
- The DNS server returns an IP address.
- Your computer uses that IP address to connect.
Your computer may get DNS server information automatically from DHCP. In many home networks, your router gives your device a DNS setting. Sometimes your router acts as a local forwarder. Sometimes your computer uses DNS servers from your internet provider or public DNS services.
The important idea is simple: if DNS resolution fails, names stop working properly.
Tools Needed
You will need:
- a Windows laptop or desktop
- internet connection
- Command Prompt or PowerShell
- your networking notebook
- screenshot tool such as Snipping Tool
- optional router admin access
- optional Wireshark if you want to compare with Lab 5
You do not need to change router settings for this lab. This is an observation and testing lab, not a configuration-heavy lab.
Safety and Privacy Note Before Publishing Screenshots
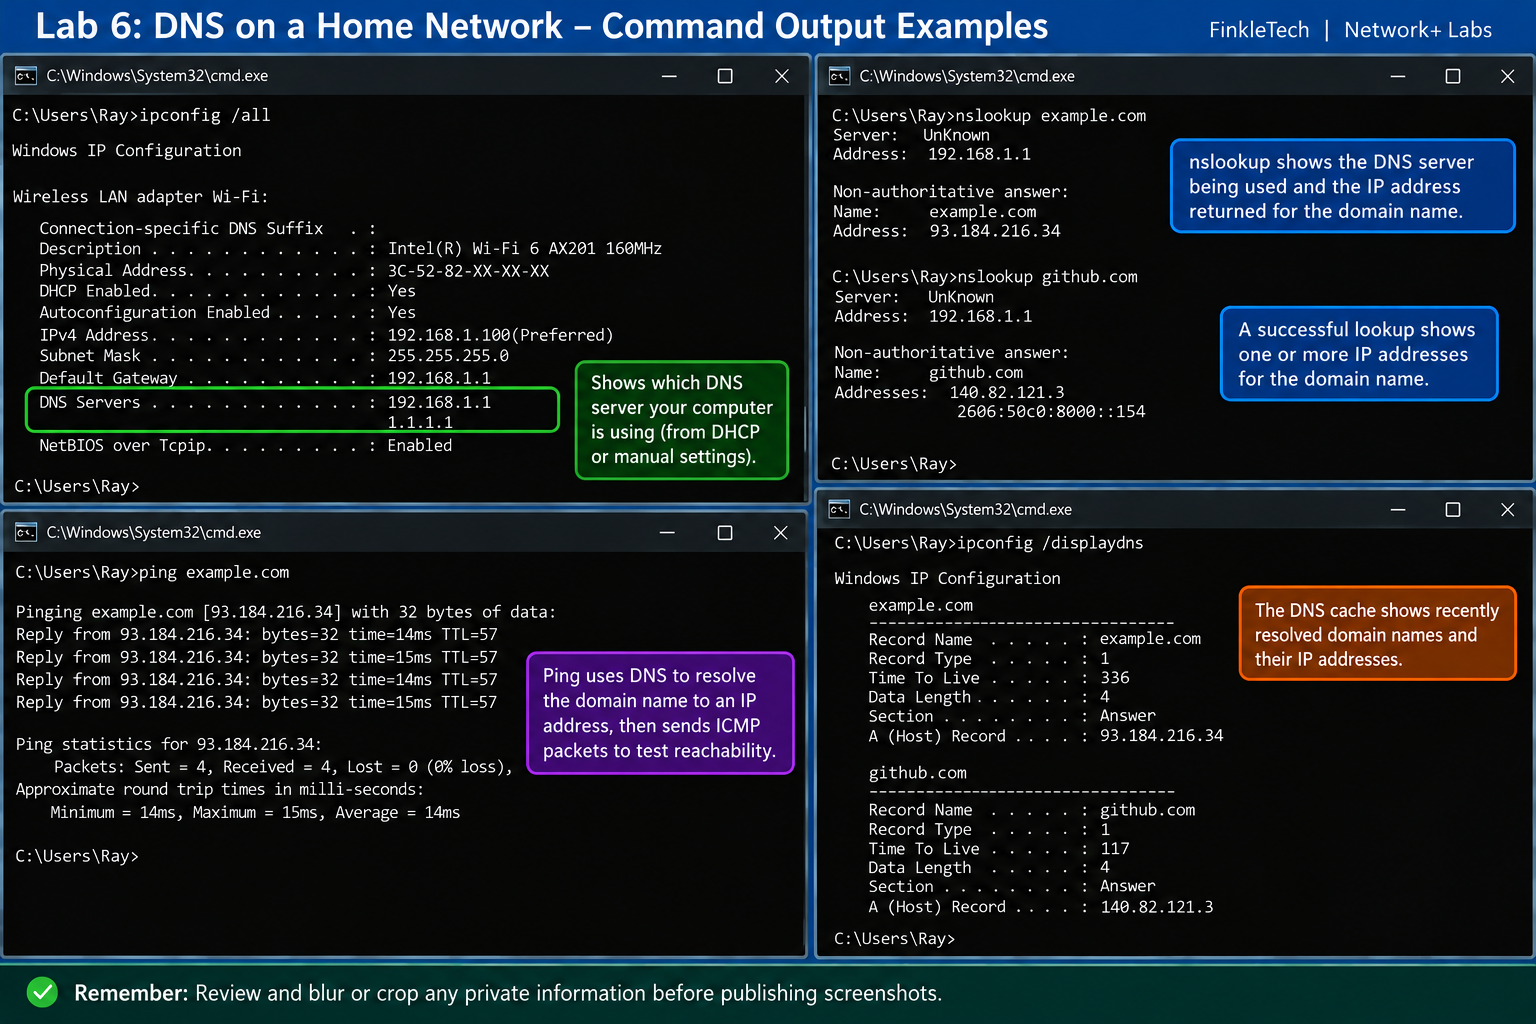
DNS screenshots can reveal websites or services your computer looked up. Before posting screenshots, review them carefully.
Blur or crop anything private. Your DNS cache may contain domains from background apps, browser tabs, updates, email services, or personal activity. Only publish clean examples that help explain the lab.
Avoid publishing:
- private browsing activity
- full device names
- public IP addresses if not needed
- router admin details
- personal DNS suffixes
- anything unrelated to the lab
For your public page, you can use simple examples such as example.com and crop the output tightly.
Step 1: Find Your Current DNS Server
Open Command Prompt.
Run:
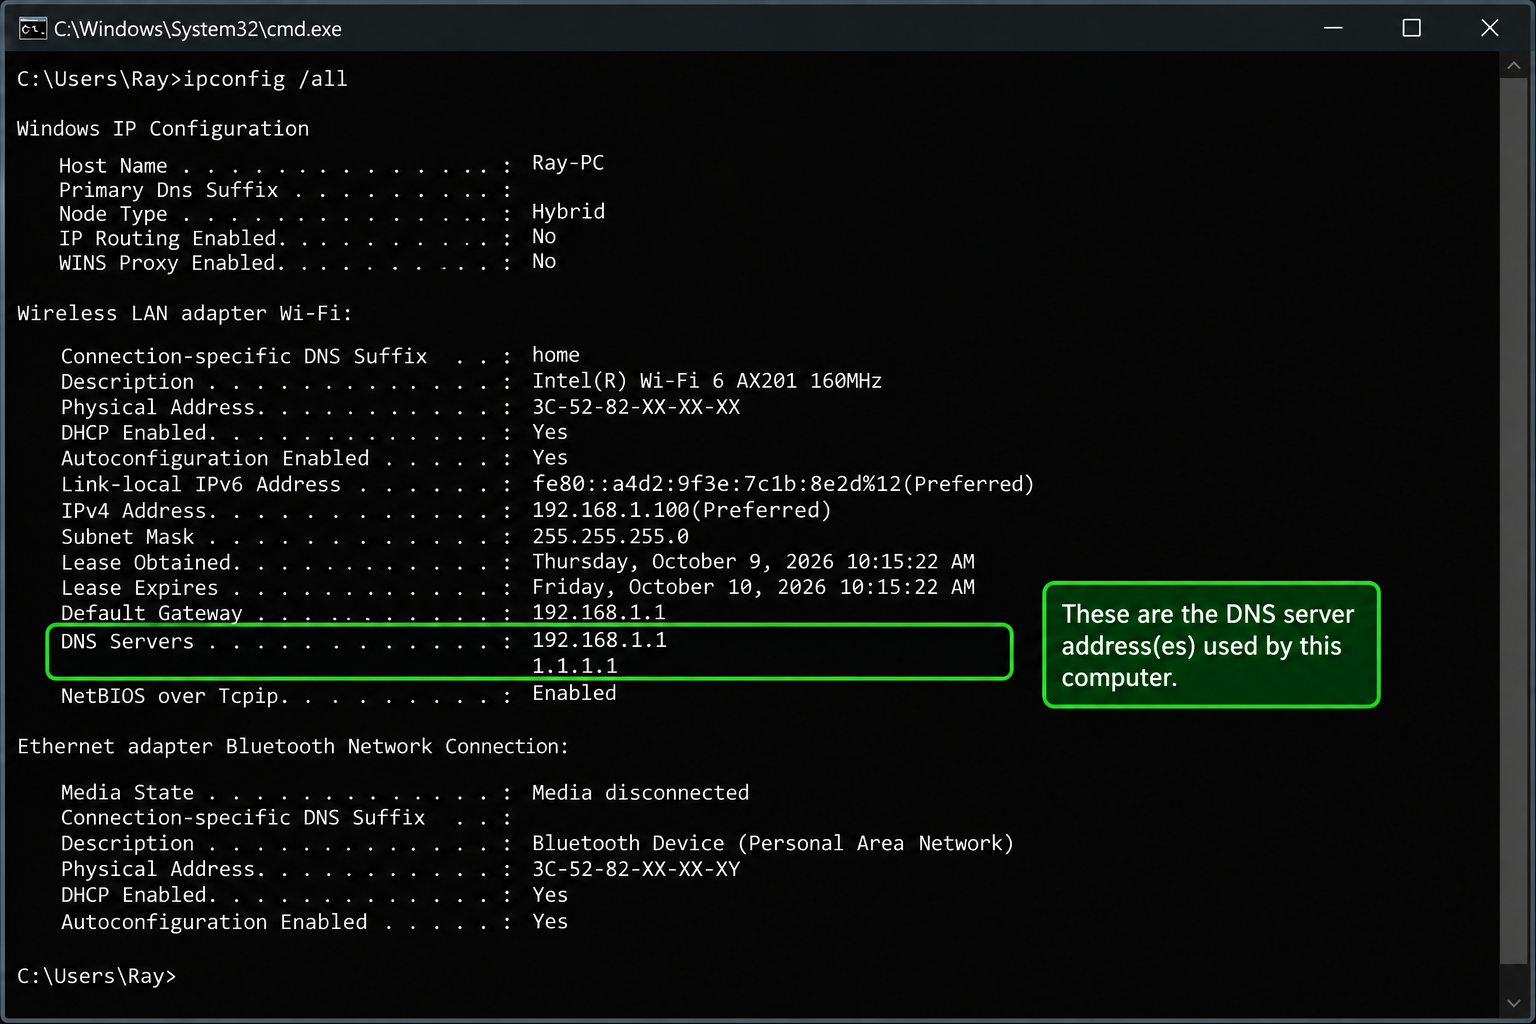
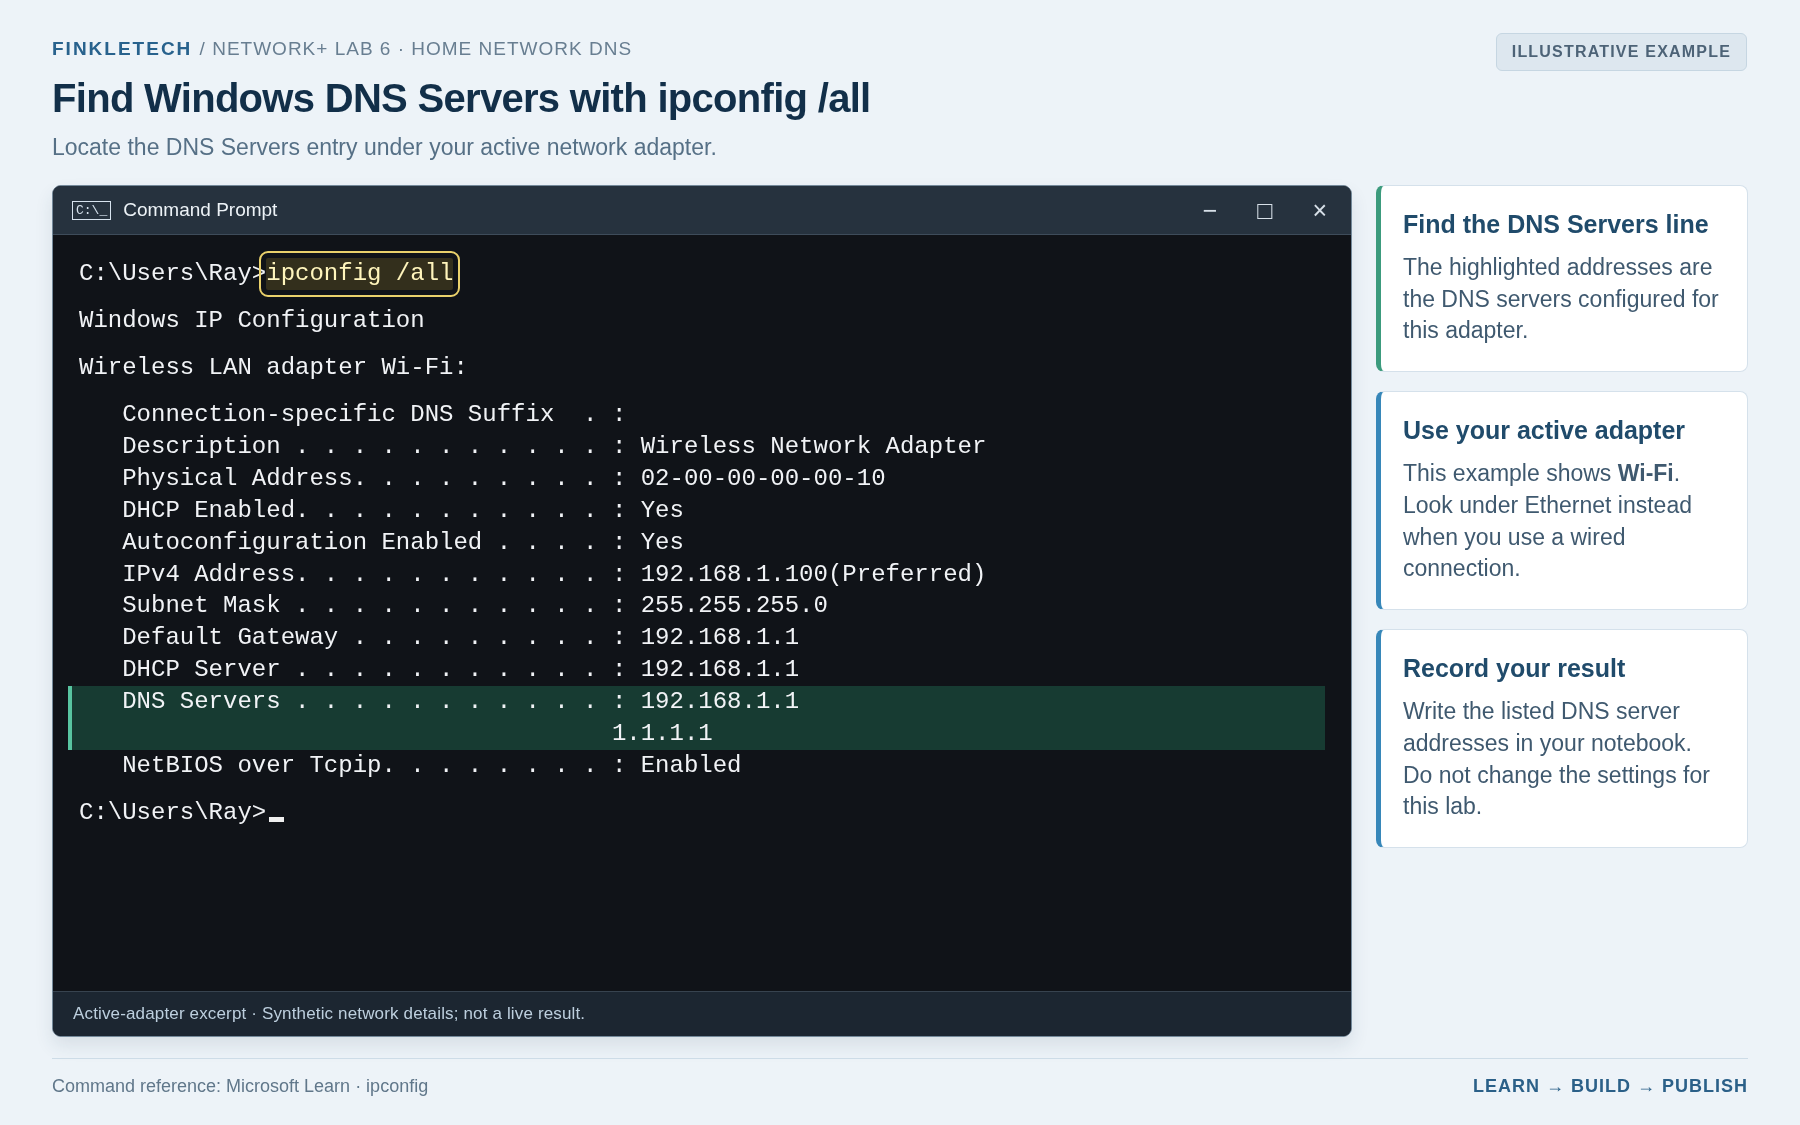
ipconfig /all
Find your active network adapter. Look for the line that says:
DNS Servers
Write down the DNS server address or addresses listed.
Your DNS server may be your router’s local IP address, such as 192.168.1.1, or it may be another DNS server address. Either result can be normal depending on your network setup.
In your notebook, create this table:
| Setting | My Result |
|---|---|
| Active Adapter | [Wi-Fi or Ethernet] |
| DNS Server 1 | [Insert result] |
| DNS Server 2 | [Insert result if shown] |
| DHCP Enabled | [Yes/No] |
Step 2: Test DNS with NSLookup
Now run:
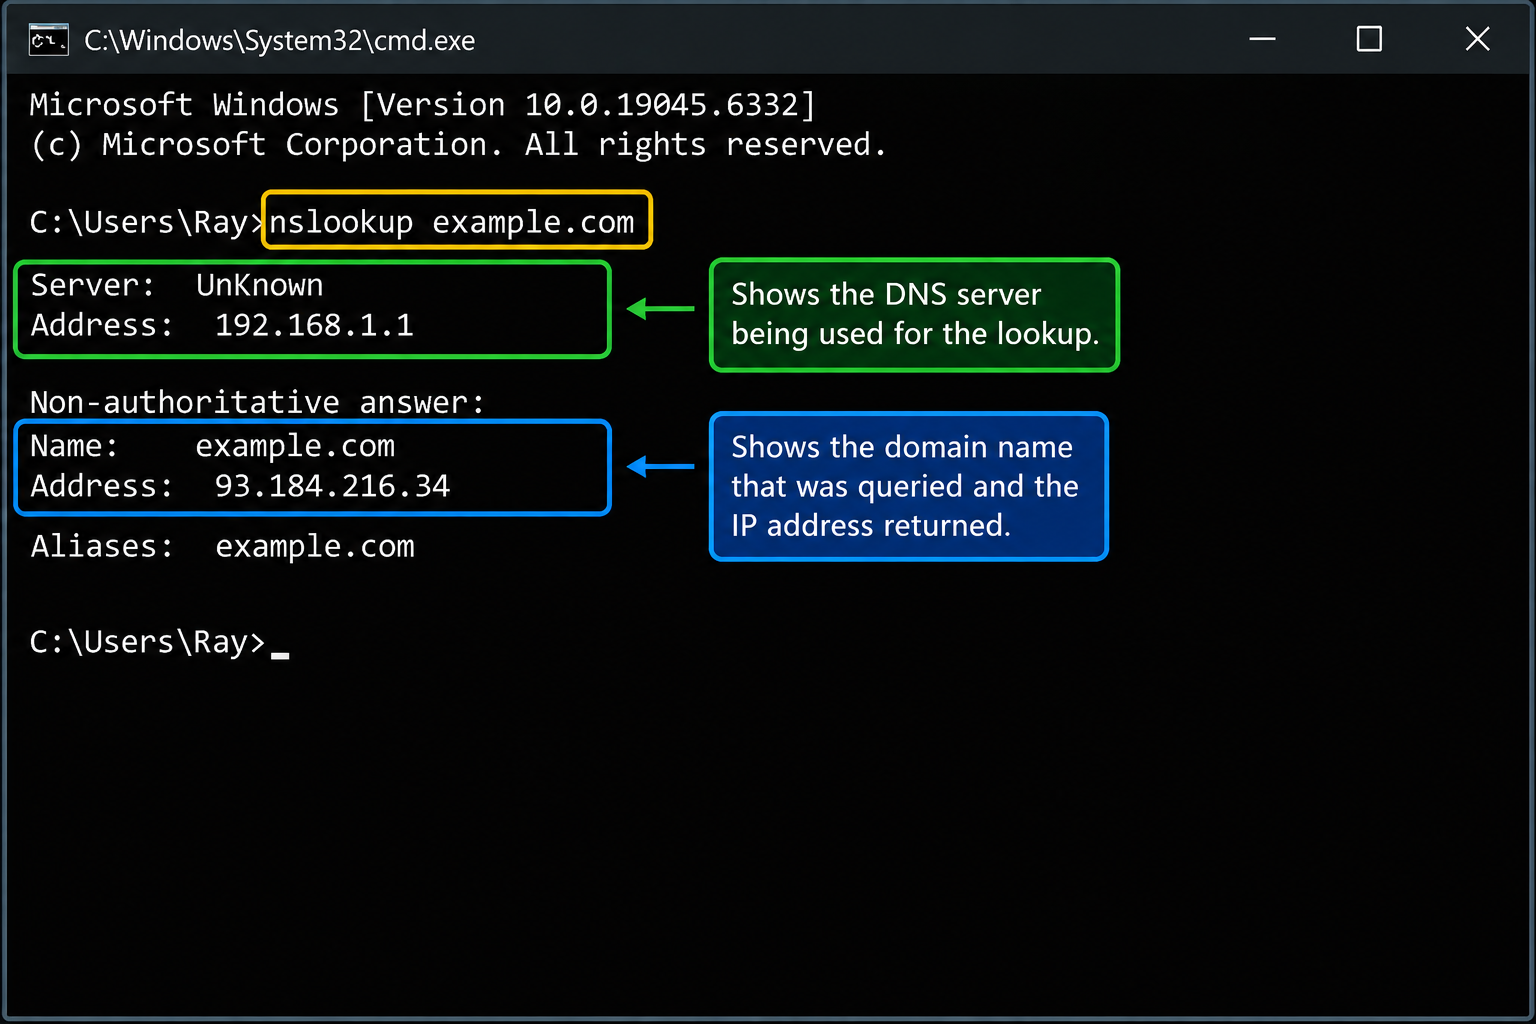
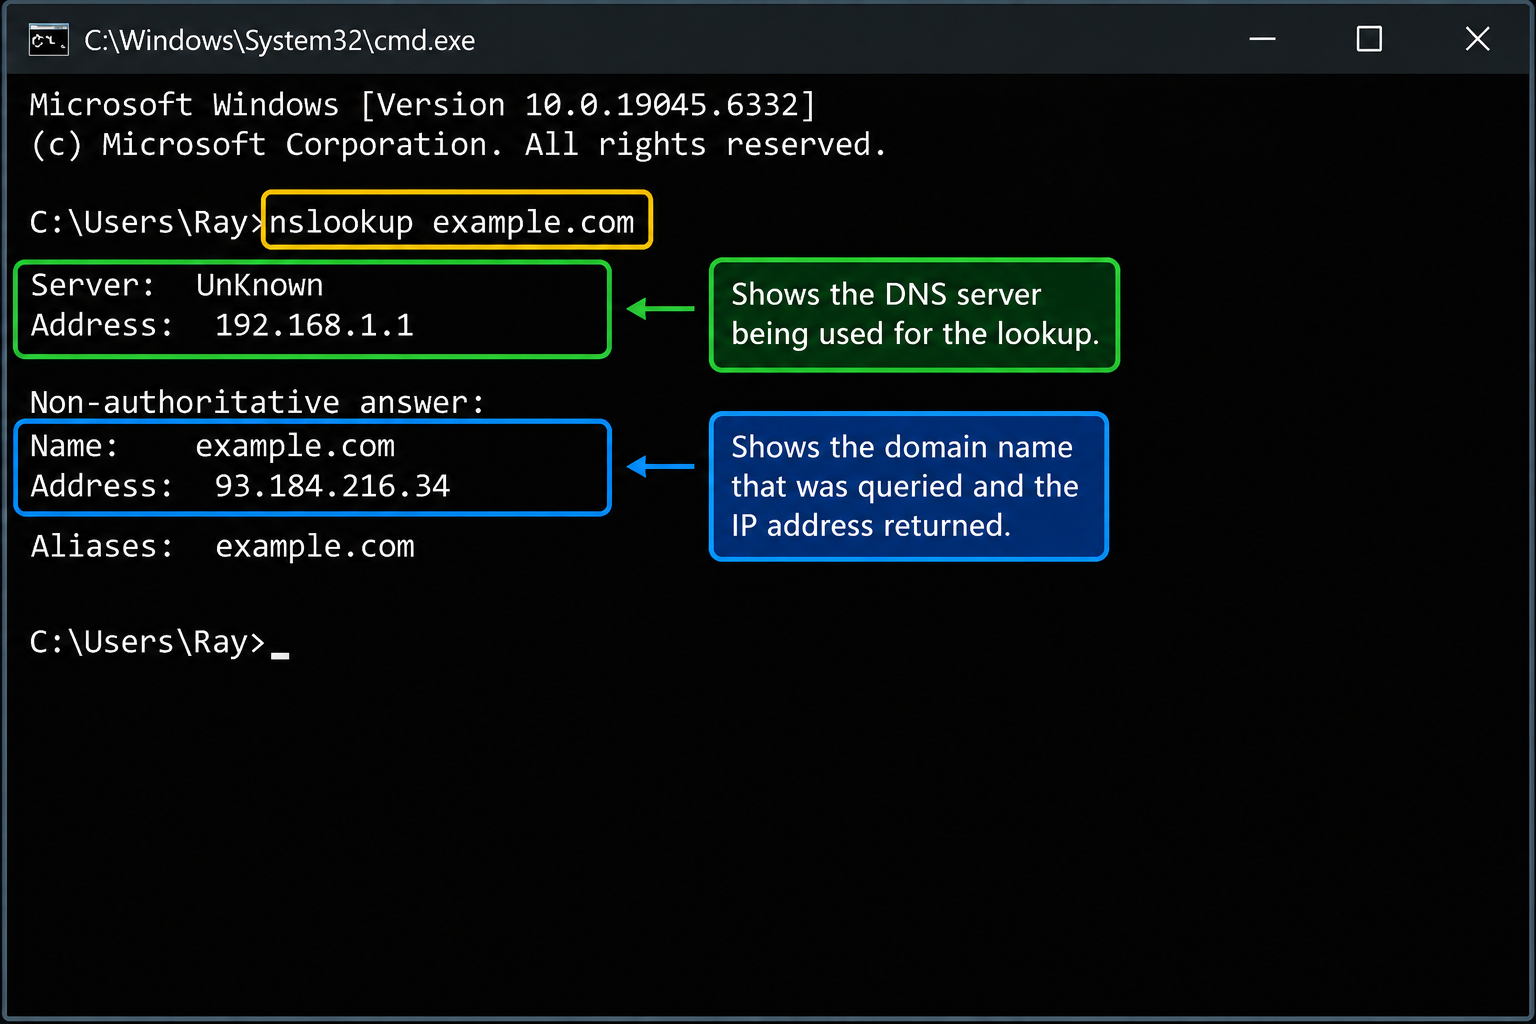
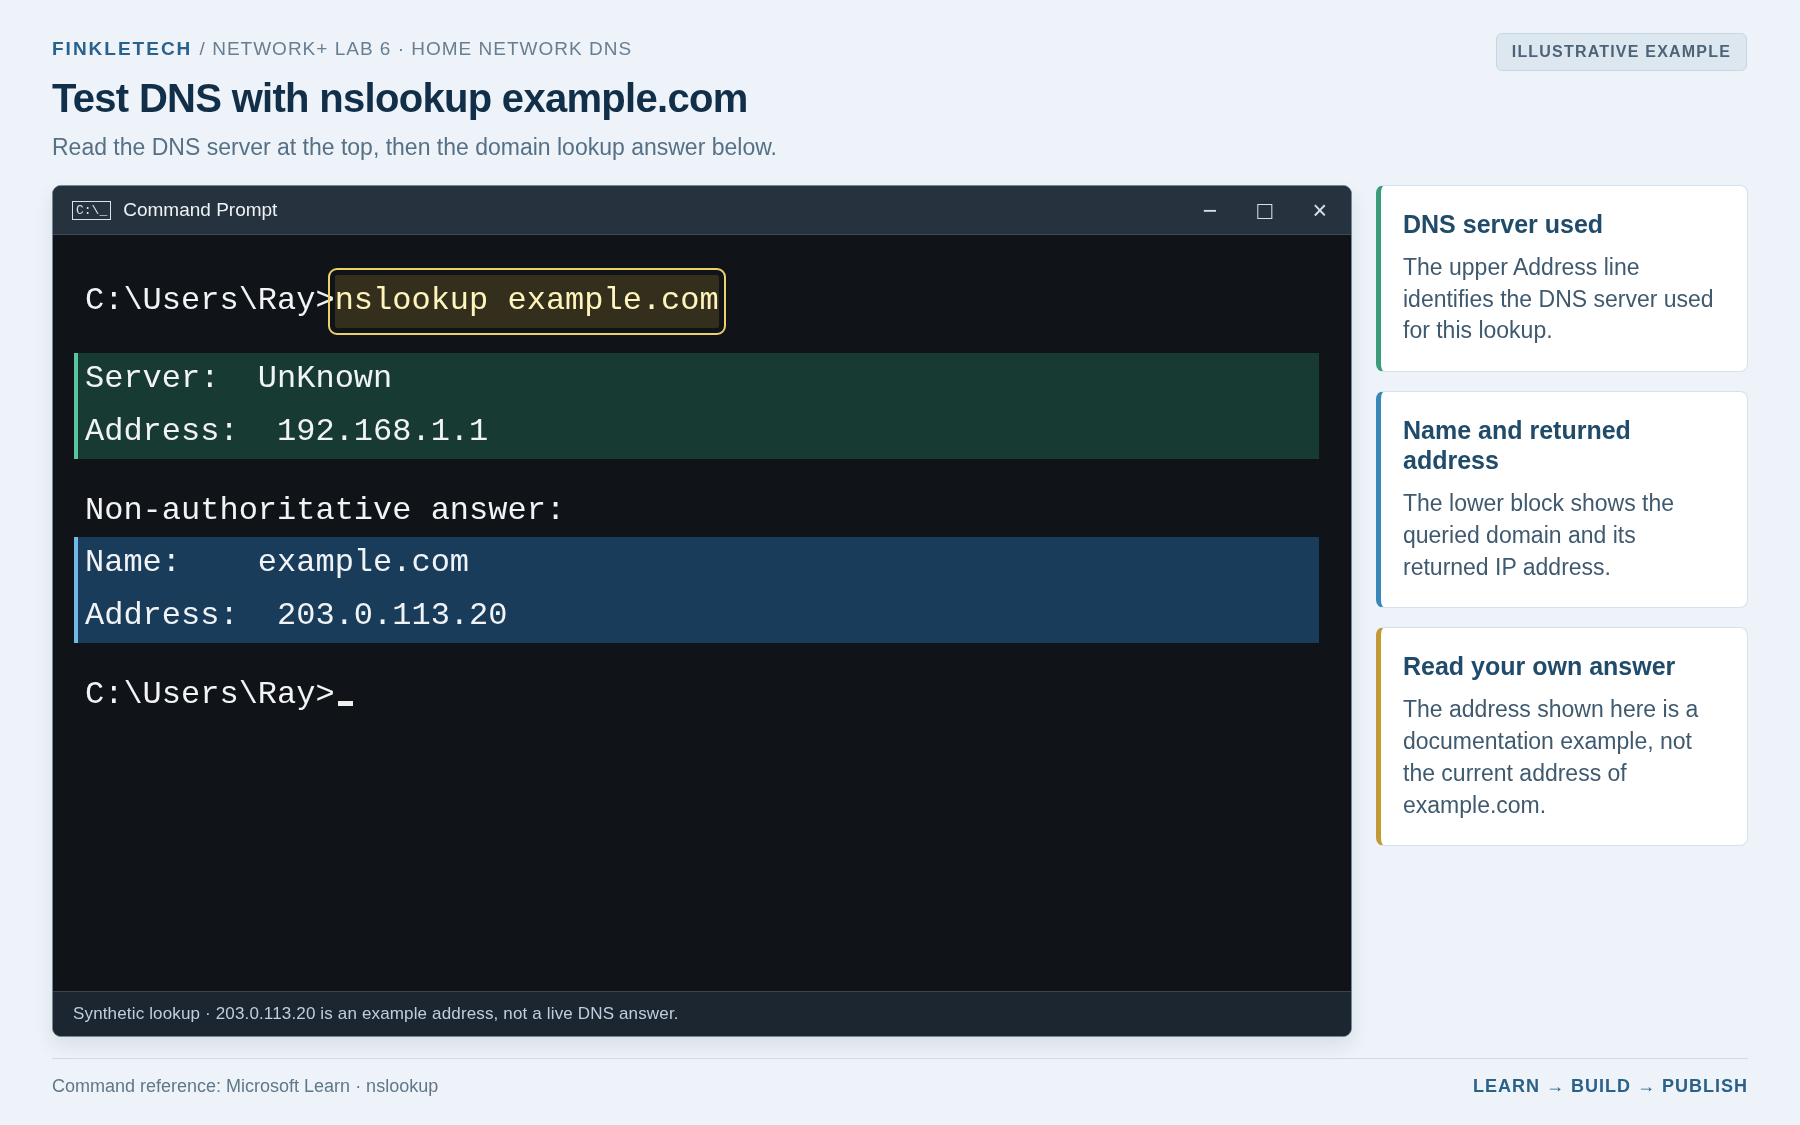
nslookup example.com
This command asks DNS to resolve the domain name into an IP address.
The result should usually show:
- the DNS server being used
- the name queried
- one or more IP addresses returned
This is a direct way to test whether DNS resolution is working.
In your notebook, record:
| DNS Test | My Result |
|---|---|
| Command Used | nslookup example.com |
| DNS Server Used | [Insert result] |
| Address Returned | [Insert result] |
| Did DNS Work? | [Yes/No] |
Step 3: Understand the NSLookup Result
Pause and read the result carefully.
The Server line tells you which DNS server answered the query. The Address line near the top usually shows the address of that DNS server. Lower in the output, you should see the domain name and the IP address or addresses returned.
This matters because DNS troubleshooting is not just about whether a website loads in the browser. A browser can fail for many reasons. nslookup gives you a more direct look at name resolution.
If nslookup example.com returns an address, DNS is working for that test. If it fails, DNS may be unreachable, misconfigured, blocked, or temporarily unavailable.
Step 4: Compare Ping by Name and Ping by IP Address
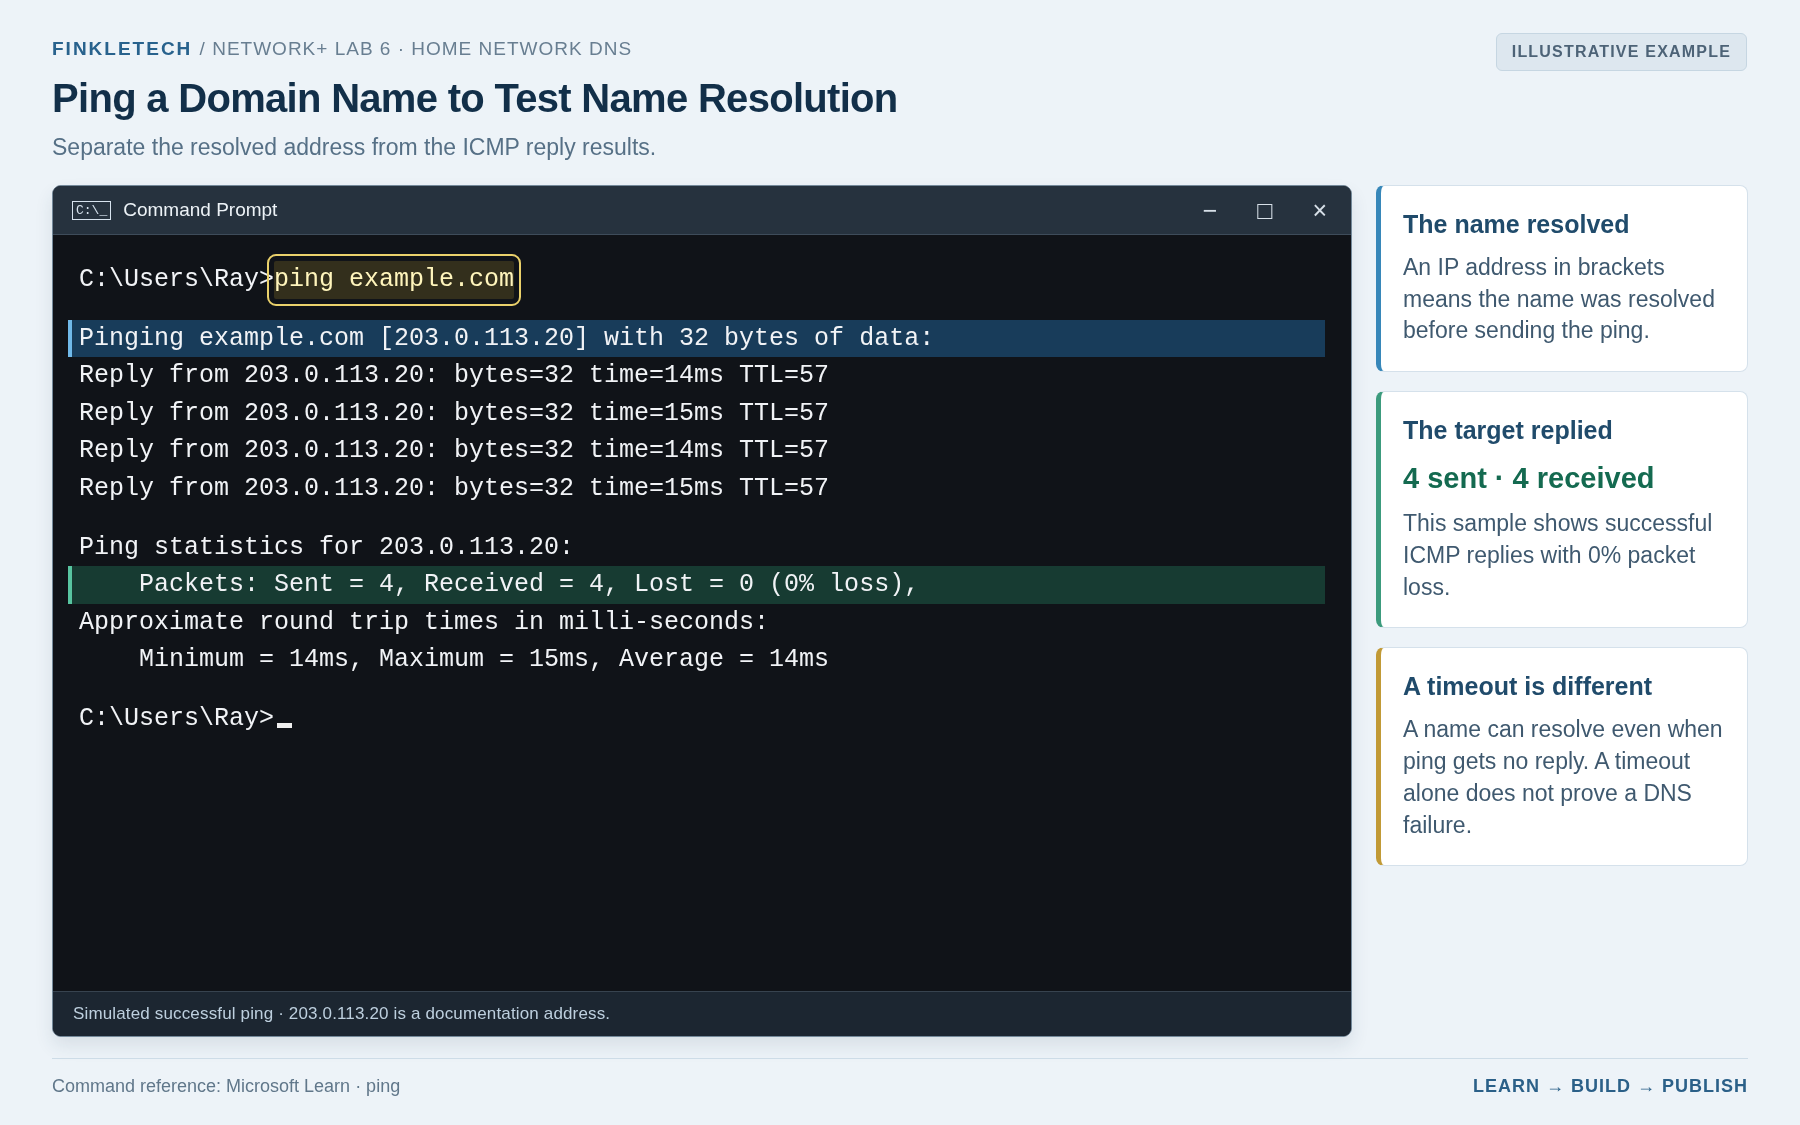
Now run:
ping example.com
This tests both DNS resolution and connectivity. Your computer must resolve the name first, then send ping traffic.
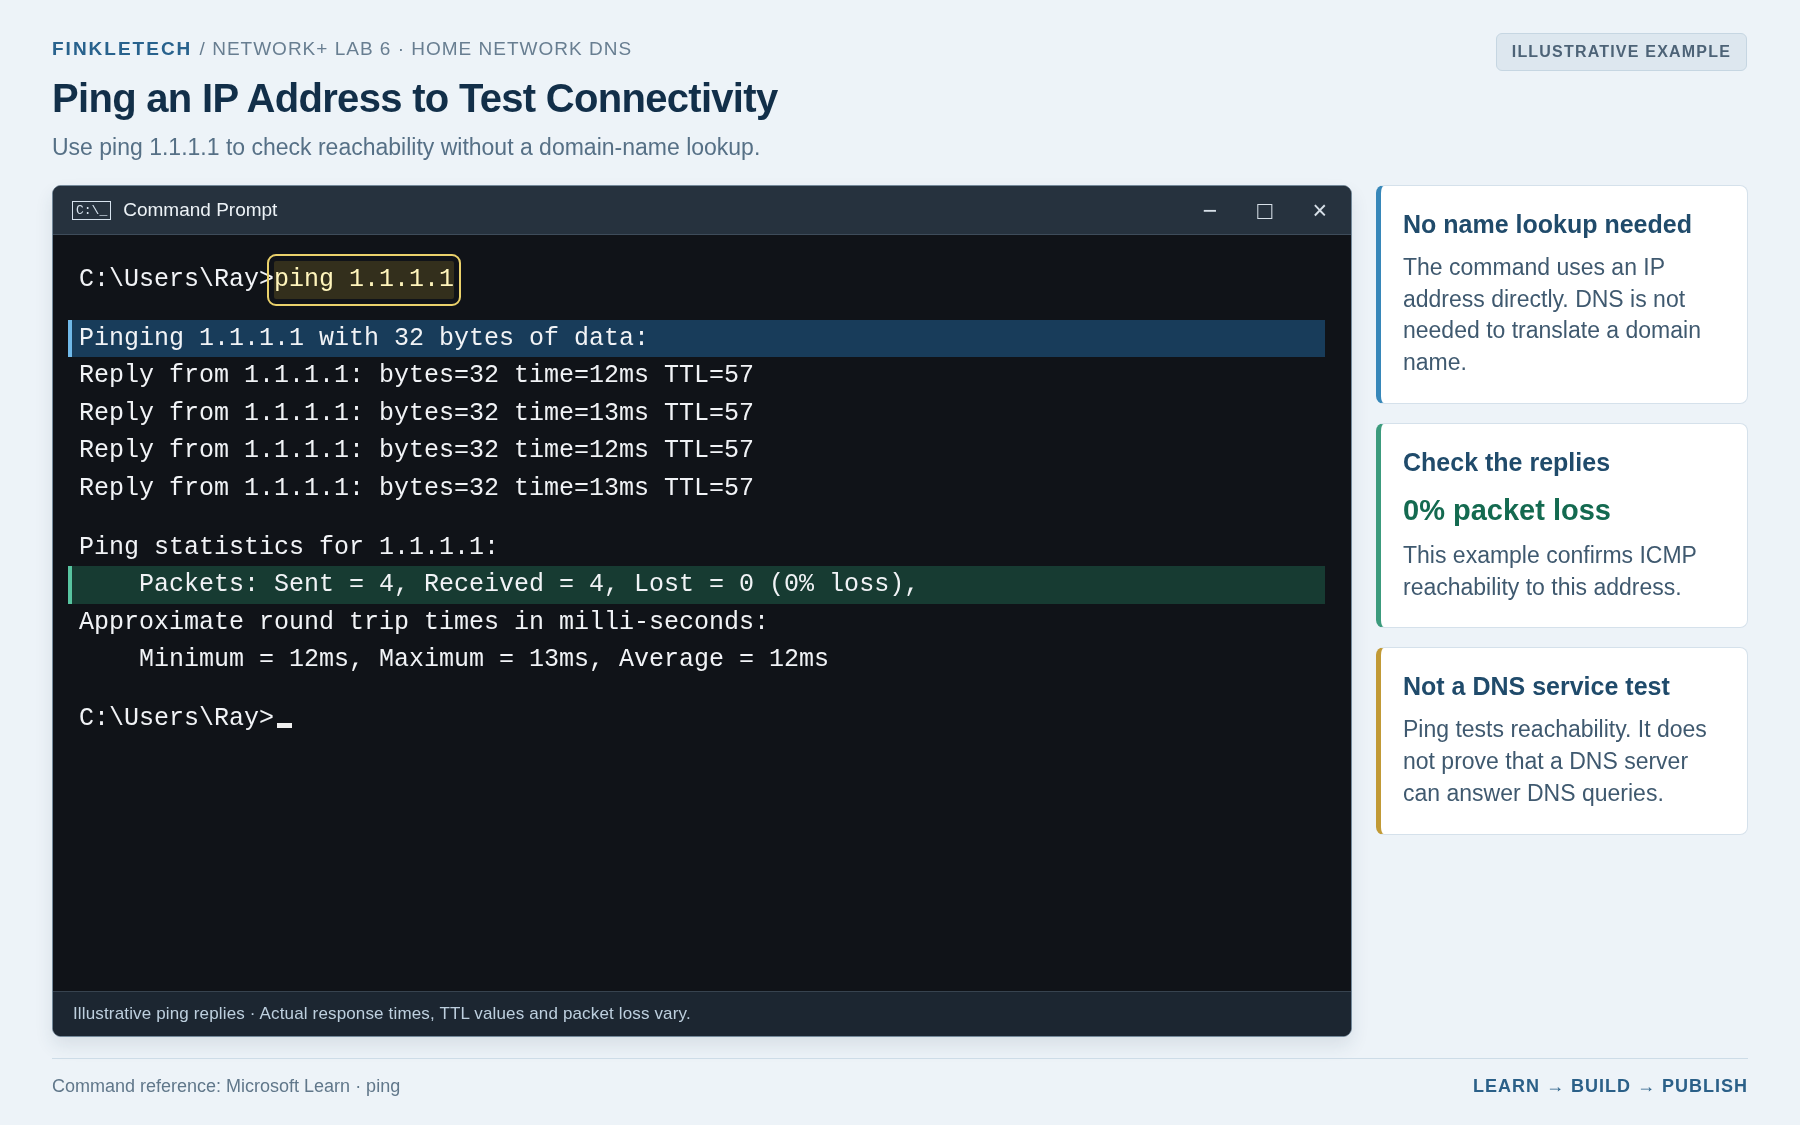
Next run:
ping 1.1.1.1
This tests connectivity by IP address without depending on DNS.
In your notebook, create this table:
| Test | Result | What It Suggests |
|---|---|---|
| ping example.com | [Success/Fail] | Tests DNS plus connectivity |
| ping 1.1.1.1 | [Success/Fail] | Tests IP connectivity without DNS |
If pinging the IP address works but pinging the domain name fails, DNS becomes a strong suspect. That is one of the classic beginner troubleshooting patterns.
Step 5: View Your DNS Cache
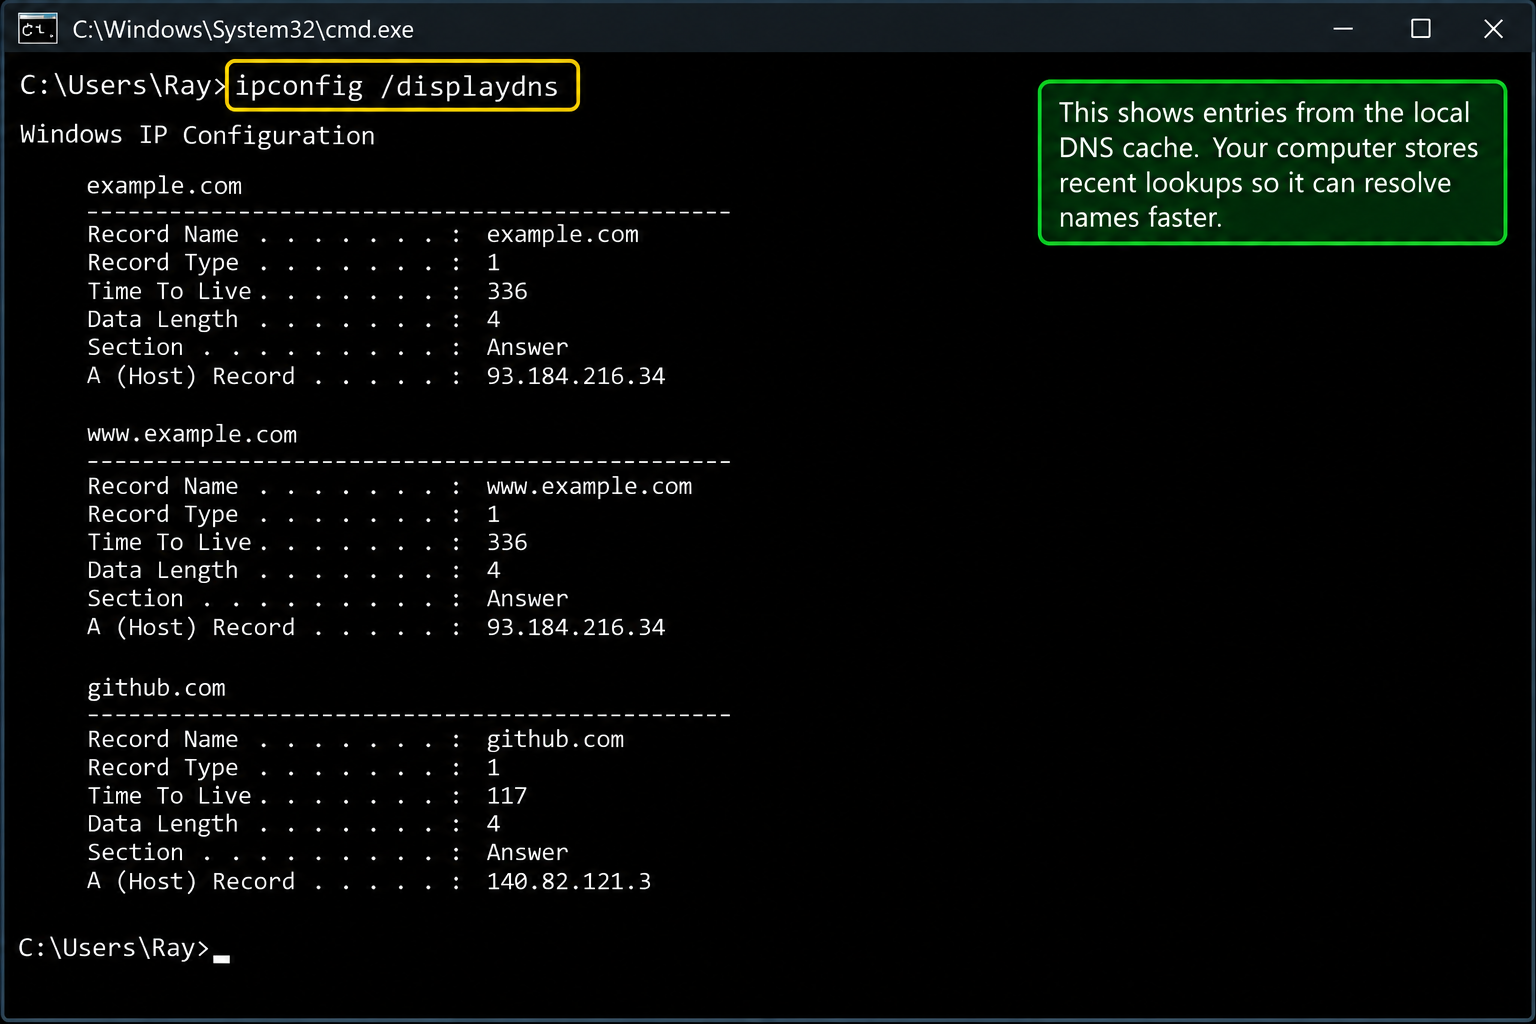
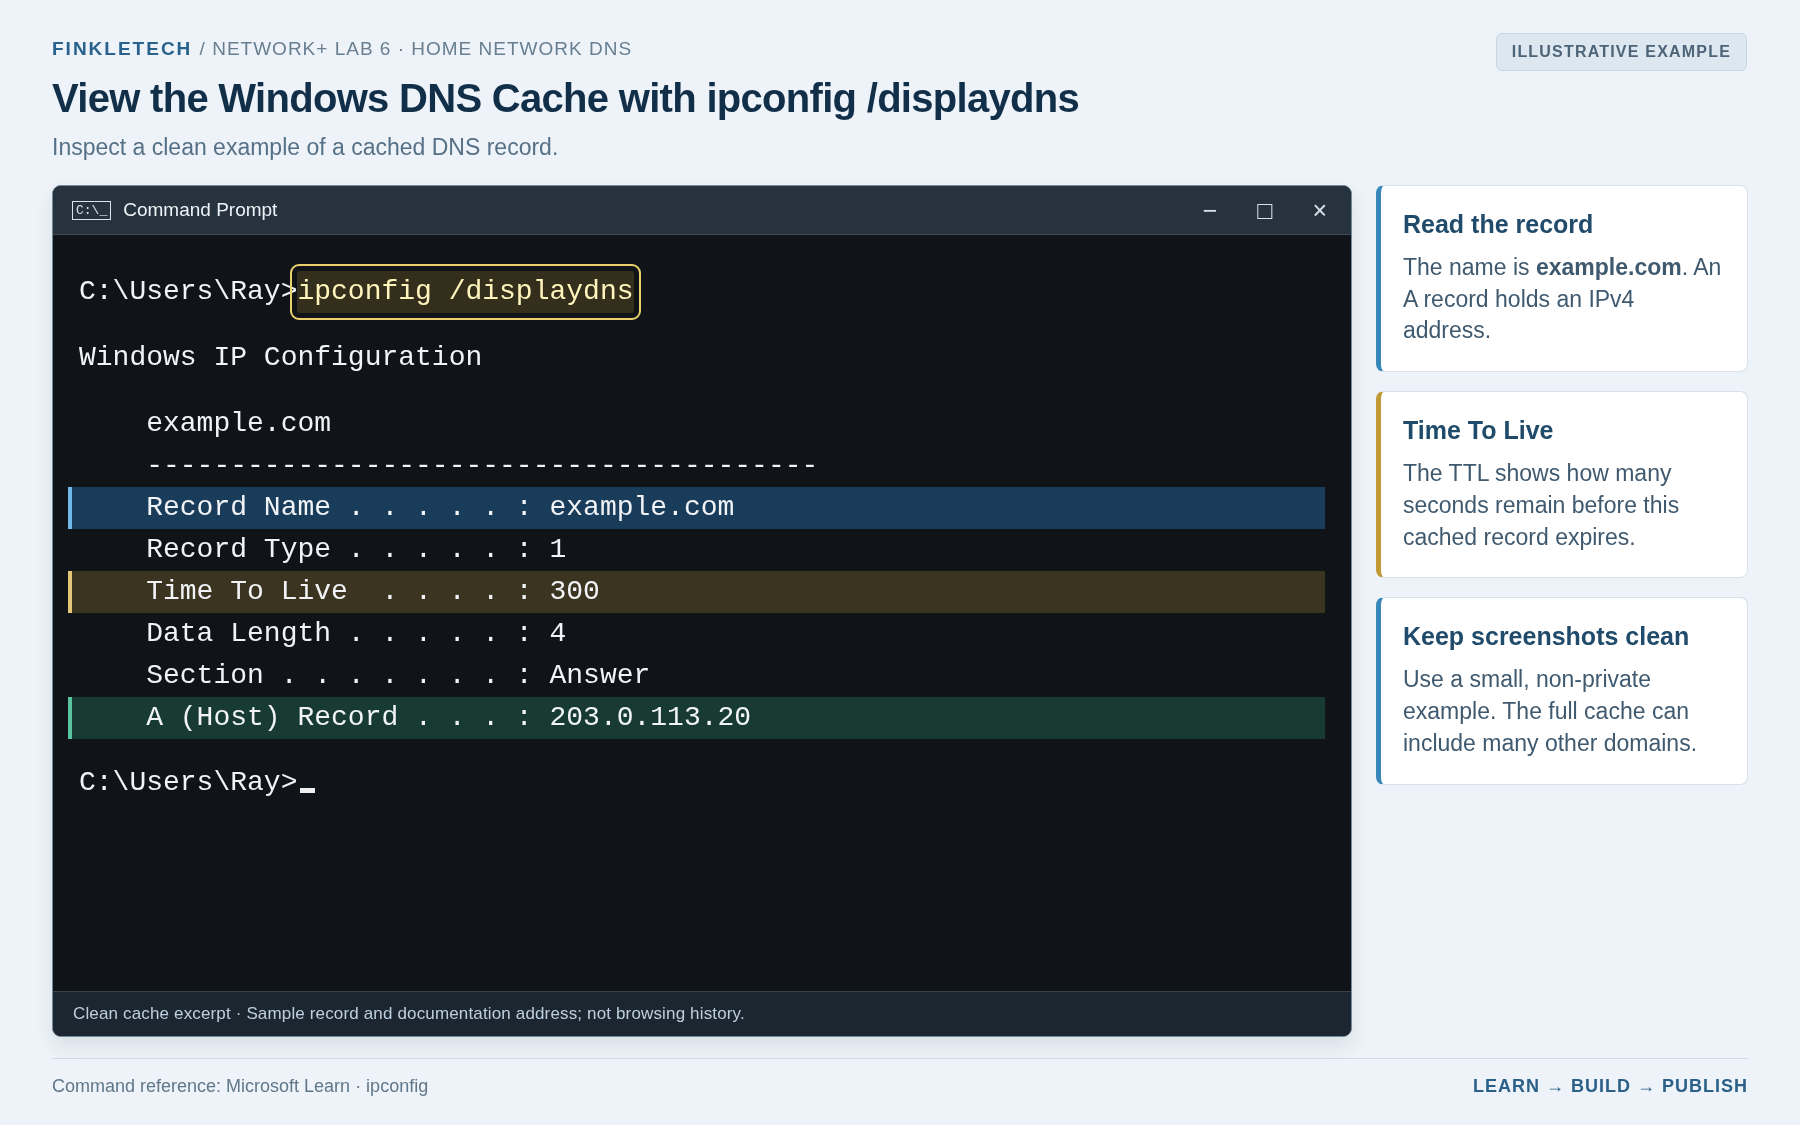
Windows keeps a DNS resolver cache. This cache stores recent name resolution results so the computer does not always need to repeat the full lookup process.
Run:
ipconfig /displaydns
You may see a lot of output. That is normal.
Do not try to understand every entry. Look for the general structure. You may see record names, record types, time to live values, and addresses.
In your notebook, write:
| DNS Cache Detail | My Result |
|---|---|
| Command Used | ipconfig /displaydns |
| Did entries appear? | [Yes/No] |
| Example domain shown | [Use clean example or blur] |
| Was the output longer than expected? | [Yes/No] |
Step 6: Understand DNS Caching
DNS caching makes browsing faster and reduces repeated DNS lookups. If your computer recently looked up a name, it may store that answer temporarily.
This is useful, but it can also cause confusion. If a cached record is old, incorrect, or stale, your computer may keep using it until the cache expires or is cleared. That is why flushing the DNS cache can sometimes help during troubleshooting.
Do not overestimate this fix, though. Flushing DNS is not magic. It only clears local cached DNS records. It will not repair broken Wi-Fi, a dead router, a bad Ethernet cable, or an ISP outage.
For Network+ thinking, remember the difference between a targeted troubleshooting step and a random ritual. Flushing DNS makes sense when DNS cache problems are possible. It does not make sense as the first move for every network problem.
Step 7: Optional — Flush the DNS Cache
This step is optional, but useful.
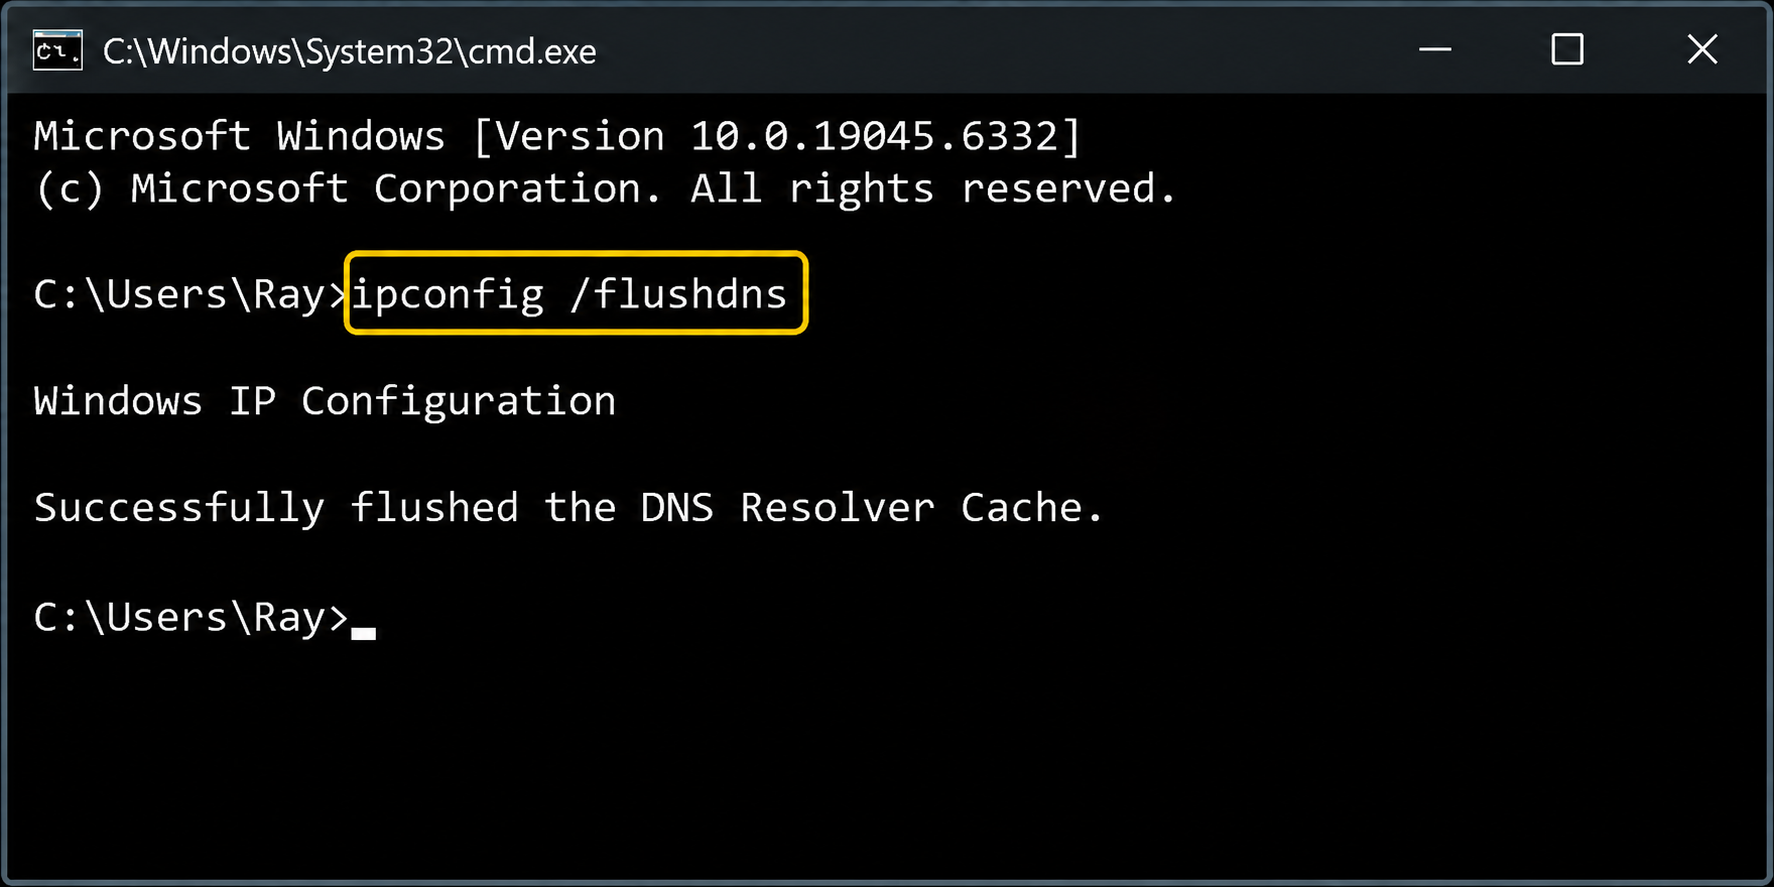
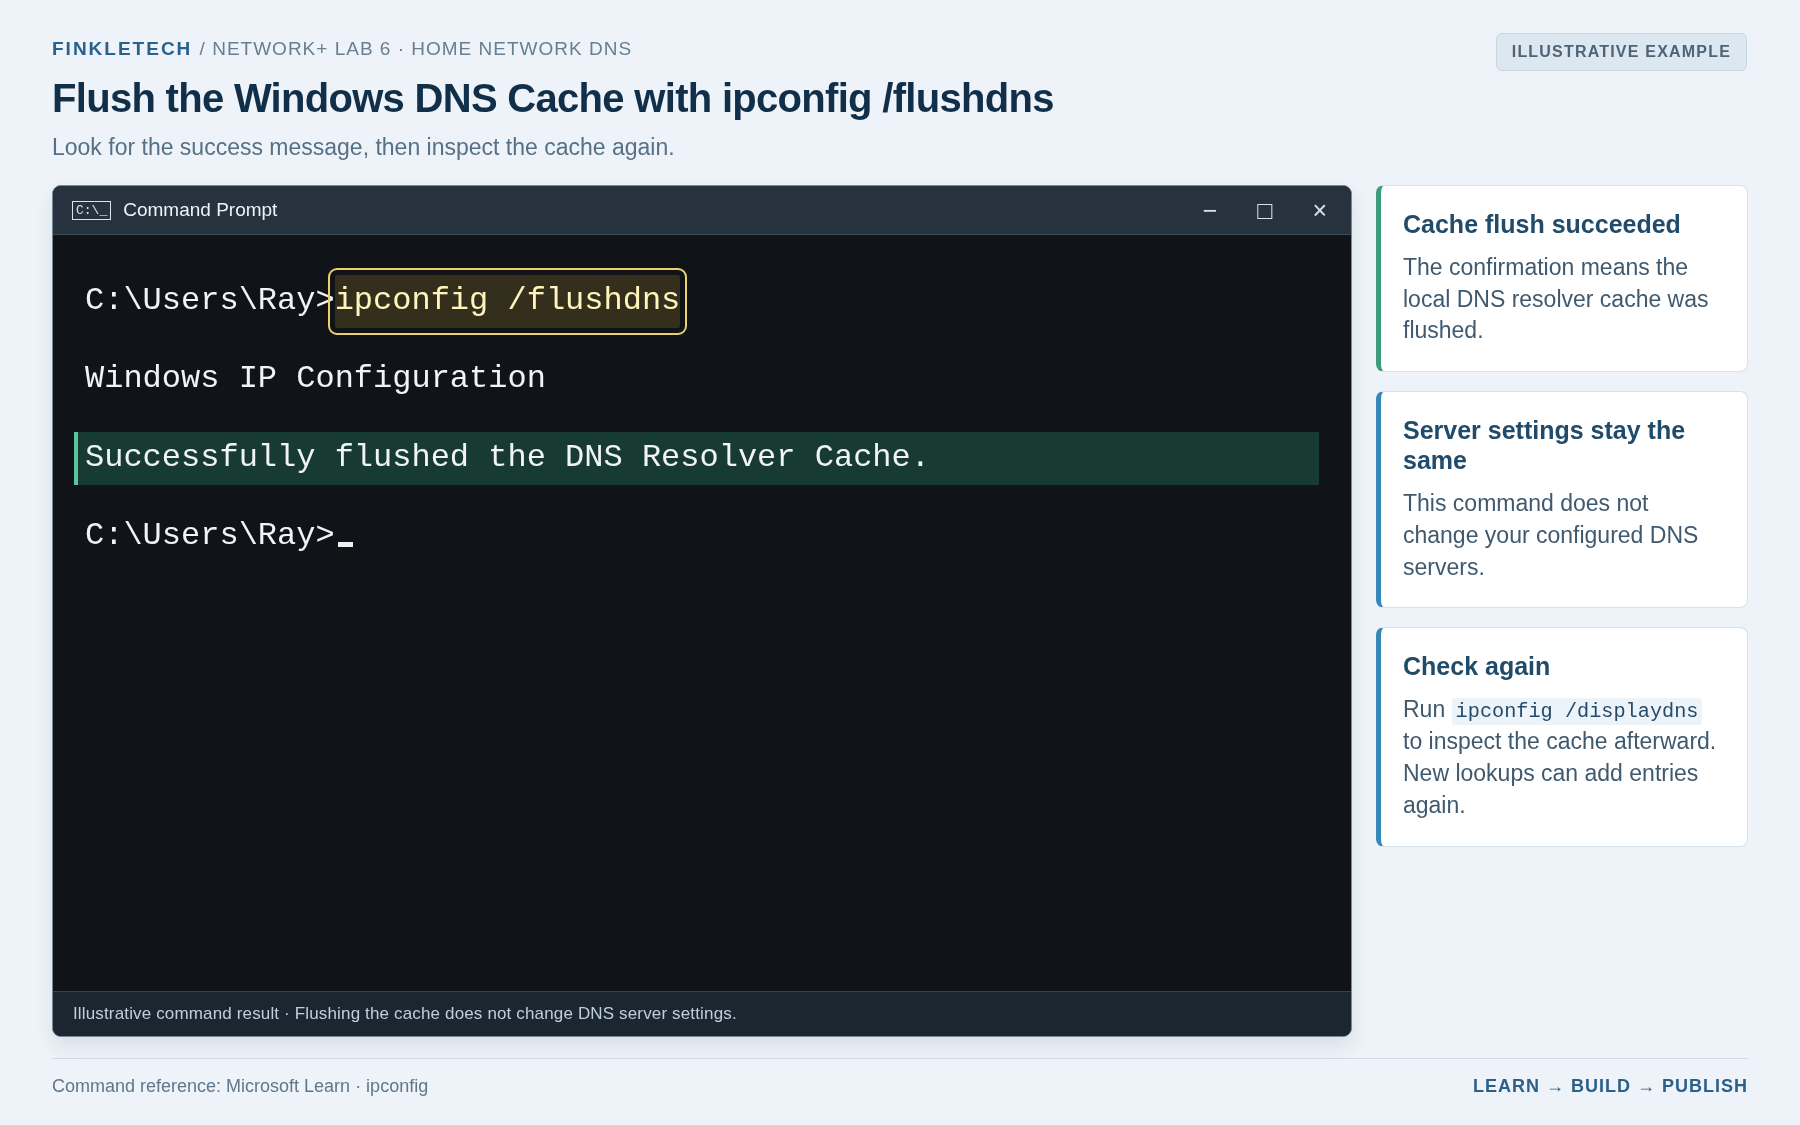
Run:
ipconfig /flushdns
You should see a message saying the DNS resolver cache was successfully flushed.
Then run:
ipconfig /displaydns
You may see fewer entries than before.
In your notebook, write:
| Flush DNS Detail | My Result |
|---|---|
| Command Used | ipconfig /flushdns |
| Did the command succeed? | [Yes/No] |
| Did the cache look different afterward? | [Yes/No] |
This is a safe beginner command in normal circumstances. It clears the local DNS cache, but it does not change your DNS server settings.
Step 8: Run NSLookup Again After Flushing DNS
Now run:
nslookup example.com
Compare this result with your earlier result.
The result may look basically the same. That is okay. Flushing DNS does not mean the domain should resolve to a different address. It just means your computer cleared its local resolver cache and performed lookup again as needed.
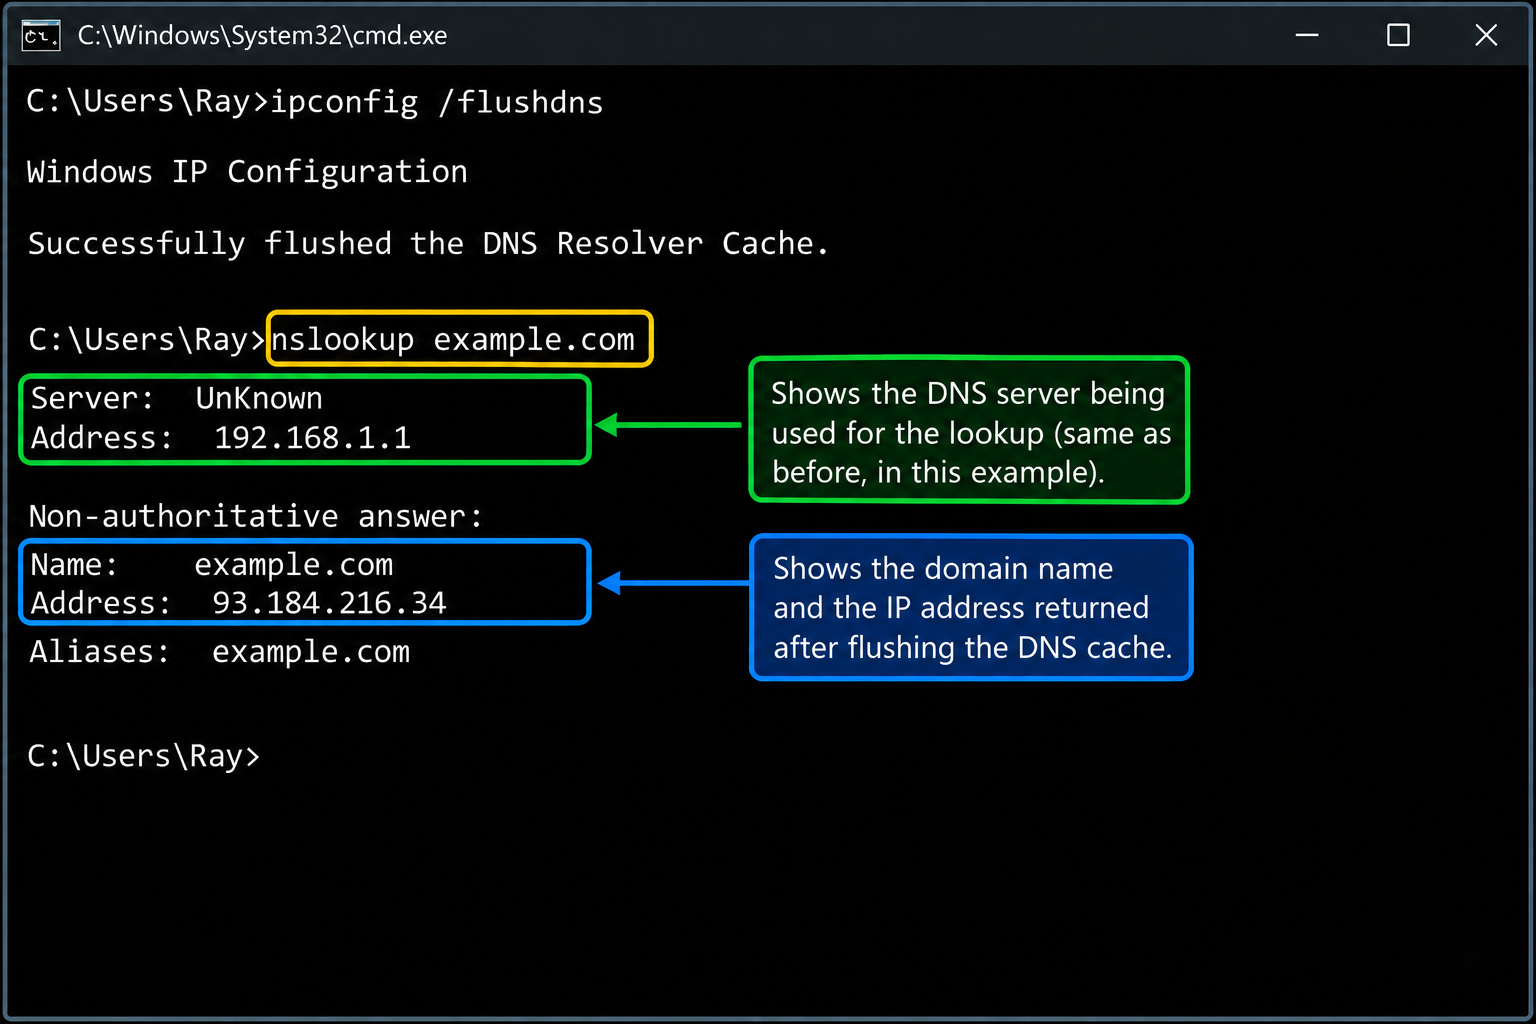
In your notebook, answer:
Did the result change after flushing DNS?
[Insert answer]
What does that tell me?
[Insert answer]
Step 9: Optional — Compare Two Domains
Run:
nslookup example.com
Then run:
nslookup cloudflare.com
Or use another normal public website.
Compare the results. You may see different IP addresses, multiple answers, or different-looking output. That is normal. Different domains can have different DNS records, multiple servers, or different infrastructure behind them.
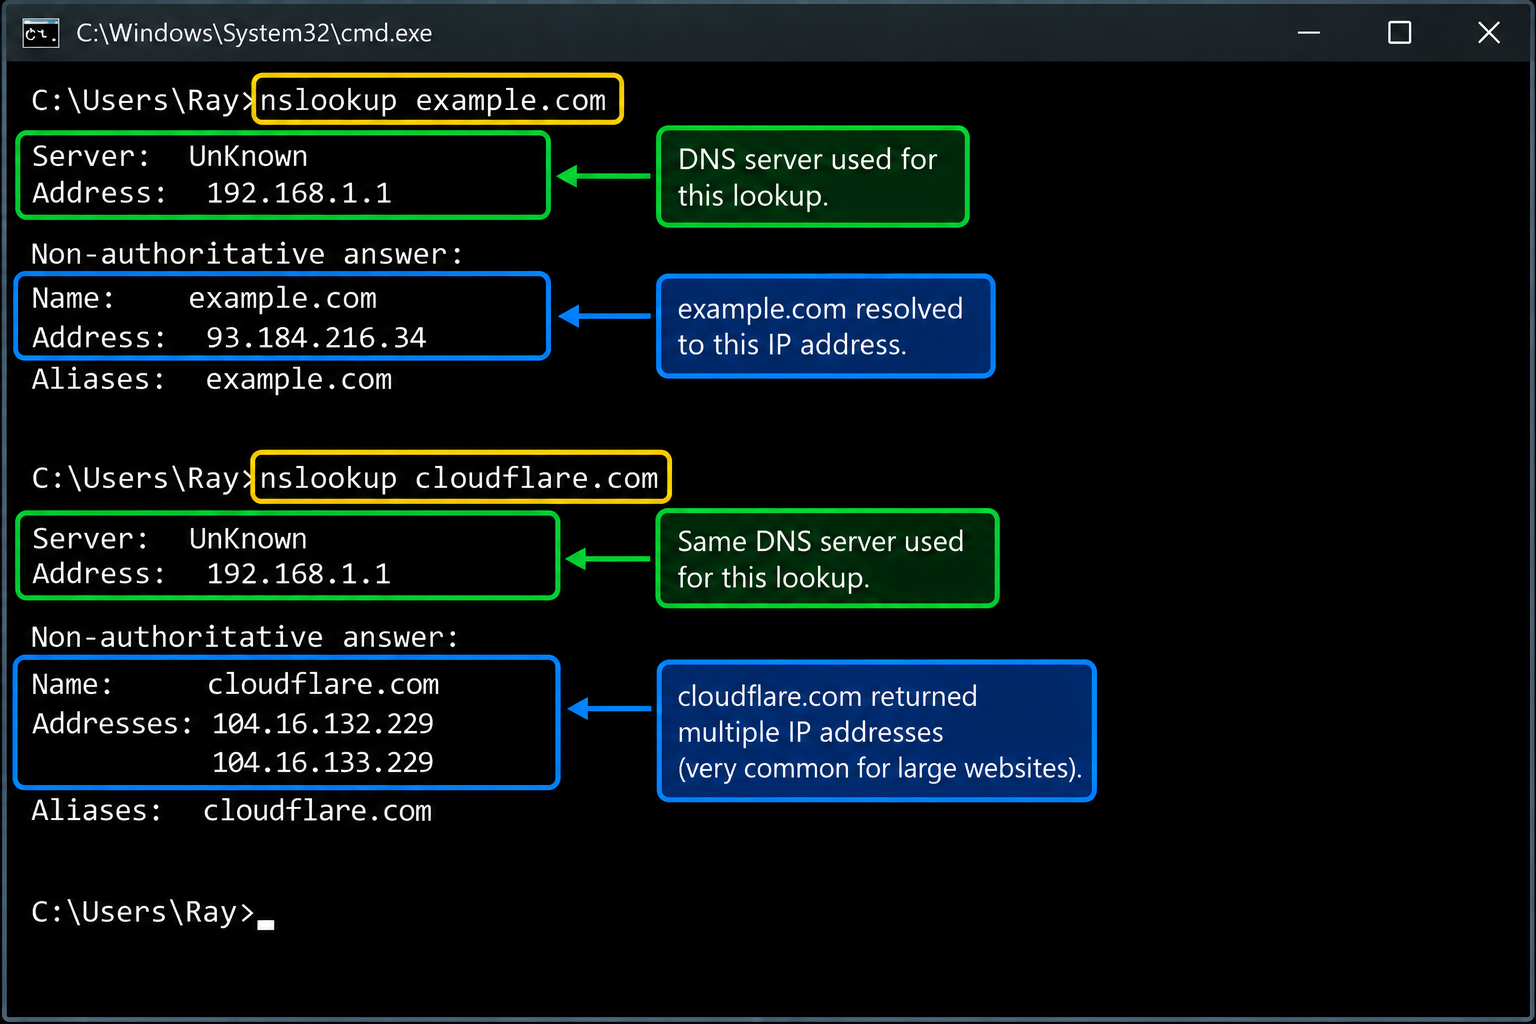
In your notebook, record:
| Domain | Address Returned | Notes |
|---|---|---|
| example.com | [Insert result] | [Insert notes] |
| second domain | [Insert result] | [Insert notes] |
Step 10: Optional Wireshark Connection
If you want to connect this lab to Lab 5, open Wireshark and start a capture on your active adapter.
Run:
nslookup example.com
Stop the capture.
Use the Wireshark filter:
dns
You may see DNS query and response packets.
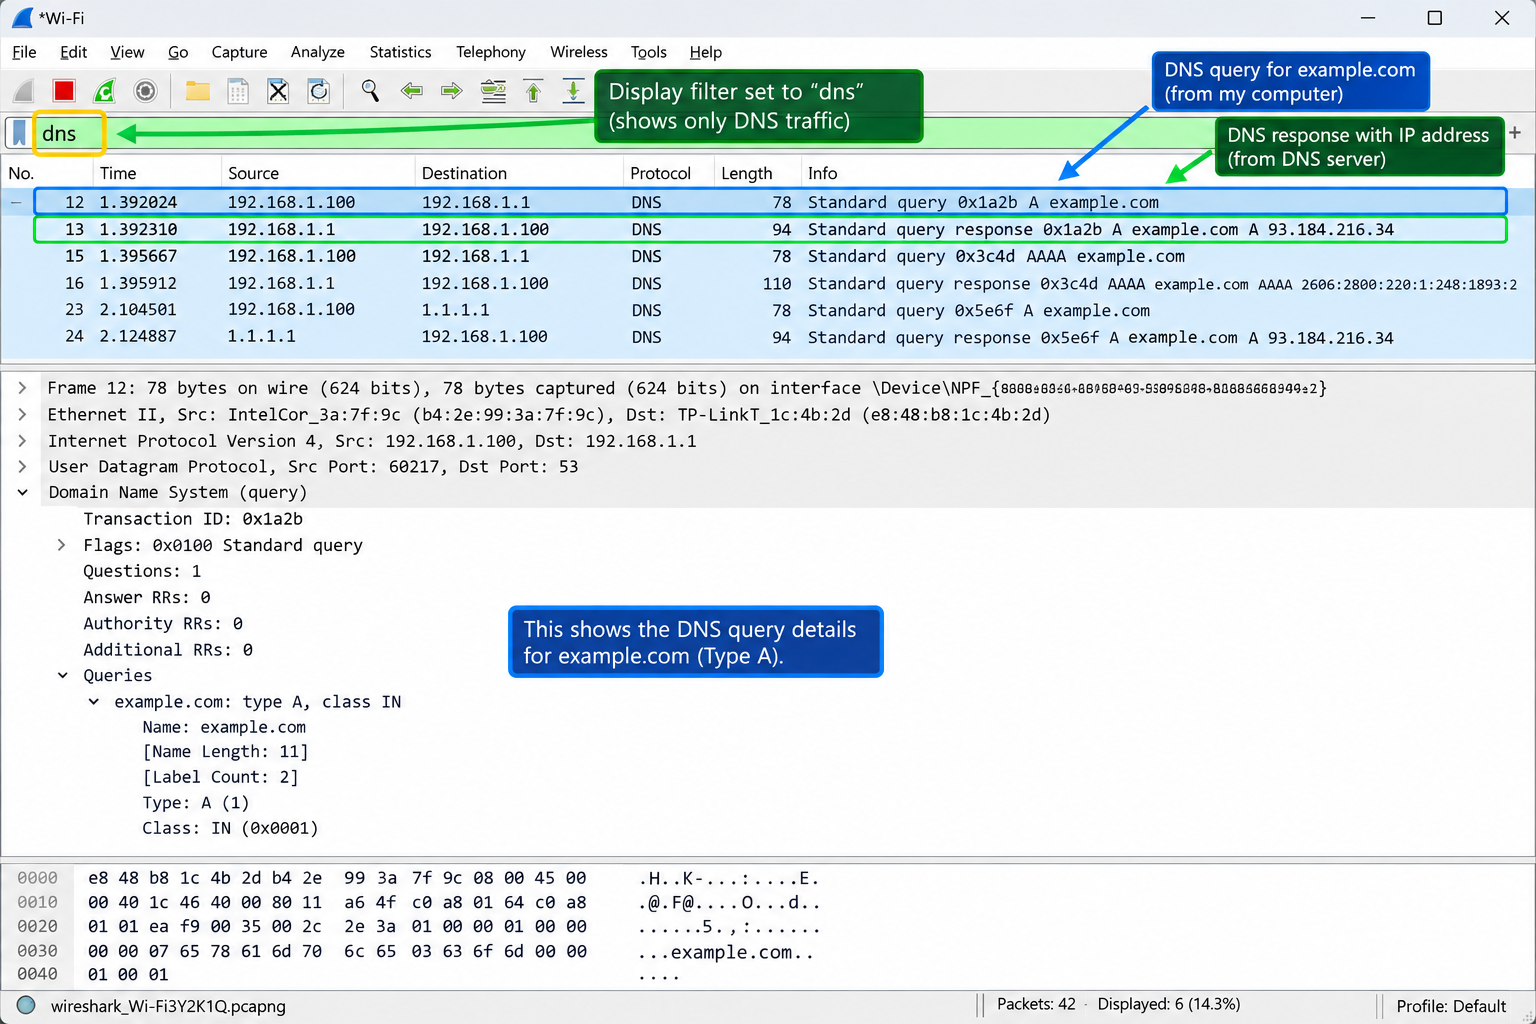
This optional step is powerful because it connects three layers of learning:
- your command
- the DNS result
- the packets behind the result
That is how you start becoming dangerous in a good way — not just memorizing terms, but understanding what is happening under the hood.
Step 11: Write Your Lab Notes
Use this section after you complete the lab.
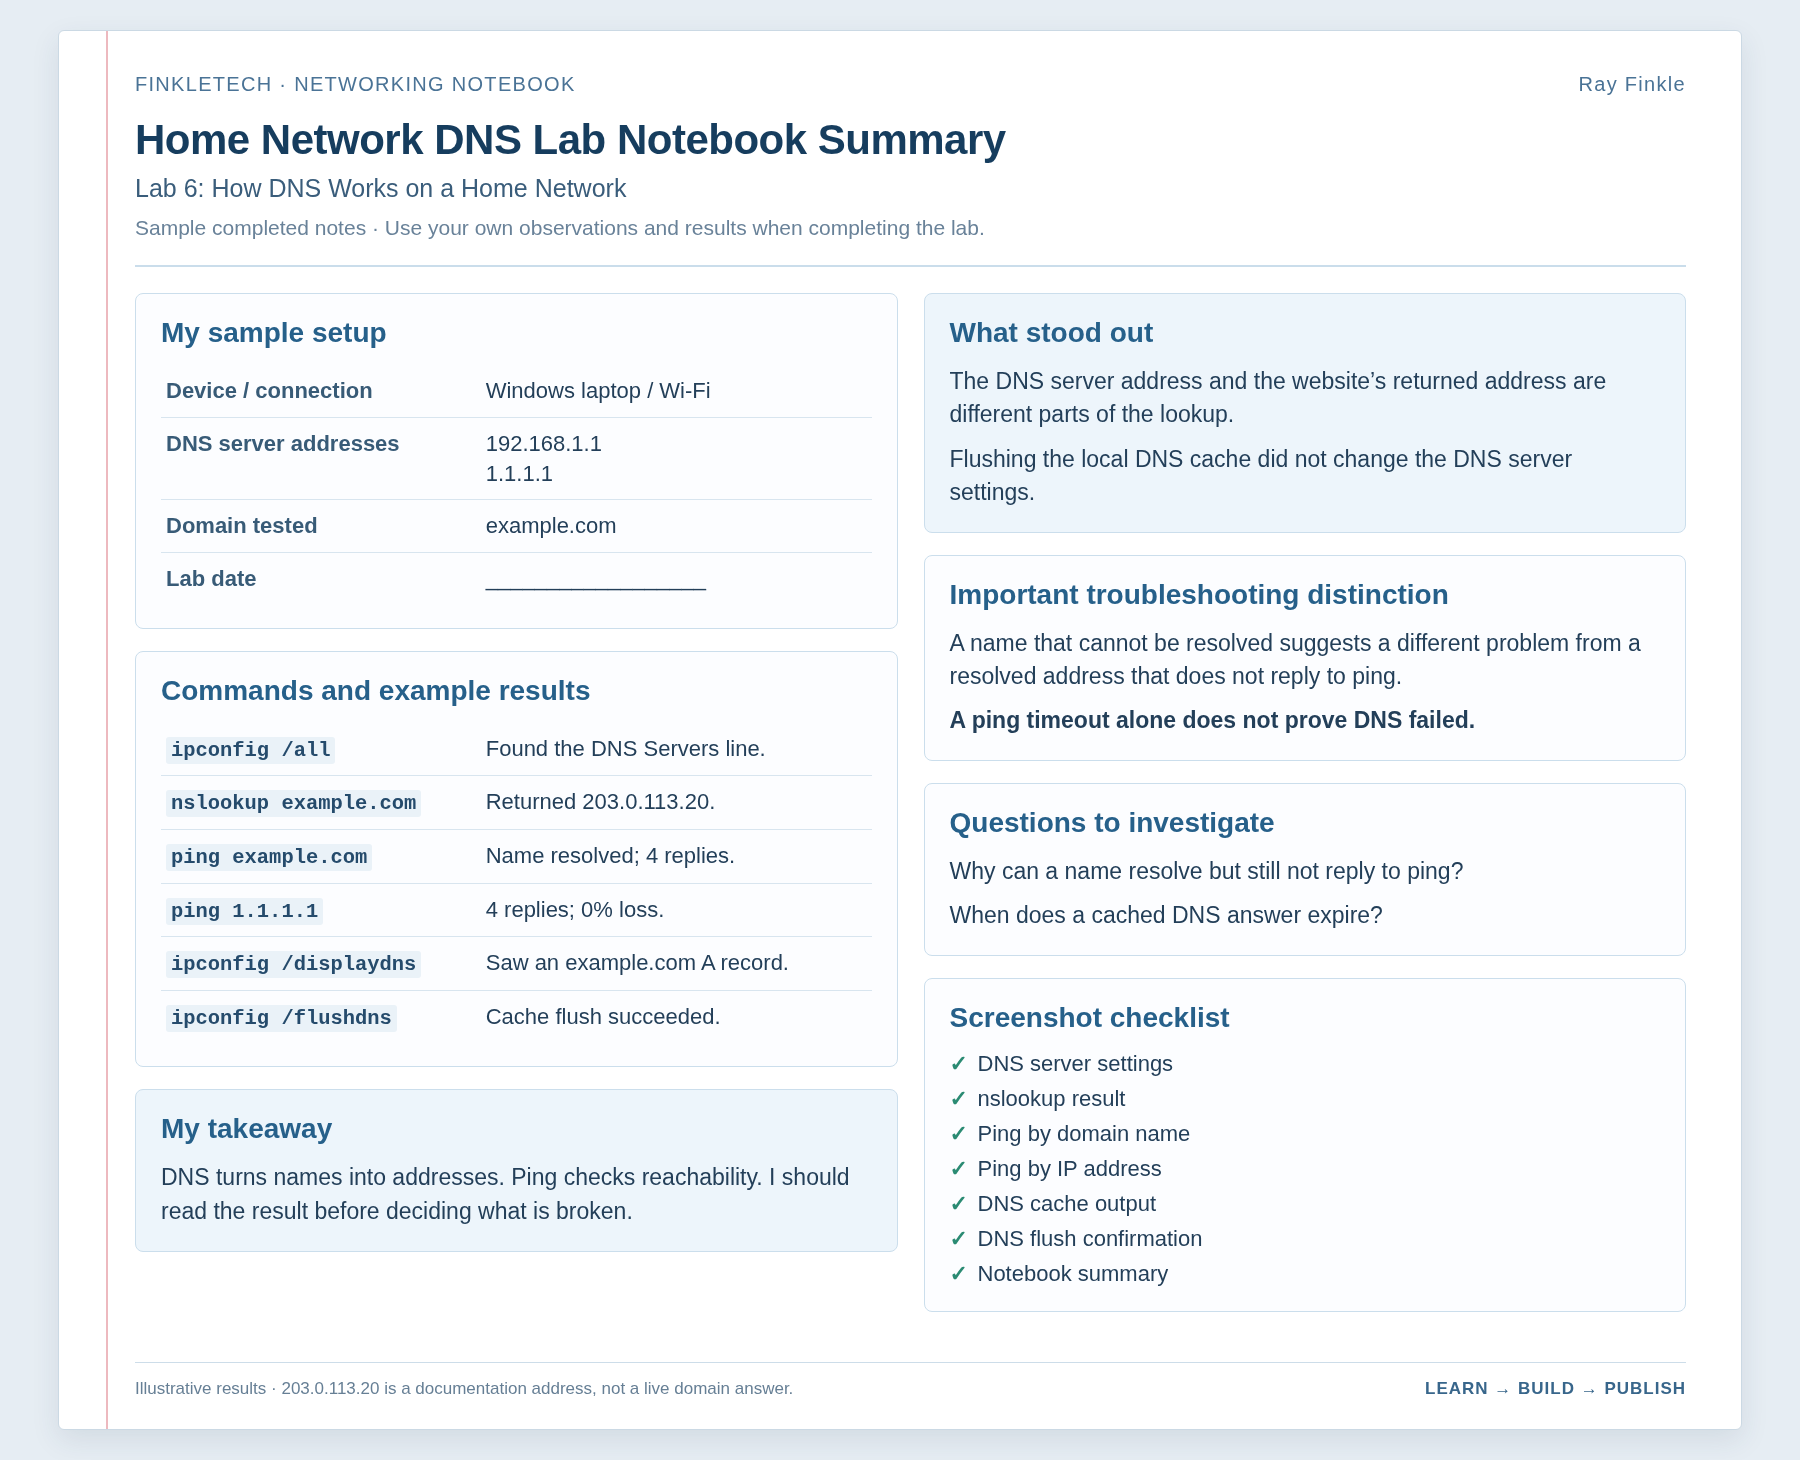
My FinkleTech Lab Notes
For this lab, I used my [laptop/desktop] connected through [Wi-Fi/Ethernet]. I started by checking my DNS server with ipconfig /all, then used nslookup to test whether domain names were resolving into IP addresses.
I compared pinging a domain name with pinging an IP address. This helped me understand the difference between DNS-based connectivity and direct IP connectivity. I also viewed my DNS cache with ipconfig /displaydns and optionally flushed the cache with ipconfig /flushdns.
One thing I noticed during this lab was [insert what stood out]. This helped me understand DNS as a real troubleshooting area, not just a textbook definition.
What Your Results Mean
If nslookup returned an IP address, DNS worked for that lookup. If pinging an IP address worked but pinging a domain name failed, DNS may be the issue. If both failed, the problem may be broader than DNS.
If your DNS cache showed many entries, that is normal. Your computer and applications perform DNS lookups in the background. If flushing the DNS cache succeeded, your local cache was cleared, but your DNS server settings did not change.
The biggest lesson is that DNS problems can look like internet problems. A good technician checks the difference before jumping to conclusions.
Common Problems
If nslookup fails, check whether your computer has a DNS server listed in ipconfig /all.
If pinging a domain fails but nslookup works, the issue may not be DNS. Some systems block ping, and some domains may not respond to ICMP traffic.
If ipconfig /displaydns shows a huge amount of output, that is normal. Crop carefully before using screenshots.
If flushing DNS does not fix a problem, do not keep repeating it. Move on to other troubleshooting steps.
If you are using a VPN, DNS results may look different because the VPN may control or redirect DNS queries.
Network+ Concepts Practiced
This lab practices several important Network+ concepts:
- DNS
- name resolution
- DNS servers
- DNS caching
nslookupipconfig /displaydnsipconfig /flushdns- IP connectivity vs name resolution
- troubleshooting methodology
- command-line tools
- packet capture connection, if using Wireshark
The main skill is learning how to tell the difference between a general connectivity problem and a DNS-specific problem.
Mini Review Questions
Use these questions after the lab to check your understanding.
- What does DNS do?
- What command can test DNS name resolution directly?
- What command shows your DNS servers on Windows?
- What does
ipconfig /displaydnsshow? - What does
ipconfig /flushdnsdo? - If pinging an IP address works but pinging a domain name fails, what is a likely issue?
- Why should you review DNS screenshots carefully before publishing them?
Short Answers
- DNS translates domain names into IP addresses.
nslookupcan test DNS name resolution directly.ipconfig /allshows DNS server information.ipconfig /displaydnsshows the local DNS resolver cache.ipconfig /flushdnsclears the local DNS resolver cache.- DNS is a likely issue.
- DNS screenshots may reveal websites, services, or private activity from your computer.