
Lab 7: How TCP, UDP, Ports, and Protocols Work
Lab Goal
In this lab, you will learn how TCP, UDP, ports, and protocols work by observing real network connections on your own computer. You will use safe built-in Windows tools to view active connections, identify local and remote ports, test common service ports, and connect those results back to Network+ study.
Ports are one of those topics that beginners often try to memorize without really understanding. You may already know that HTTP uses port 80, HTTPS uses port 443, DNS often uses port 53, and SSH uses port 22. That is useful, but memorizing numbers is only part of the job.
The bigger idea is this: ports help devices keep track of different network conversations. Your computer can browse websites, check email, sync files, update apps, and run background services because ports help separate one type of communication from another.
By the end of this lab, you should understand what ports are, why TCP and UDP are different, how to view active connections, and why port numbers matter in troubleshooting.
Before You Start: Use Your Networking Notebook
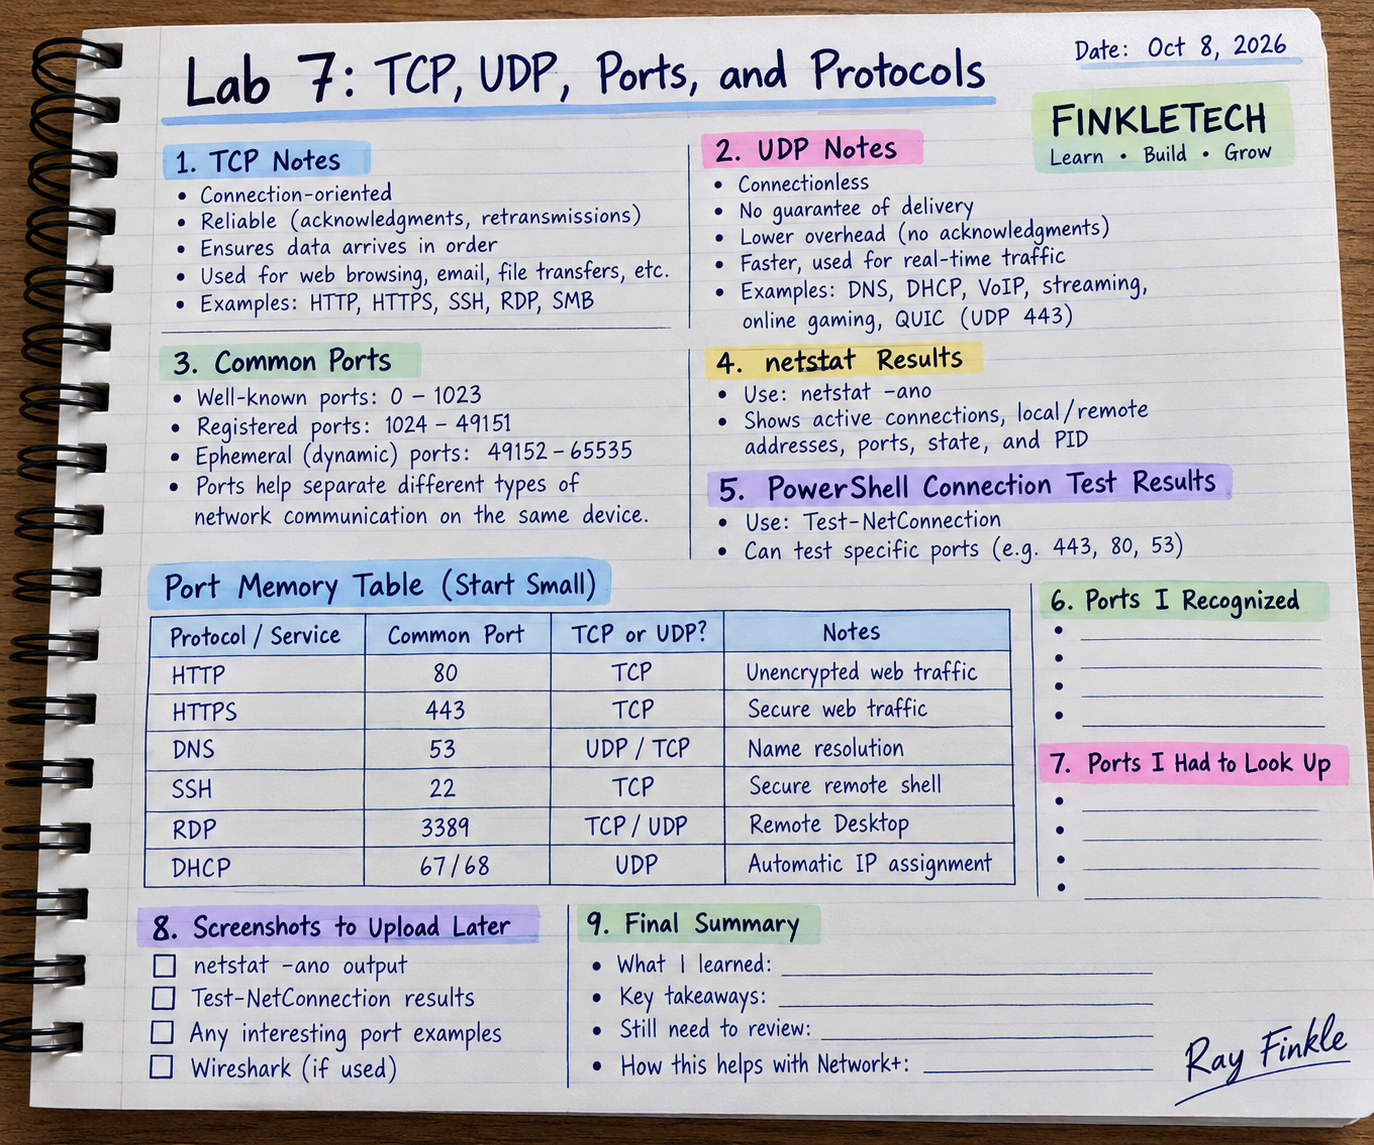
Open your networking notebook to a fresh page and write:
Lab 7: TCP, UDP, Ports, and Protocols
Create sections for:
- TCP notes
- UDP notes
- common ports
netstatresults- PowerShell connection test results
- ports I recognized
- ports I had to look up
- screenshots to upload later
- final summary
This is a perfect lab for your notebook because port numbers are easy to forget when they are just floating around in your head. Writing them down beside real command output makes them much easier to remember.
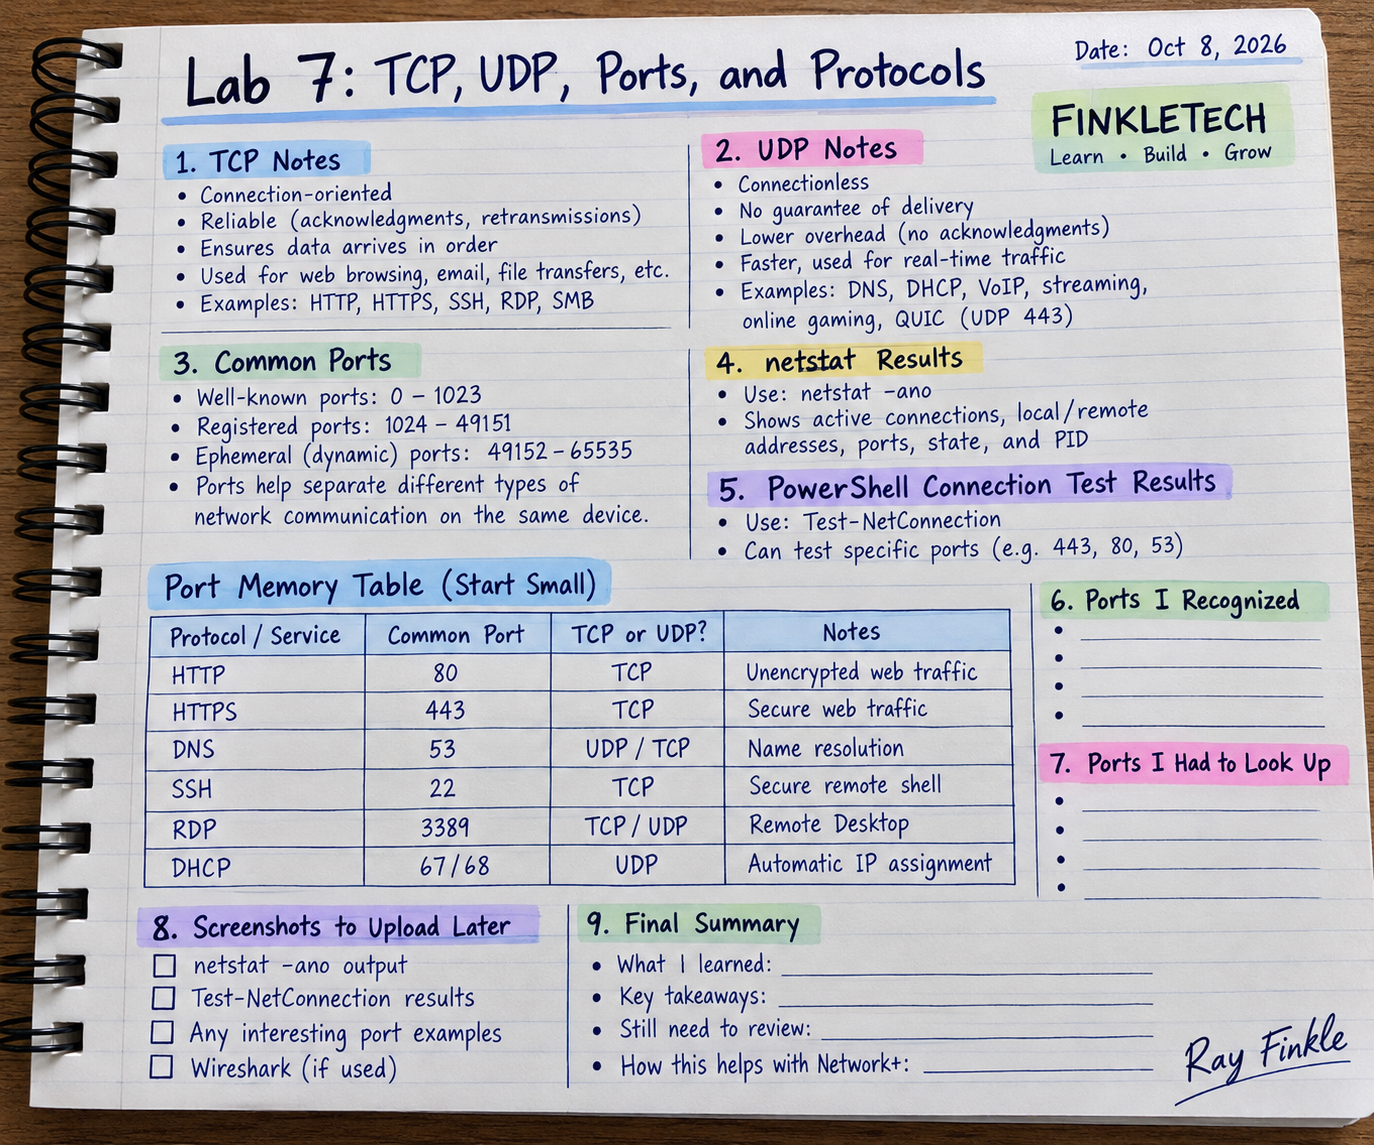
Create a small “port memory table” in your notebook. Start with only a few important ones:
| Protocol / Service | Common Port | TCP or UDP? | Notes |
|---|---|---|---|
| HTTP | 80 | TCP | Unencrypted web traffic |
| HTTPS | 443 | TCP | Secure web traffic |
| DNS | 53 | UDP/TCP | Name resolution |
| SSH | 22 | TCP | Secure remote shell |
| RDP | 3389 | TCP/UDP | Remote Desktop |
| DHCP | 67/68 | UDP | Automatic IP assignment |
Do not try to memorize every port in one sitting. Build the table slowly. Your goal is to understand the pattern first.
Why This Lab Matters
Ports are everywhere in networking. When you visit a website, your computer connects to a remote server on a port. When DNS resolves a name, it uses a protocol and port. When a firewall allows or blocks traffic, it often makes decisions based on port numbers, protocols, source addresses, and destination addresses.
For Network+ study, this topic matters because it connects directly to troubleshooting, security, firewalls, services, servers, and protocols. If a website is not loading, port 443 may matter. If remote access is failing, SSH, RDP, or VPN-related ports may matter. If DNS is failing, port 53 may matter. If DHCP is broken, UDP ports 67 and 68 may matter.
This lab helps turn those numbers into something real. Instead of only seeing ports in a textbook chart, you will see port numbers in command output from your own computer.
Quick Concept Refresher: What Is a Port?
An IP address identifies a device or host on a network. A port helps identify a specific service or conversation on that device.
A simple way to think about it is this: the IP address gets traffic to the right building, and the port gets traffic to the right room inside that building. That is not perfect technically, but it is a useful beginner mental model.
When your computer connects to a website using HTTPS, the destination server usually listens on TCP port 443. Your computer also uses a temporary local port, often called an ephemeral port, for its side of the conversation. This lets your computer manage many connections at once.
So a connection is not just “my computer talked to a website.” It is more specific. It may look like:
My local IP address + temporary local port → remote IP address + destination port 443
That level of detail helps technicians troubleshoot what is really happening.
Quick Concept Refresher: TCP vs UDP
TCP stands for Transmission Control Protocol. It is connection-oriented and focuses on reliable delivery. TCP uses acknowledgments, sequencing, and connection management. It is commonly used when reliability matters, such as web browsing, file transfers, email, and remote access.
UDP stands for User Datagram Protocol. It is connectionless and has less overhead. UDP does not establish a full connection the way TCP does. It is commonly used where speed, simplicity, or real-time communication matters, such as DNS queries, DHCP, streaming, VoIP, and some gaming traffic.
Do not oversimplify this into “TCP good, UDP bad.” That is wrong. They are different tools. TCP is better when reliability and ordered delivery matter. UDP is useful when lower overhead or real-time delivery matters.
For Network+ study, the key is understanding why a service might use TCP, UDP, or sometimes both.
Tools Needed
You will need:
- a Windows laptop or desktop
- internet connection
- Command Prompt
- PowerShell
- your networking notebook
- screenshot tool such as Snipping Tool
- optional Wireshark if you want to connect this lab to packet captures
You do not need special networking hardware for this lab. You also do not need to scan other networks or test random systems.
Safety and Privacy Note Before Publishing Screenshots
Command output can reveal local IP addresses, remote IP addresses, process IDs, device names, or services running on your computer. Review screenshots before publishing.
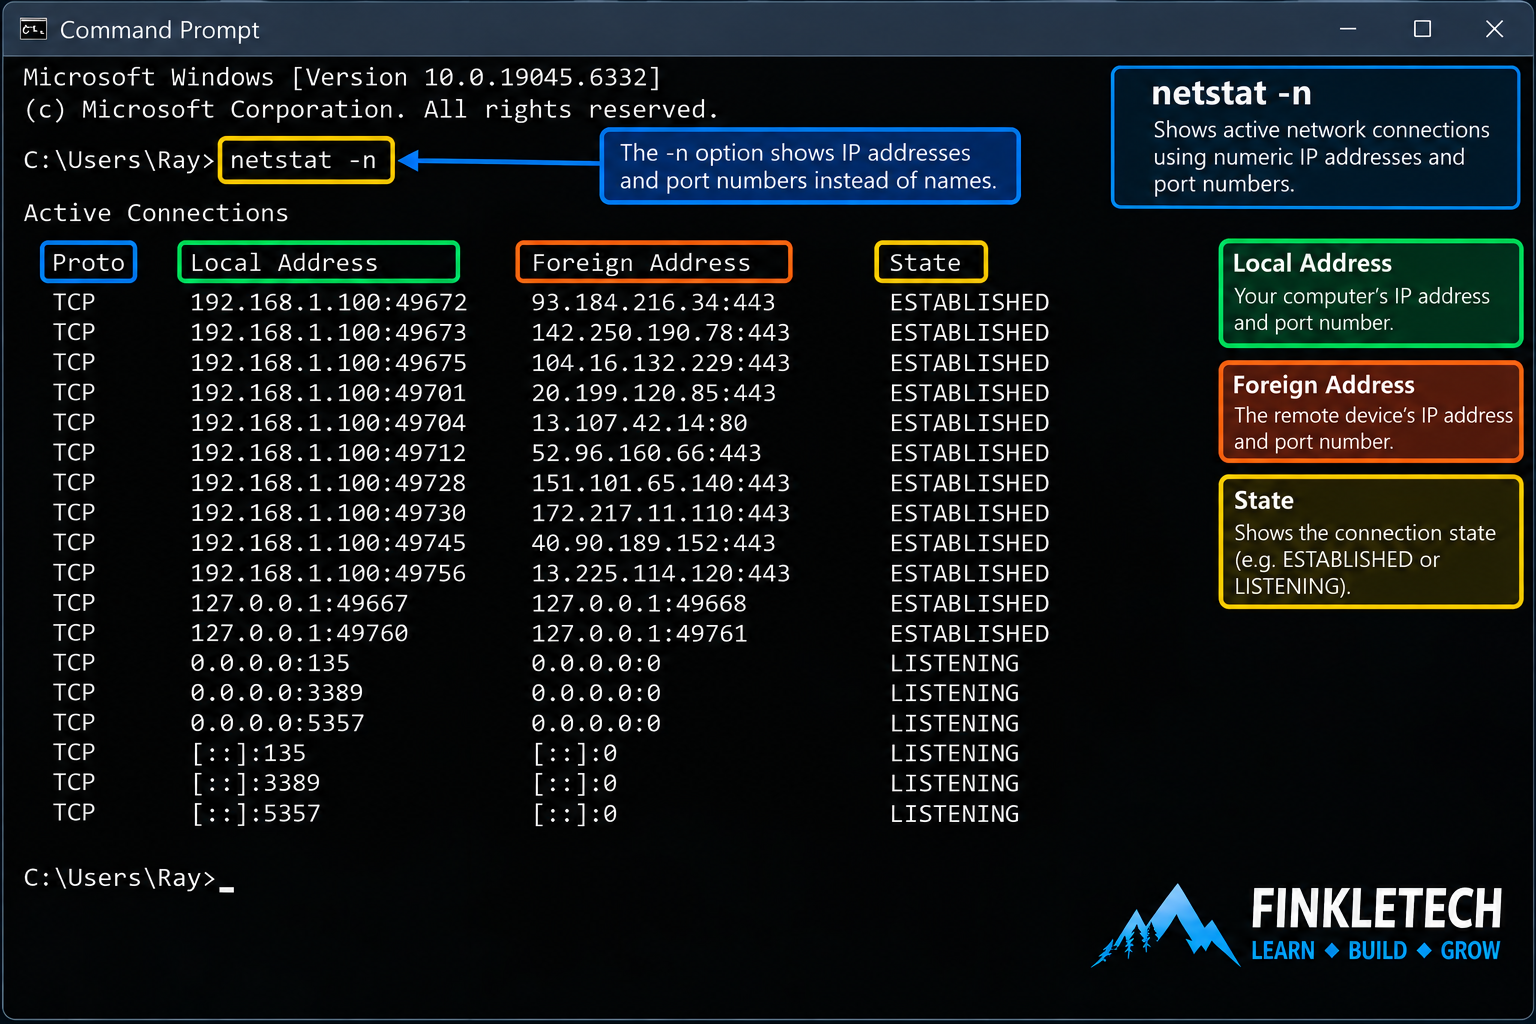
Blur or crop anything that feels too specific. You do not need to publish every remote IP address your computer contacted. It is enough to show a clean example of port numbers and connection states.
Also, be responsible with port testing. This lab uses basic connection checks for learning. Do not scan networks you do not own. Do not run aggressive tests against public systems. Keep this lab simple, safe, and educational.
Step 1: Open Command Prompt and Run Netstat
Open Command Prompt.
Run:
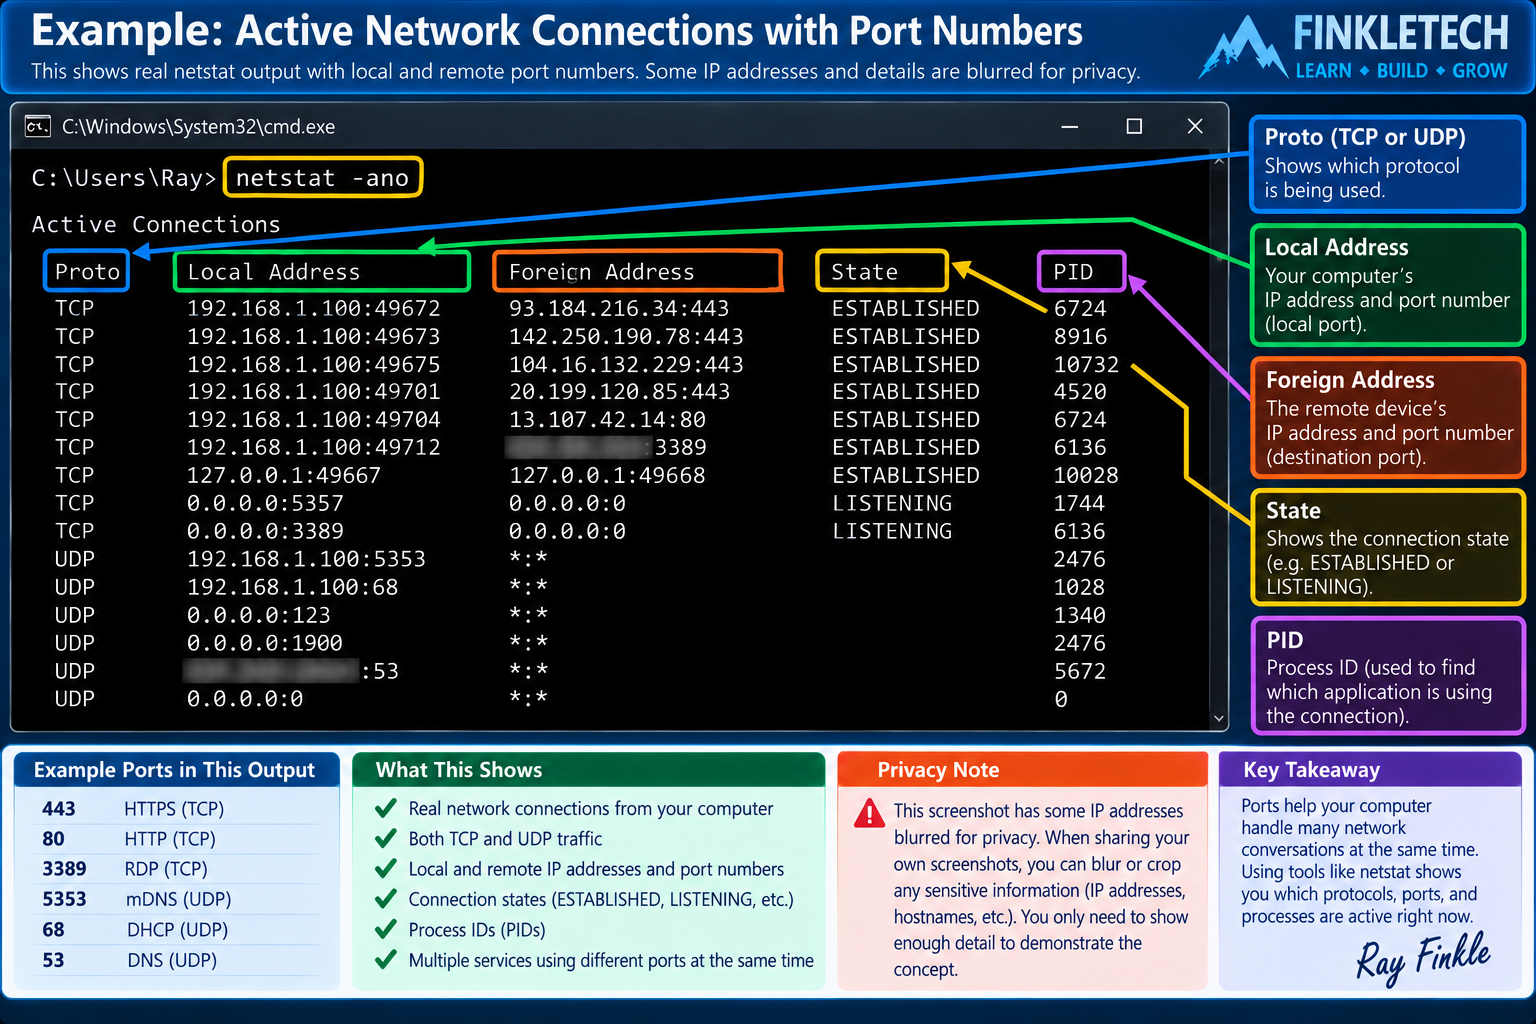
netstat
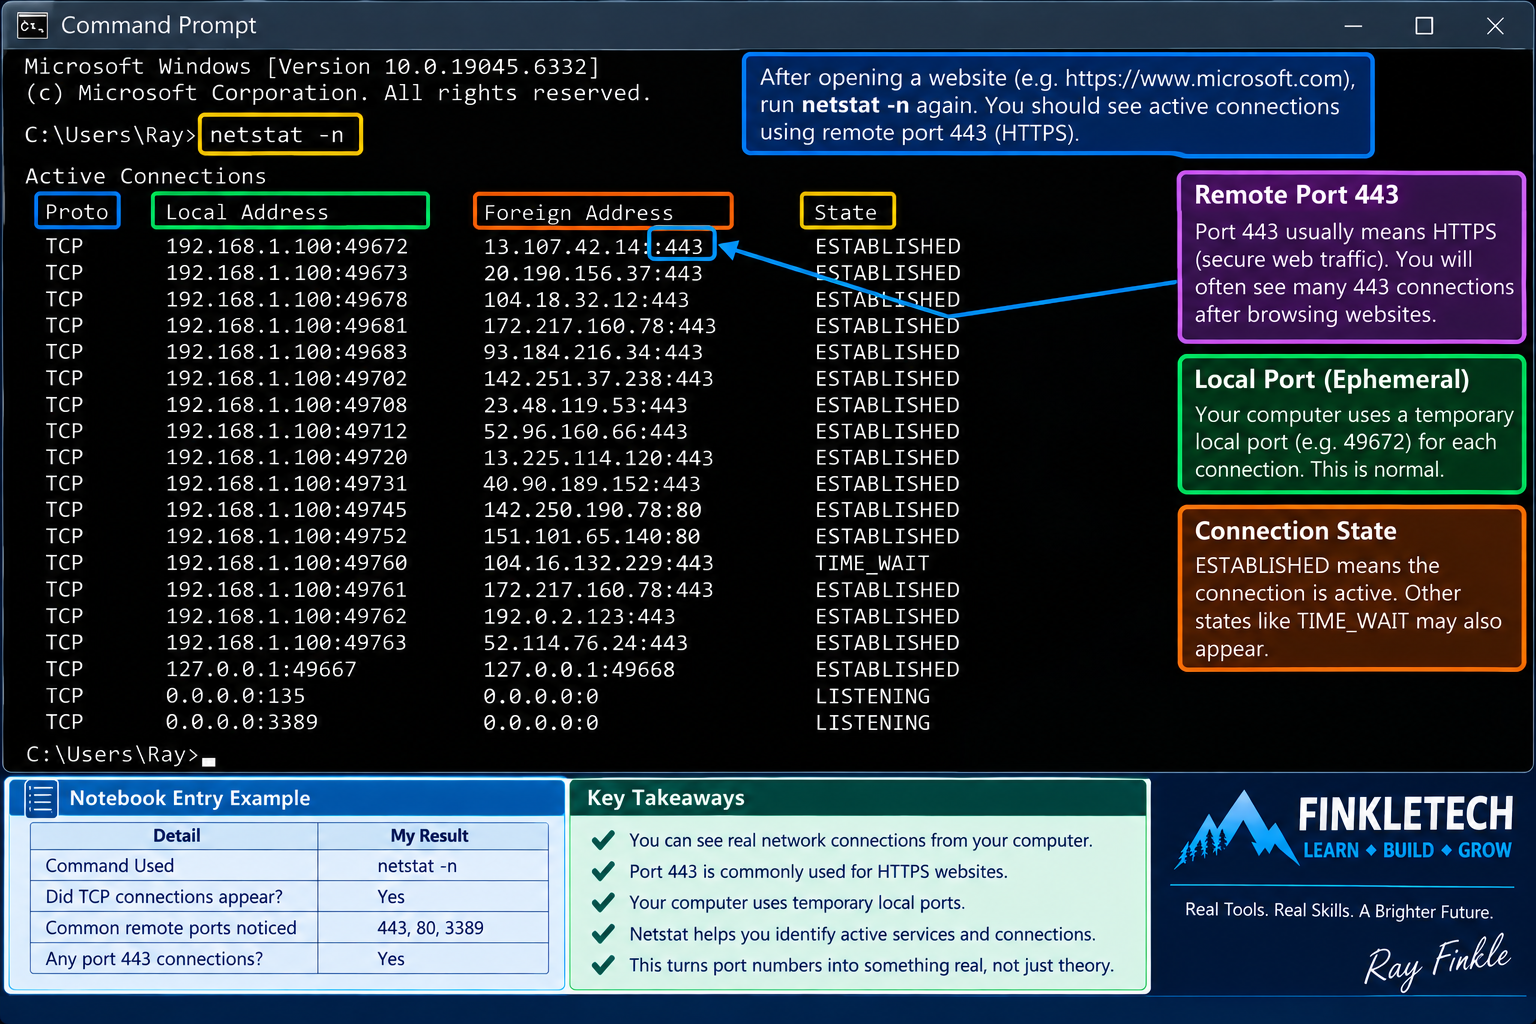
You may see active TCP connections. The output usually includes local addresses, foreign addresses, and connection states.
Now run:
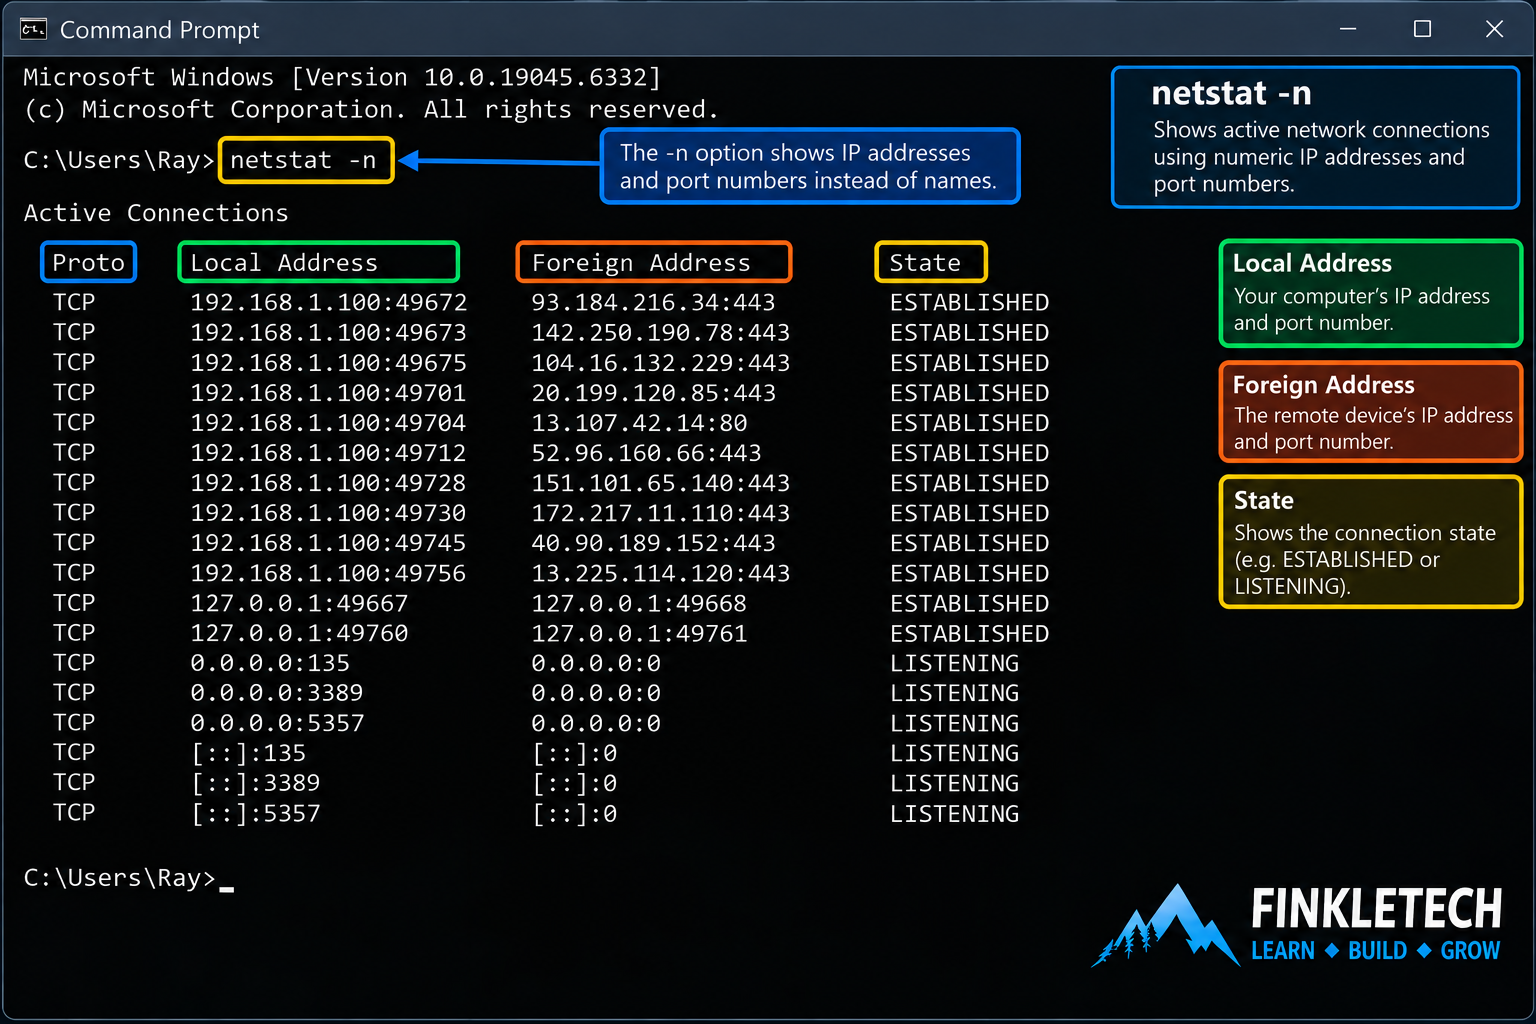
netstat -n
The -n option shows addresses and port numbers numerically instead of trying to resolve names.
In your notebook, record:
| Detail | My Result |
|---|---|
| Command Used | netstat -n |
| Did TCP connections appear? | [Yes/No] |
| Common remote ports noticed | [Insert examples] |
| Any port 443 connections? | [Yes/No] |
Step 2: Understand the Netstat Output
Look carefully at one line of output.
You may see something like:
TCP 192.168.1.10:50123 93.184.216.34:443 ESTABLISHED
This means your computer has a TCP connection from a local IP address and local port to a remote IP address and remote port. The remote port 443 usually means HTTPS.
The local port, such as 50123, is usually a temporary port chosen by your computer. This is normal. Your computer needs local ports to keep track of different conversations.
The connection state tells you what is happening. For example, ESTABLISHED means the connection is active. Other states may appear during opening, closing, or waiting stages.
This is where ports become real. You are no longer just memorizing “443 equals HTTPS.” You are seeing your computer actually using port 443 during normal network activity.
Step 3: Open a Website and Check Netstat Again
Open a browser and visit a normal public website.
Then return to Command Prompt and run:
netstat -n
Look for new or active connections using port 443.
Most modern websites use HTTPS, so you will likely see remote connections ending in :443.
In your notebook, write:
| Test | Result |
|---|---|
| Website visited | [Use clean public example] |
| Did port 443 appear? | [Yes/No] |
| What connection state appeared? | [ESTABLISHED/TIME_WAIT/etc.] |
| What did this show? | [Insert explanation] |
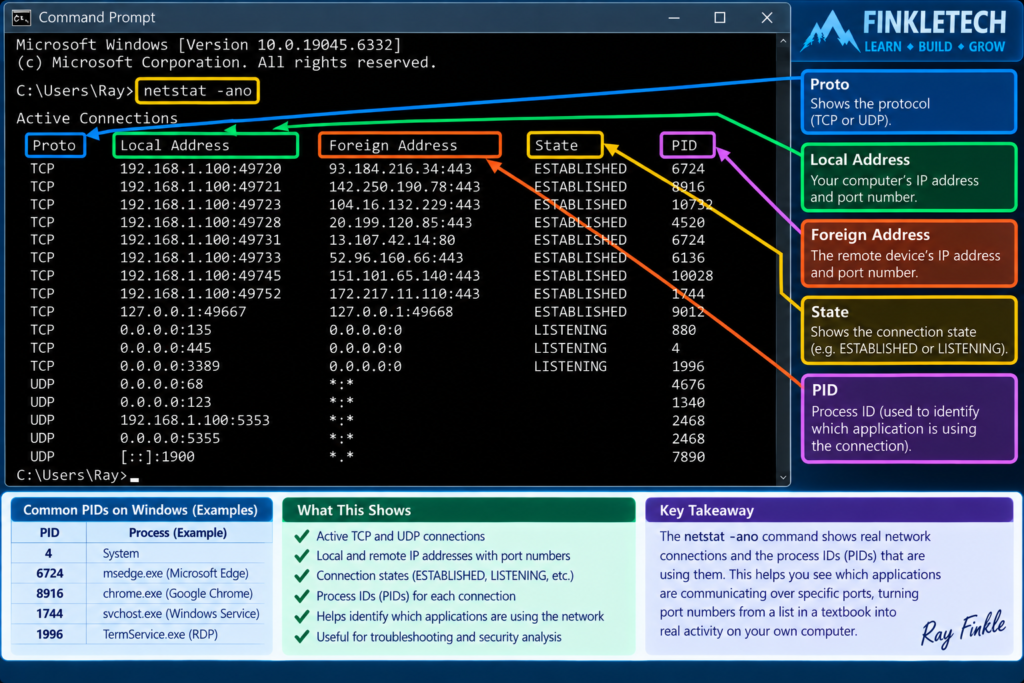
Step 4: Use Netstat with Process IDs
Now run:
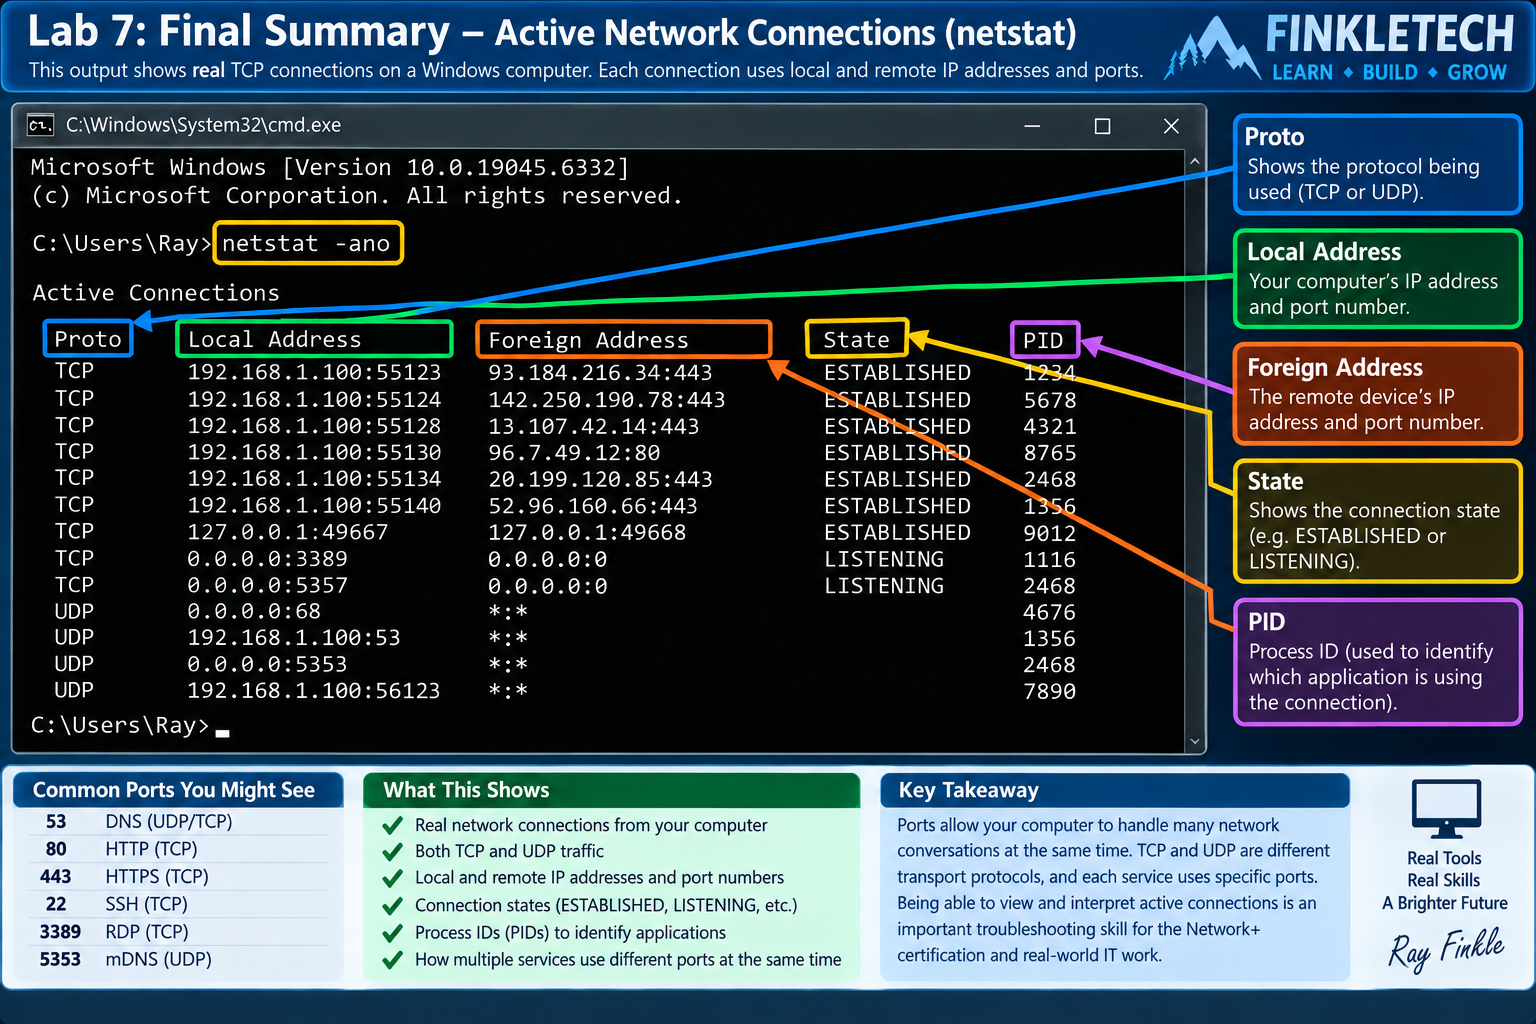
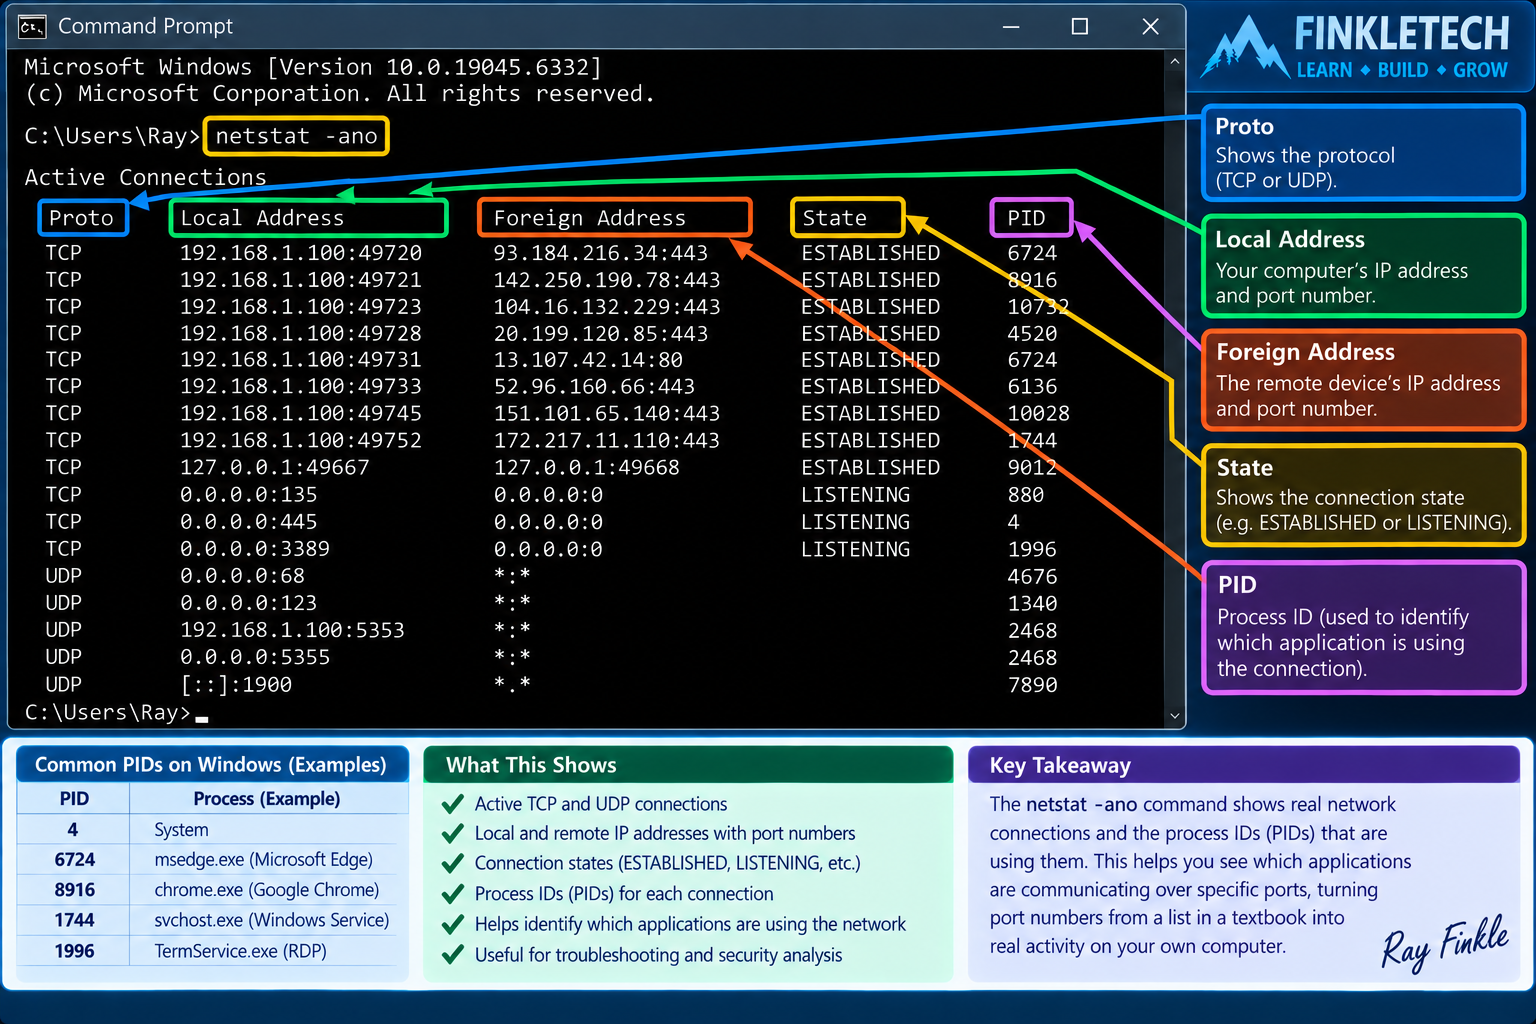
netstat -ano
This shows active connections with process IDs, also called PIDs.
A PID is a number that identifies a running process on your computer. This can help connect network activity to an application.
In your notebook, record:
| Detail | My Result |
|---|---|
| Command Used | netstat -ano |
| Did PID column appear? | [Yes/No] |
| Example remote port | [Insert result] |
| Example connection state | [Insert result] |
Do not worry about identifying every process yet. The goal is simply to see that network connections can be associated with processes.
Step 5: Optional — Match a PID to a Process
Open Task Manager.
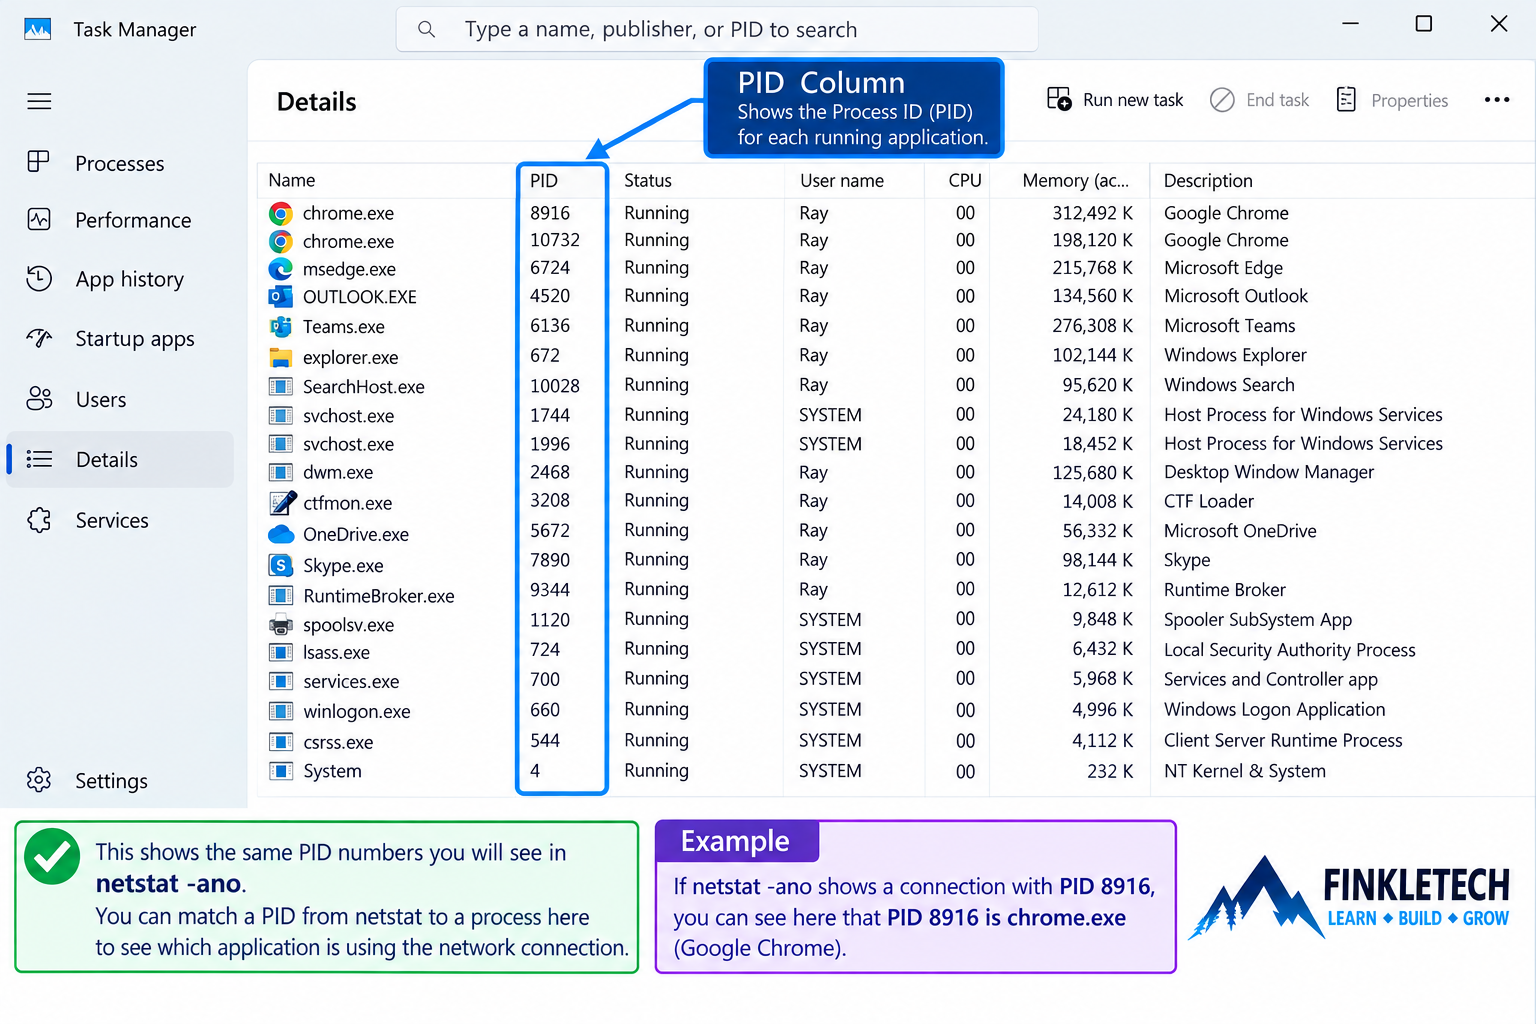
Go to the Details tab.
Look for the PID column. If you do not see it, you may need to right-click the column headers and enable PID.
Try to match one PID from netstat -ano to a process in Task Manager.
In your notebook, write:
| PID | Process Name | Notes |
|---|---|---|
| [Insert PID] | [Insert process] | [Browser/app/system process/etc.] |
This step helps you understand that network connections are not random. They are created by processes running on your computer.
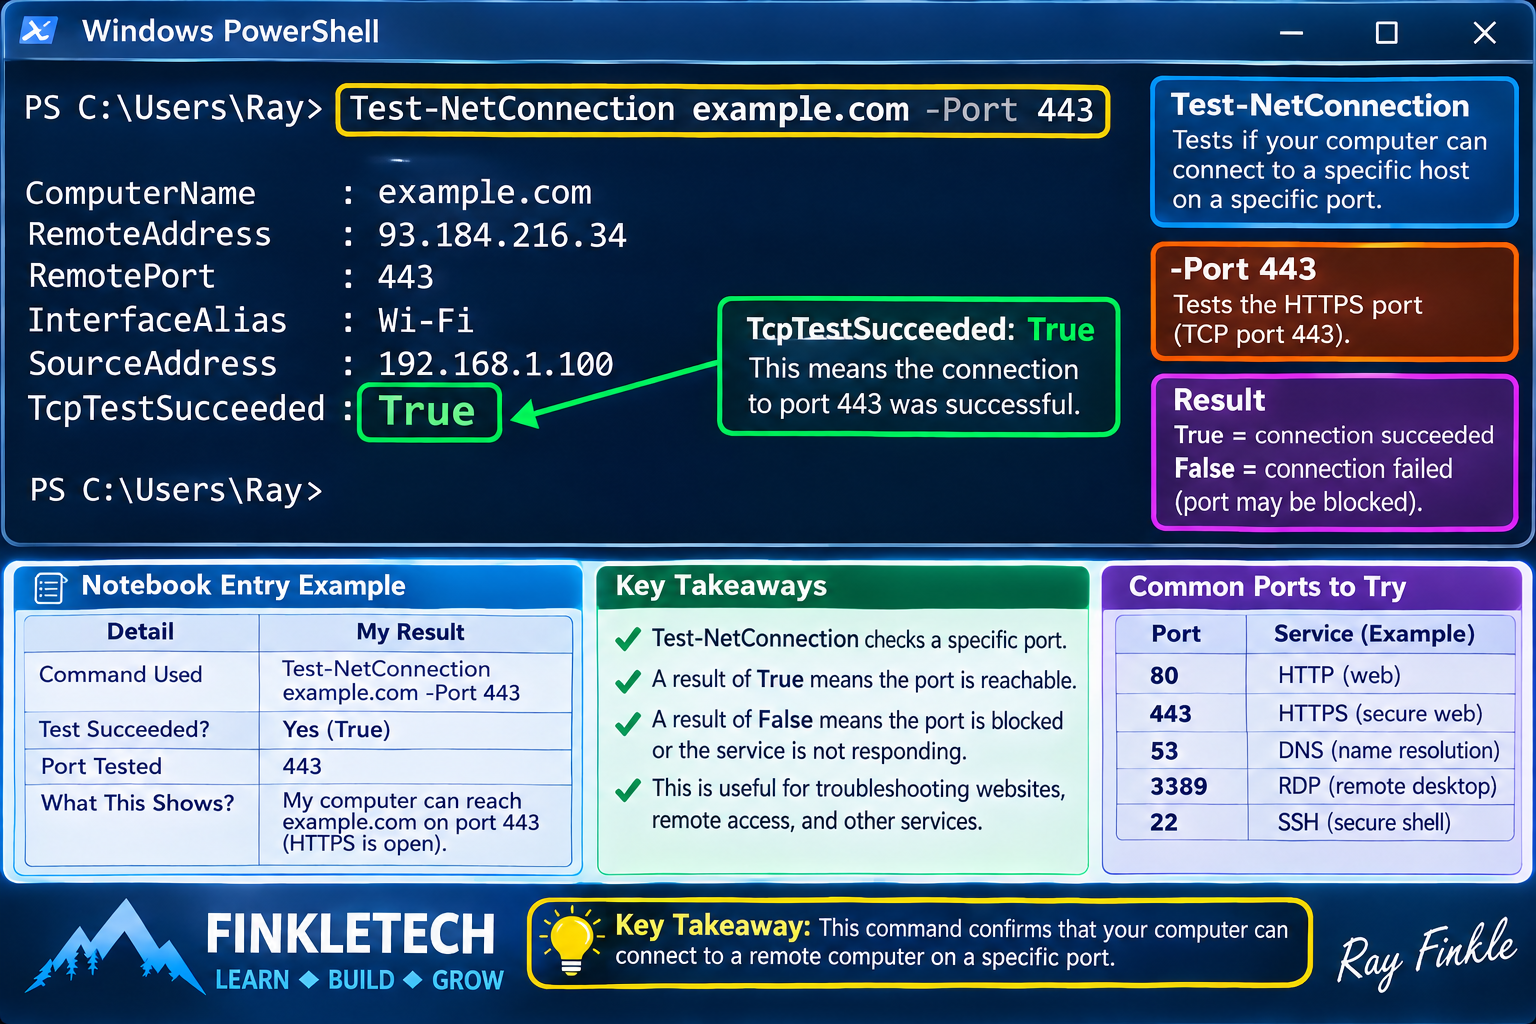
Step 6: Test a Port with PowerShell
Open PowerShell.
Run:
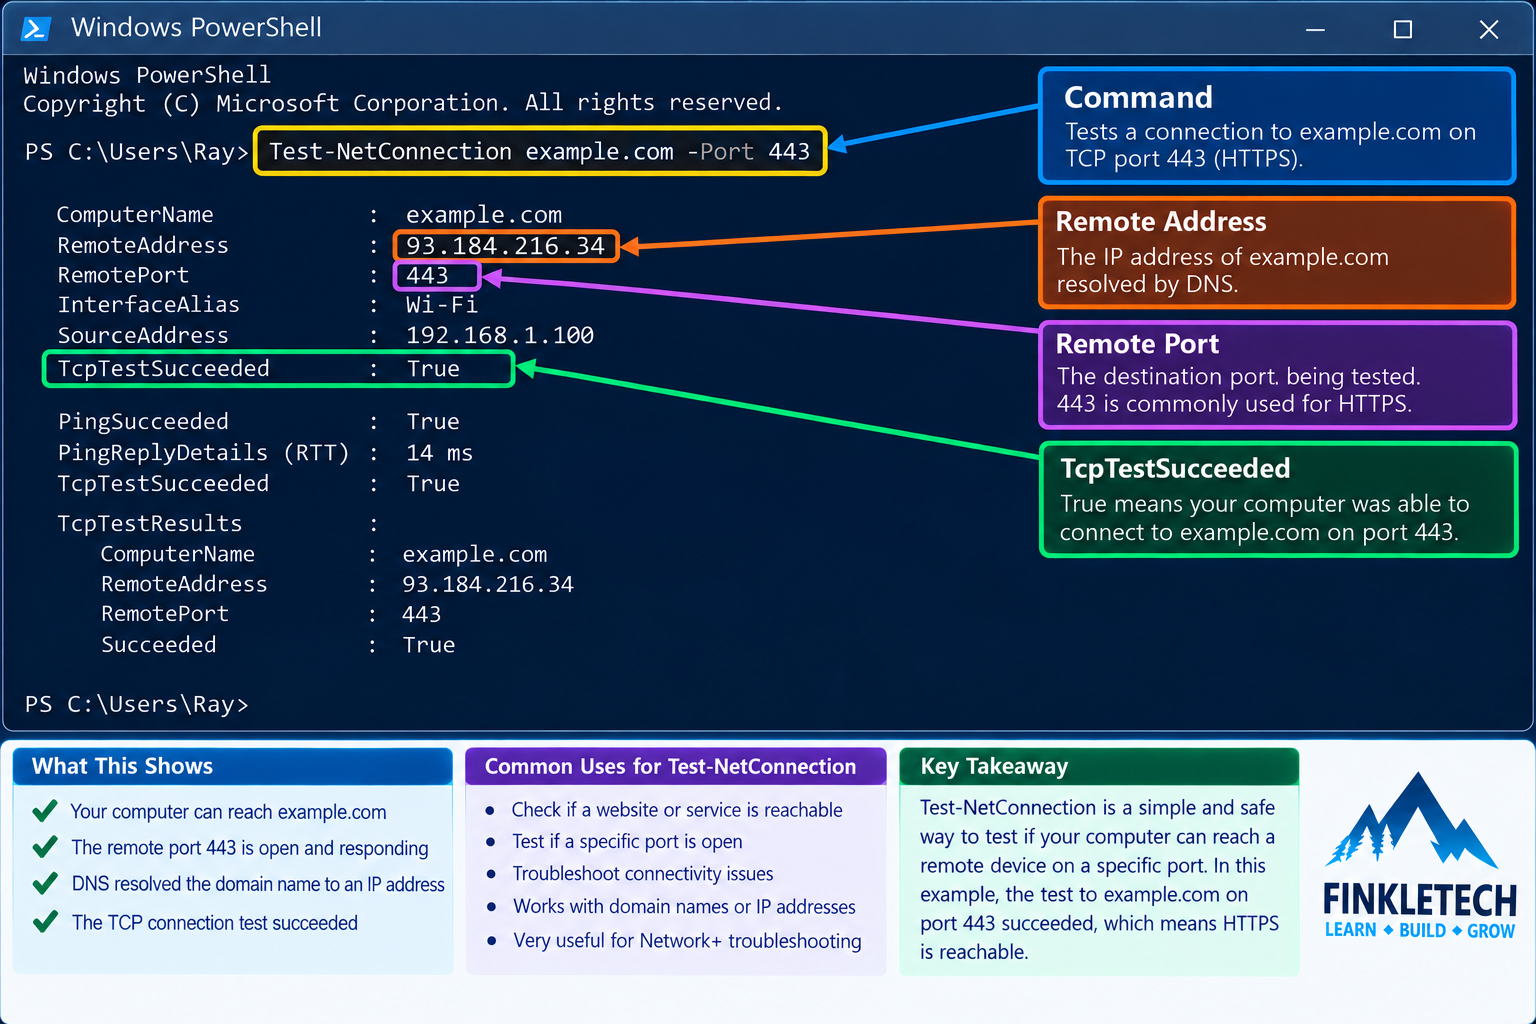
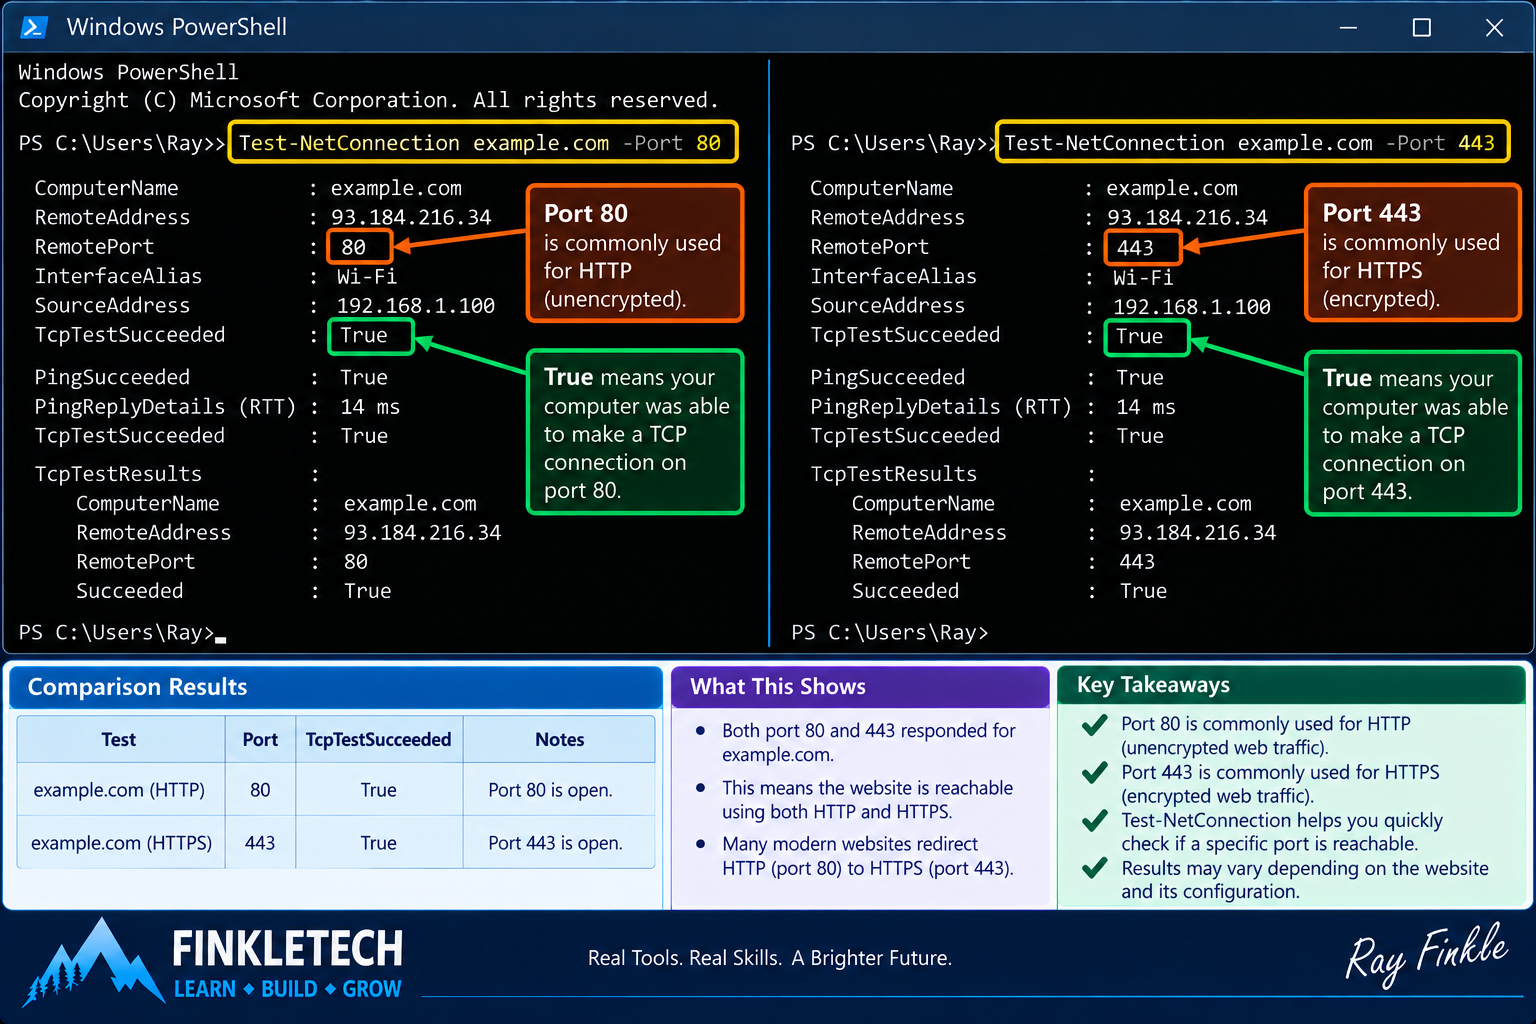
Test-NetConnection example.com -Port 443
This tests whether your computer can reach example.com on TCP port 443.
You should see output showing whether the TCP test succeeded.
In your notebook, record:
| Test | My Result |
|---|---|
| Command Used | Test-NetConnection example.com -Port 443 |
| Remote Port | 443 |
| TcpTestSucceeded | [True/False] |
| What This Suggests | [Insert explanation] |
If the test succeeds, your computer was able to make a TCP connection to that destination port. If it fails, the service may not be reachable, the port may be blocked, the destination may not respond, or there may be another network issue.
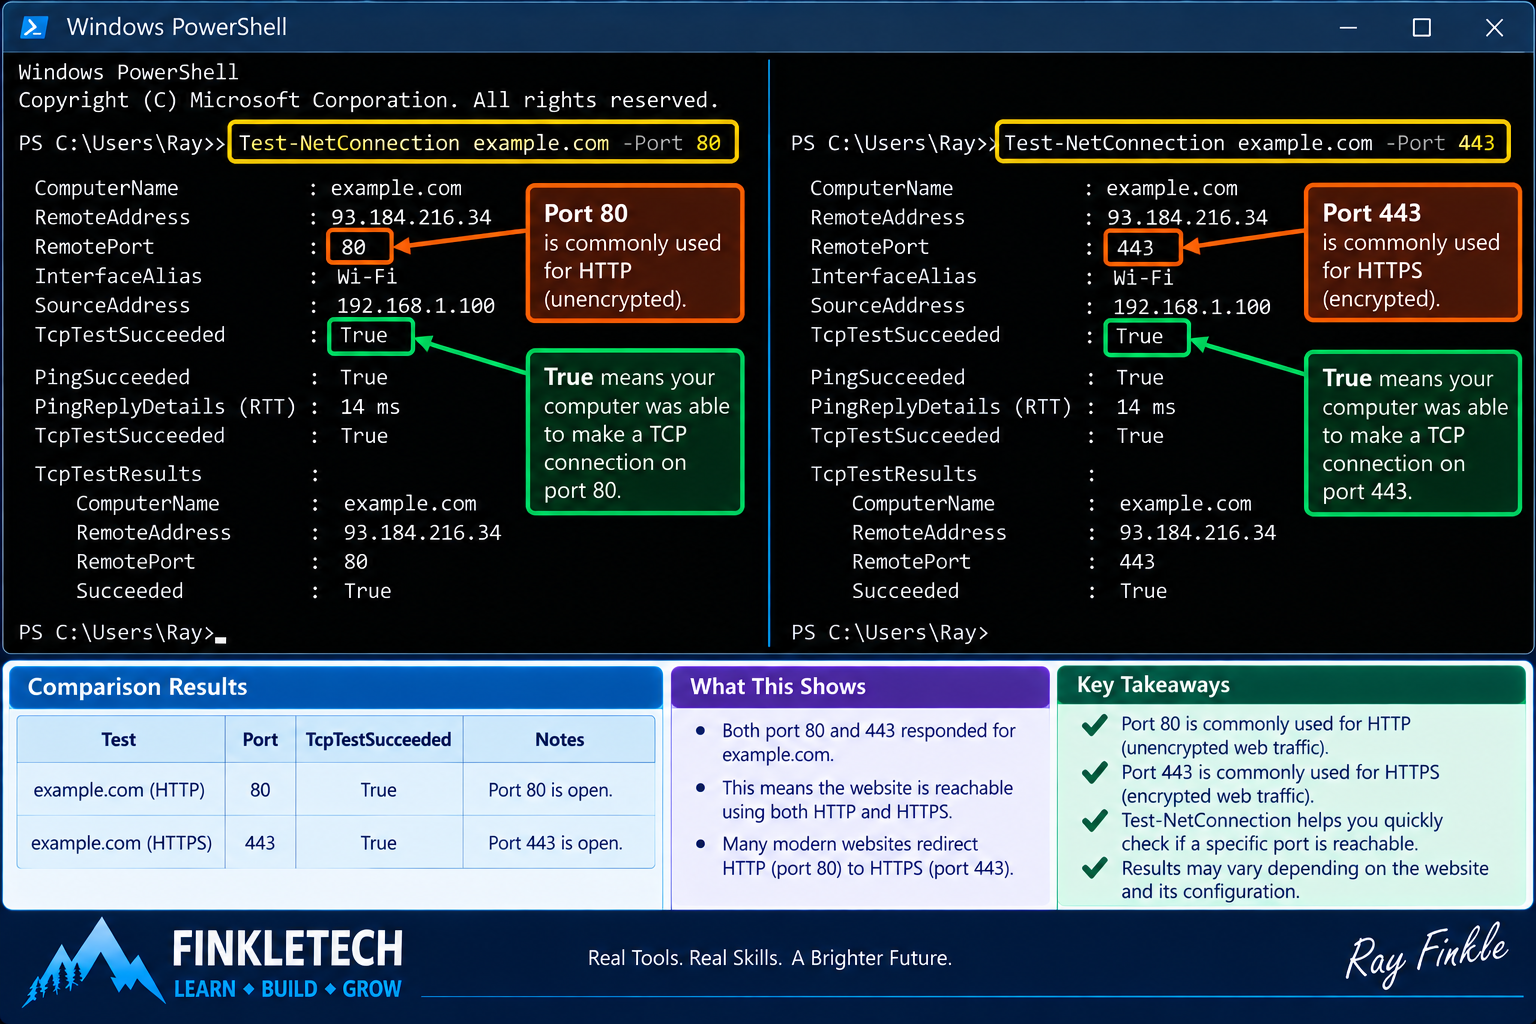
Step 7: Compare Port 443 and Port 80
Now test:
Test-NetConnection example.com -Port 80
Then compare it with:
Test-NetConnection example.com -Port 443
Port 80 is commonly used for HTTP. Port 443 is commonly used for HTTPS.
Depending on the destination, both may respond, one may respond, or behavior may vary. Modern websites often prefer HTTPS.
In your notebook, create this table:
| Destination | Port Tested | Common Service | Result |
|---|---|---|---|
| example.com | 80 | HTTP | [True/False] |
| example.com | 443 | HTTPS | [True/False] |
Step 8: Understand What a Port Test Does and Does Not Prove
A successful port test tells you that your computer could reach that destination on that TCP port. That is useful, but it does not prove everything about the application is working.
For example, reaching port 443 tells you the TCP connection succeeded. It does not prove the website content loaded correctly, the certificate is valid, the application is healthy, or the user experience is perfect.
A failed port test is also a clue, not an instant final answer. The destination may not listen on that port. A firewall may block it. The service may be down. The address may be wrong. Your network may block the traffic.
This is good troubleshooting thinking. Commands give evidence. They do not replace judgment.
Step 9: Optional — Look at UDP Connections
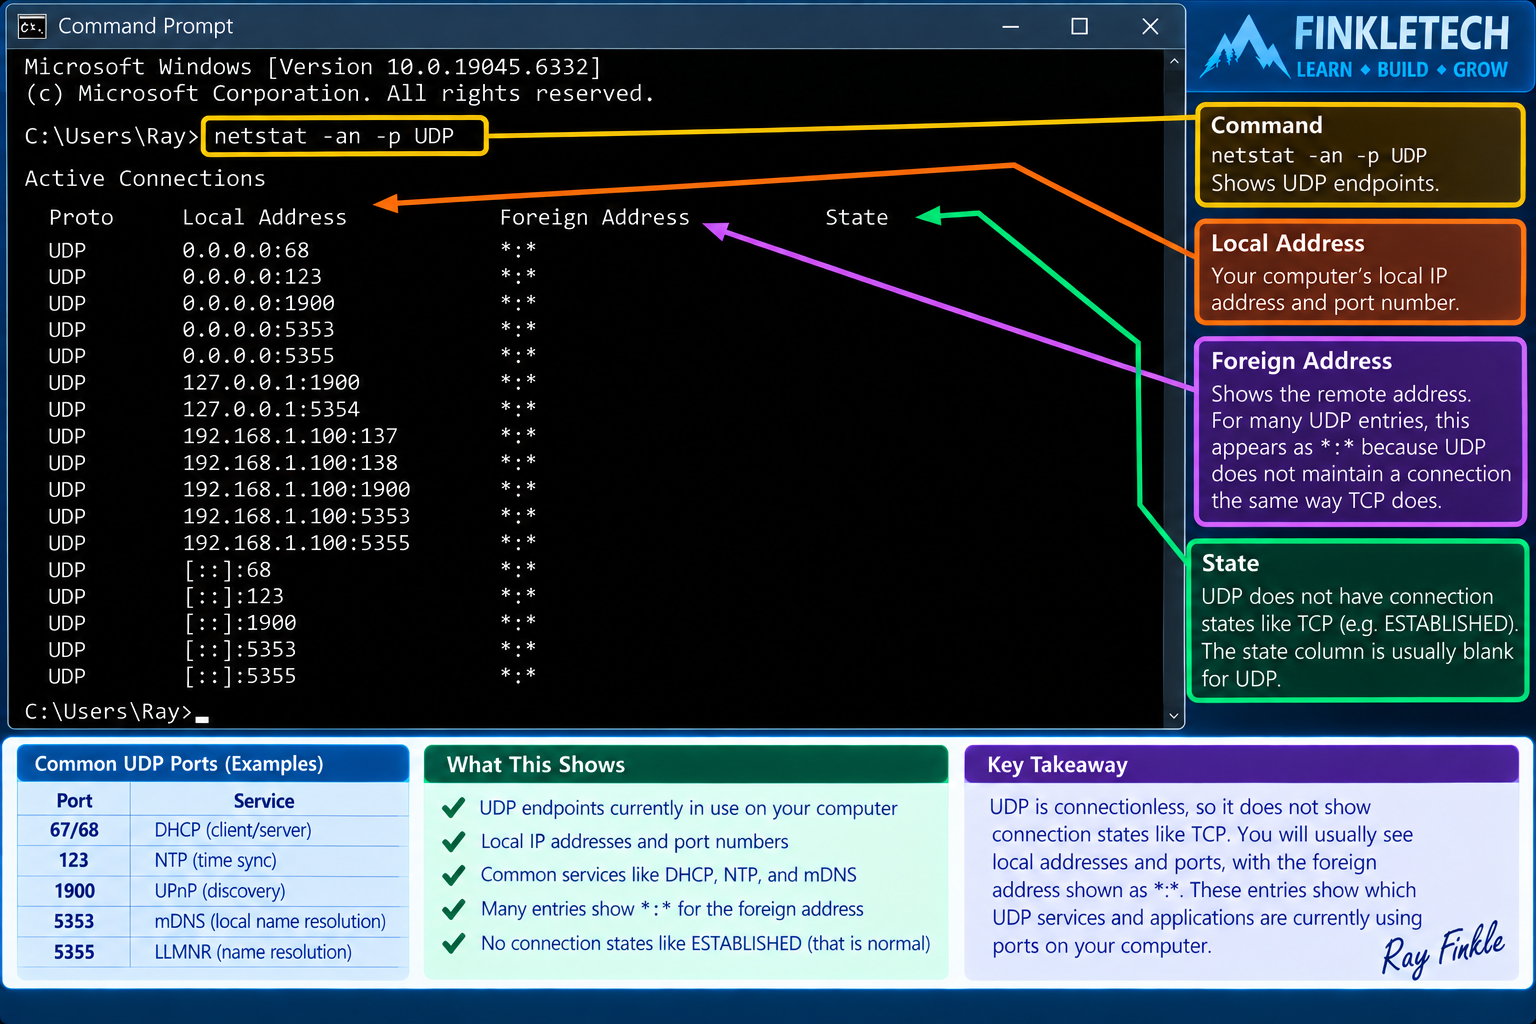
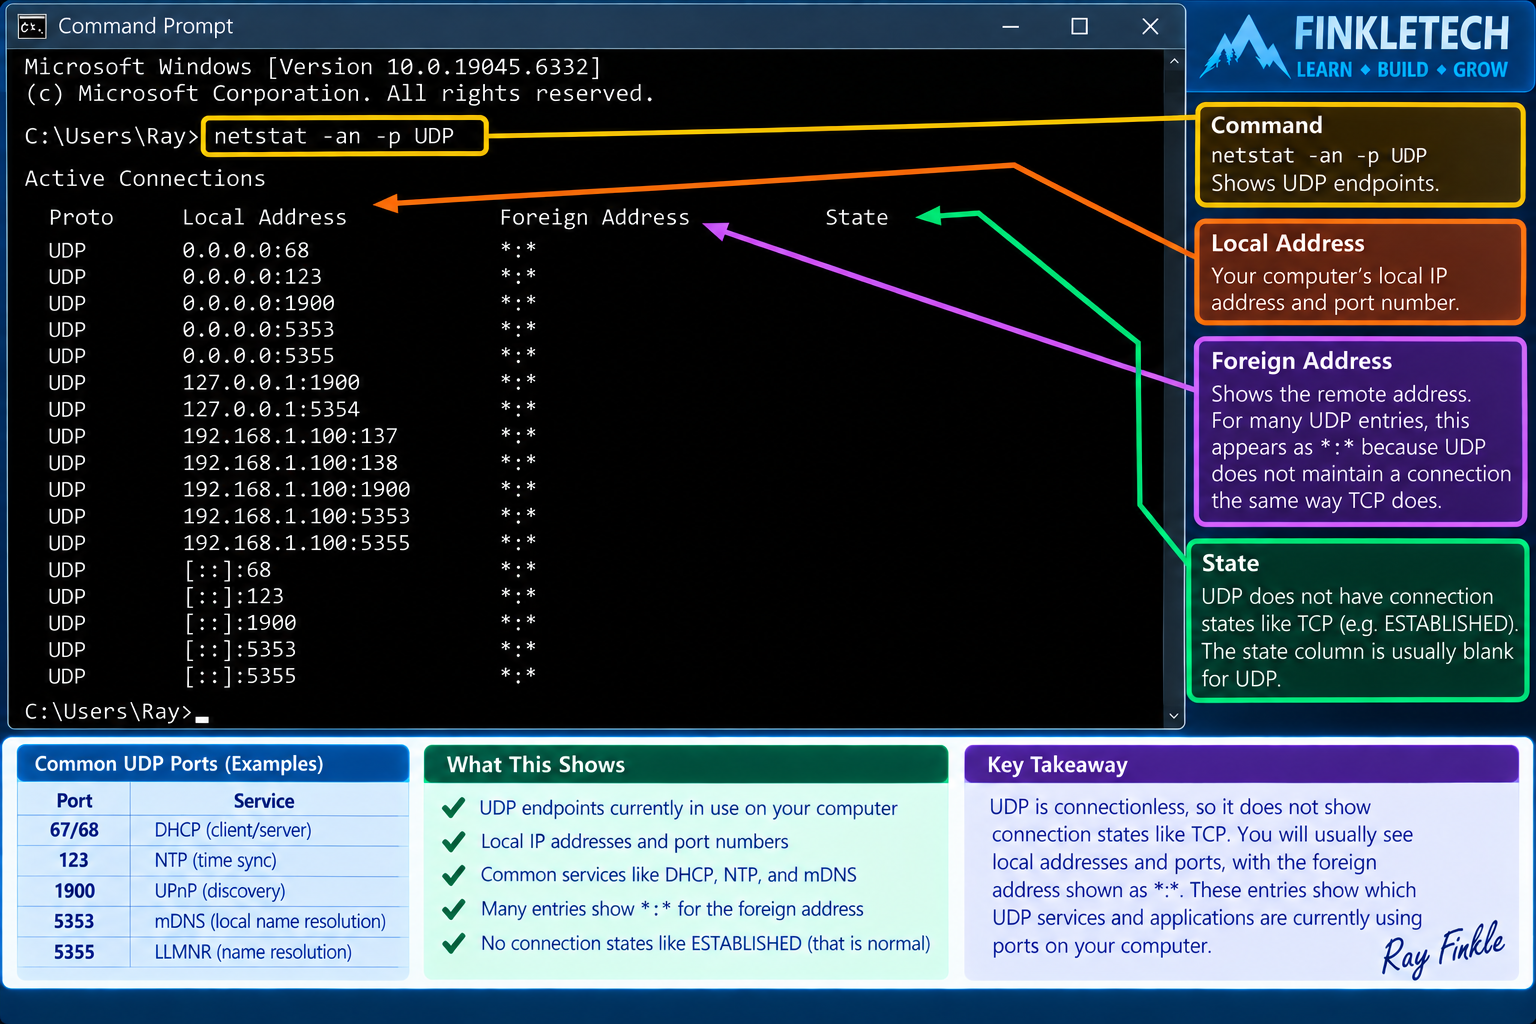
UDP is different from TCP, and it does not have connection states like TCP.
In Command Prompt, run:
netstat -an -p UDP
This shows UDP endpoints.
You may see local addresses and ports, but you usually will not see ESTABLISHED the way you do with TCP.
In your notebook, record:
| Detail | My Result |
|---|---|
| Command Used | netstat -an -p UDP |
| Did UDP entries appear? | [Yes/No] |
| Any familiar ports? | [Insert examples] |
| Did UDP show ESTABLISHED states? | [Yes/No] |
This step helps reinforce the difference between TCP and UDP. TCP has connection states. UDP does not work the same way.
Step 10: Connect Ports to Common Services
Now add to your port memory table.
Start with a few core examples:
| Port | Protocol | Service | Why It Matters |
|---|---|---|---|
| 20/21 | TCP | FTP | File transfer |
| 22 | TCP | SSH | Secure remote shell |
| 25 | TCP | SMTP | Sending email |
| 53 | UDP/TCP | DNS | Name resolution |
| 67/68 | UDP | DHCP | Automatic IP assignment |
| 80 | TCP | HTTP | Web traffic |
| 110 | TCP | POP3 | Email retrieval |
| 143 | TCP | IMAP | Email retrieval |
| 443 | TCP | HTTPS | Secure web traffic |
| 3389 | TCP/UDP | RDP | Remote Desktop |
Do not try to memorize this whole table in one minute. The better method is to connect each port to a story. DNS matters because names need addresses. DHCP matters because devices need network settings. HTTPS matters because secure web traffic is everywhere. RDP matters because remote desktop access can be useful but risky if exposed poorly.
That is how you remember ports: connect the number to a use case.
Step 11: Optional Wireshark Connection
If you want to connect this lab to Wireshark, start a capture and then visit a website.
Use this Wireshark display filter:
tcp.port == 443
This shows TCP traffic using port 443.
You can also try:
tcp.port == 80
Only do this with normal browsing traffic and clean examples. Review screenshots carefully before publishing.
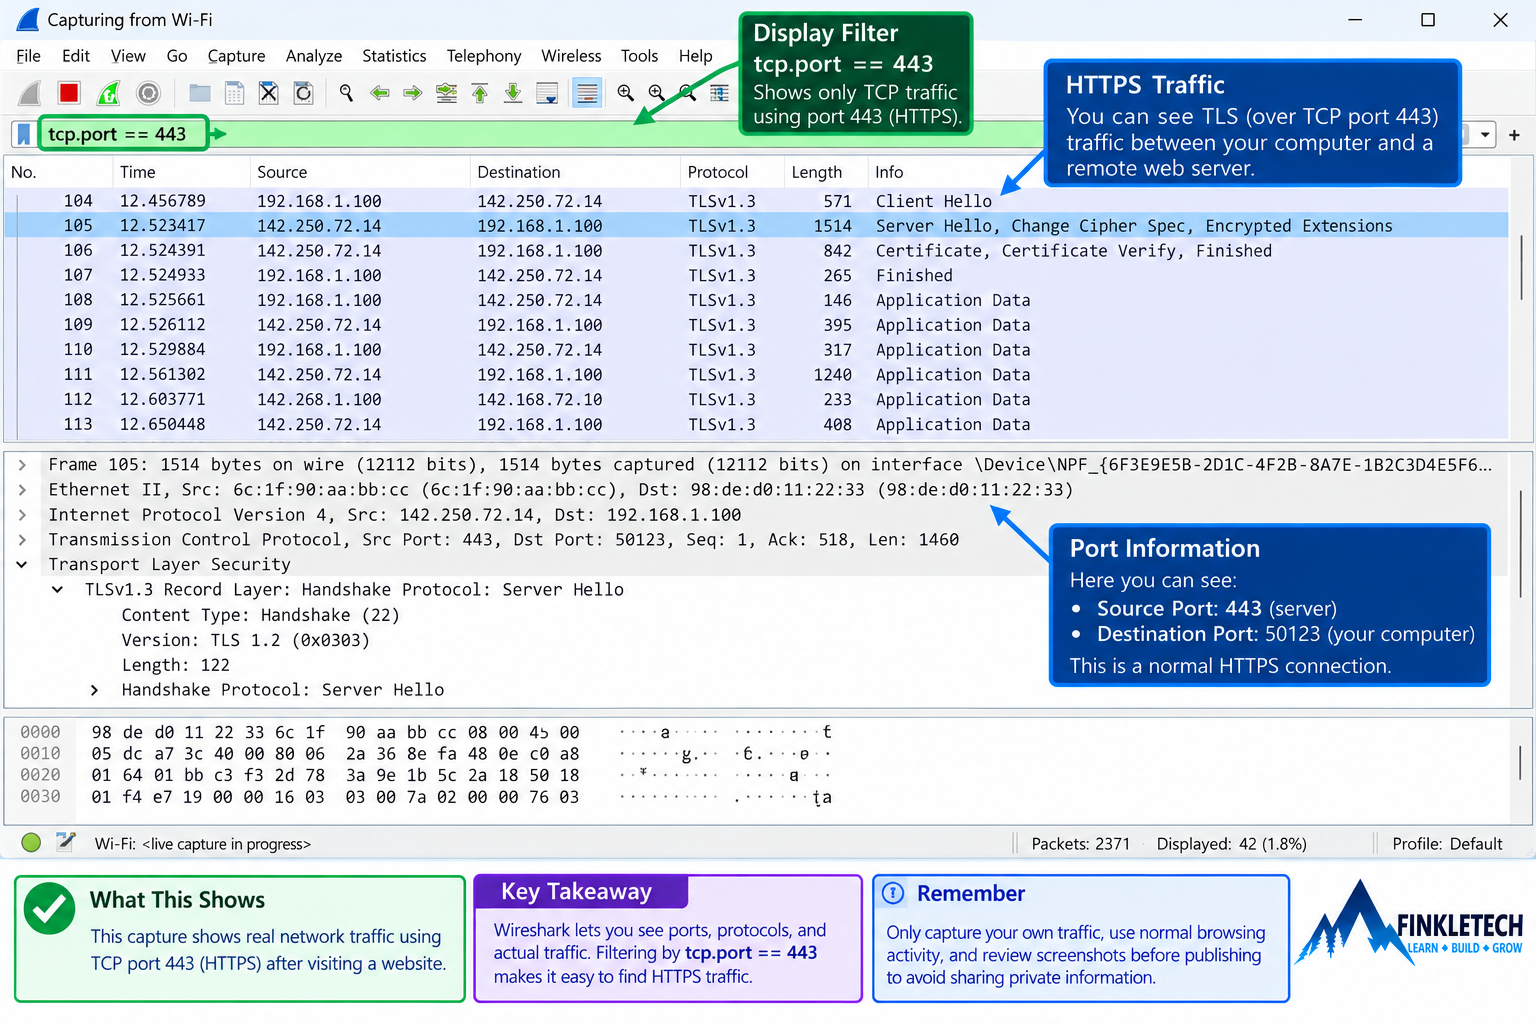
This optional step ties together Labs 5 and 7. Netstat shows active connections from the operating system side. Wireshark shows packets on the network side.
Step 12: Write Your Lab Notes
Use this section after you complete the lab.
My FinkleTech Lab Notes
For this lab, I used my [laptop/desktop] connected through [Wi-Fi/Ethernet]. I started by running netstat -n to view active TCP connections and port numbers. After opening a website, I looked for connections using port 443, which is commonly used for HTTPS traffic.
I also used netstat -ano to view process IDs and tested ports with PowerShell using Test-NetConnection. This helped me understand that ports are not just numbers to memorize. They are part of how computers organize different network conversations.
One thing I noticed during this lab was [insert what stood out]. This helped me connect common Network+ port numbers to real traffic on my own computer.
What Your Results Mean
If you saw TCP connections with remote port 443, your computer was likely communicating with HTTPS services. That is normal during modern web browsing.
If Test-NetConnection succeeded on port 443, your computer could reach that destination using that TCP port. If it failed, that result would be a clue to investigate further.
If UDP output looked different from TCP output, that is expected. UDP does not establish connections the same way TCP does.
The big lesson is that ports identify services and conversations. They help computers handle many types of traffic at the same time.
Common Problems
If netstat shows too much output, close extra browser tabs and apps, then try again.
If you do not see port 443, open a normal HTTPS website and rerun the command quickly.
If Test-NetConnection is not recognized, make sure you are using Windows PowerShell. Some environments may behave differently.
If a port test fails, do not instantly assume your computer is broken. The destination may not allow that port, a firewall may block it, or the service may not be listening.
If the output contains many remote IP addresses, crop or blur screenshots before publishing.
Network+ Concepts Practiced
This lab practices several important Network+ concepts:
- TCP
- UDP
- ports
- protocols
- common port numbers
- local ports
- remote ports
- ephemeral ports
- connection states
netstatTest-NetConnection- process IDs
- firewalls and service reachability
- troubleshooting by port
- basic protocol awareness
The main skill is learning to connect port numbers to real services and real network behavior. That is much stronger than memorizing a list with no context.
Mini Review Questions
Use these questions after the lab to check your understanding.
- What does a port number help identify?
- What is TCP generally used for?
- What is UDP generally used for?
- What port is commonly used for HTTPS?
- What command can show active connections on Windows?
- What does
Test-NetConnection example.com -Port 443test? - Why might your computer use a temporary local port?
- Why should you avoid scanning networks you do not own?
Short Answers
- A port number helps identify a service or network conversation on a device.
- TCP is generally used for reliable, connection-oriented communication.
- UDP is generally used for lower-overhead, connectionless communication.
- HTTPS commonly uses TCP port 443.
netstatcan show active connections on Windows.- It tests whether your computer can reach
example.comusing TCP port 443. - Temporary local ports help your computer manage multiple network conversations at the same time.
- Scanning networks without permission can be intrusive, unauthorized, and unsafe.