
Lab 8: How to Test an Ethernet Cable and Understand Link Lights
Lab Goal
In this lab, you will learn how to inspect and test a basic Ethernet connection. You will check the physical cable, observe link lights, compare wired and wireless network behavior, and optionally use a cable tester if you have one.
This lab focuses on the physical side of networking. A lot of beginners jump straight into IP addresses, DNS, DHCP, and command-line troubleshooting, but sometimes the problem is much simpler. The cable may be loose. The connector may be damaged. The wrong port may be used. The link light may be off. The Ethernet adapter may be disabled.
By the end of this lab, you should understand how to inspect an Ethernet cable, what link lights can tell you, how to confirm whether a wired connection is active, and how physical-layer problems can cause higher-level network symptoms.
Before You Start: Use Your Networking Notebook
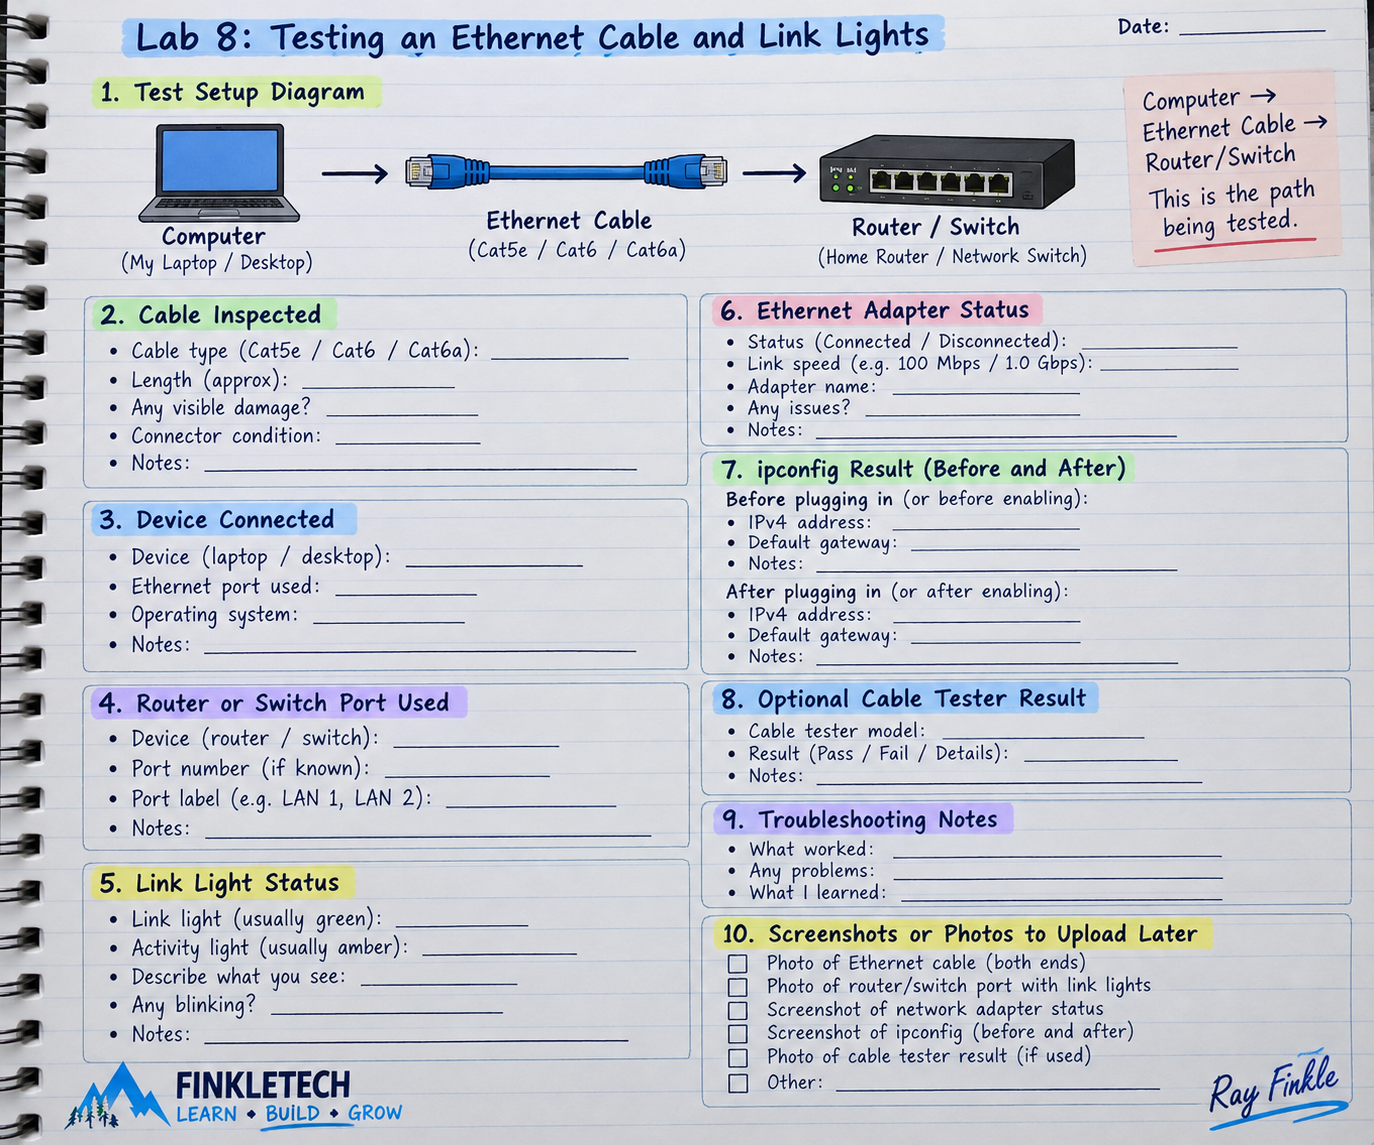
Open your networking notebook to a fresh page and write:
Lab 8: Testing an Ethernet Cable and Link Lights
Create sections for:
- cable inspected
- device connected
- router or switch port used
- link light status
- Ethernet adapter status
ipconfigresult before and after plugging in- optional cable tester result
- troubleshooting notes
- screenshots or photos to upload later
This is a good lab for combining written notes with real photos. You can take a picture of the Ethernet cable, the connector, the router or switch port, and the link lights. Those images will make the final page feel very original because they show your actual hands-on work.
In your notebook, leave room for a small diagram. Draw your test setup like this:
Computer → Ethernet Cable → Router/Switch
That simple little diagram matters. In troubleshooting, you always want to know the exact path being tested.
Why This Lab Matters
The physical layer is easy to overlook because it feels too basic. But in real troubleshooting, physical problems are common. A bad cable, loose connector, disabled port, damaged RJ45 clip, or unplugged switch can make a network connection fail before IP addressing even matters.
This is an important mindset for Network+ study. Networking is layered. If the physical connection is broken, then DHCP, DNS, TCP, and application troubleshooting may not even get a fair chance to work. You cannot fix a disconnected cable with nslookup.
Ethernet troubleshooting also builds technician discipline. Before blaming software, configuration, drivers, DNS, DHCP, or the ISP, check the obvious physical path. Is the cable plugged in? Are the link lights on? Is the right adapter active? Does the device show a wired connection?
This lab teaches that habit without overcomplicating it.
Quick Concept Refresher: What Is Ethernet?
Ethernet is a common wired networking technology used to connect devices in local networks. A typical home Ethernet setup uses twisted-pair copper cable with RJ45 connectors. You may see labels such as Cat5e, Cat6, or Cat6a printed on the cable jacket.
Ethernet is commonly used to connect desktop computers, routers, switches, access points, game consoles, smart TVs, network printers, and servers. Compared with Wi-Fi, Ethernet is usually more stable, lower latency, and less affected by interference.
That does not mean Ethernet is always better for every situation. Wi-Fi is convenient. Ethernet is dependable. A good technician understands both.
For this lab, you are not trying to become a cabling expert. You are learning how to inspect a basic wired connection and confirm whether the link is active.
Quick Concept Refresher: What Are Link Lights?
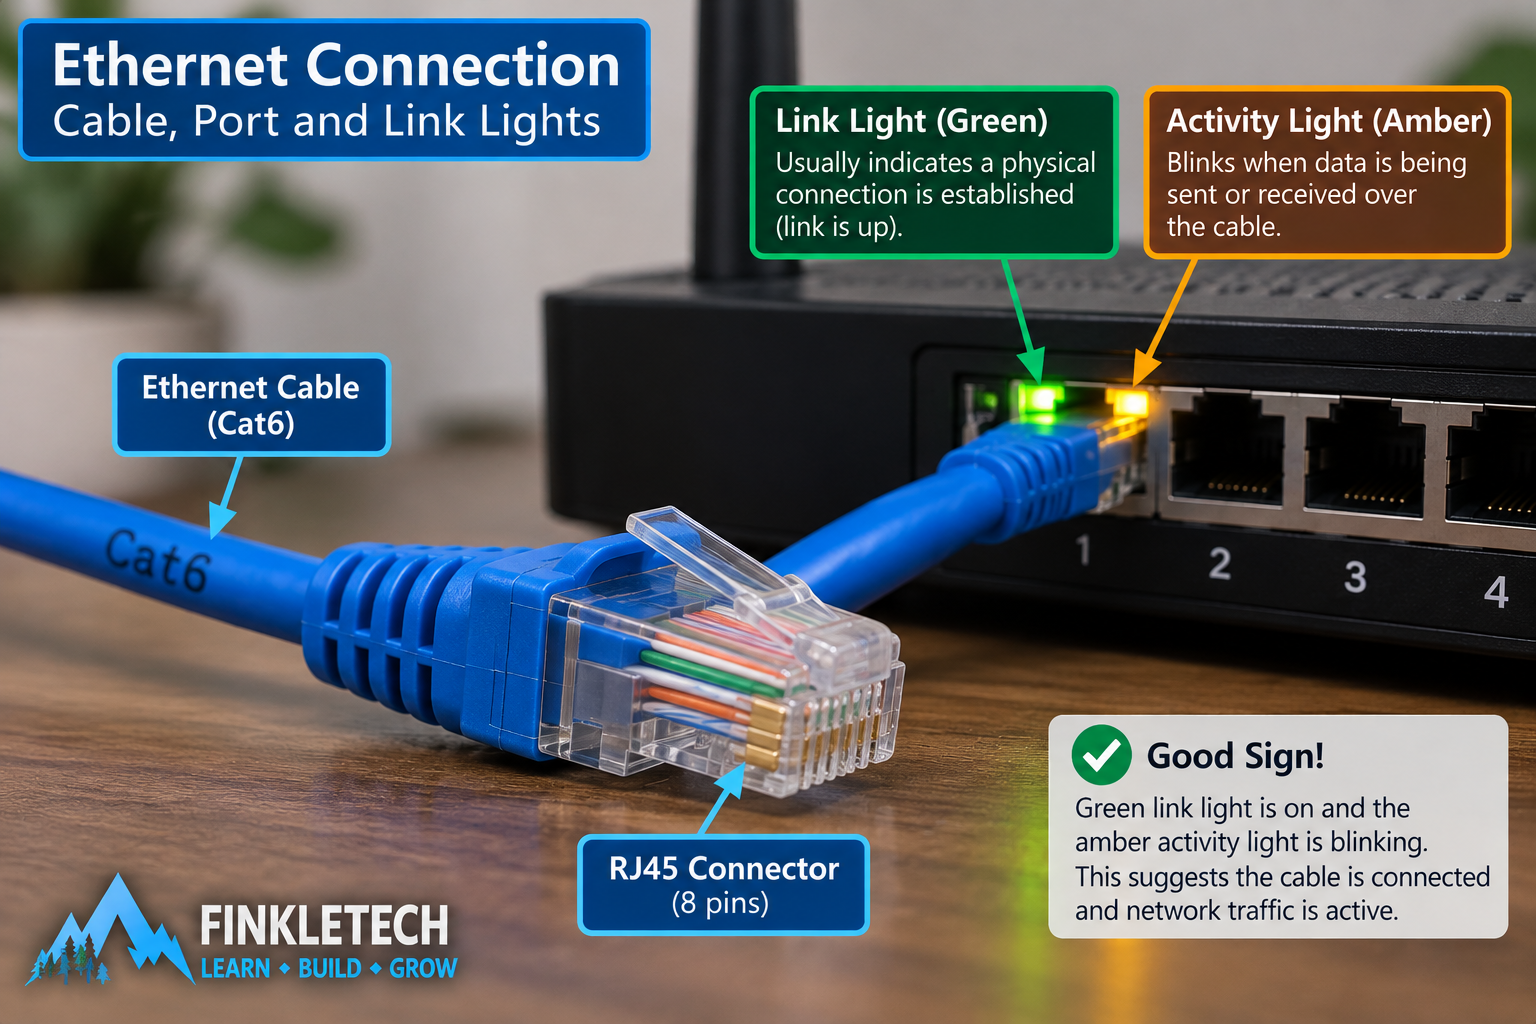
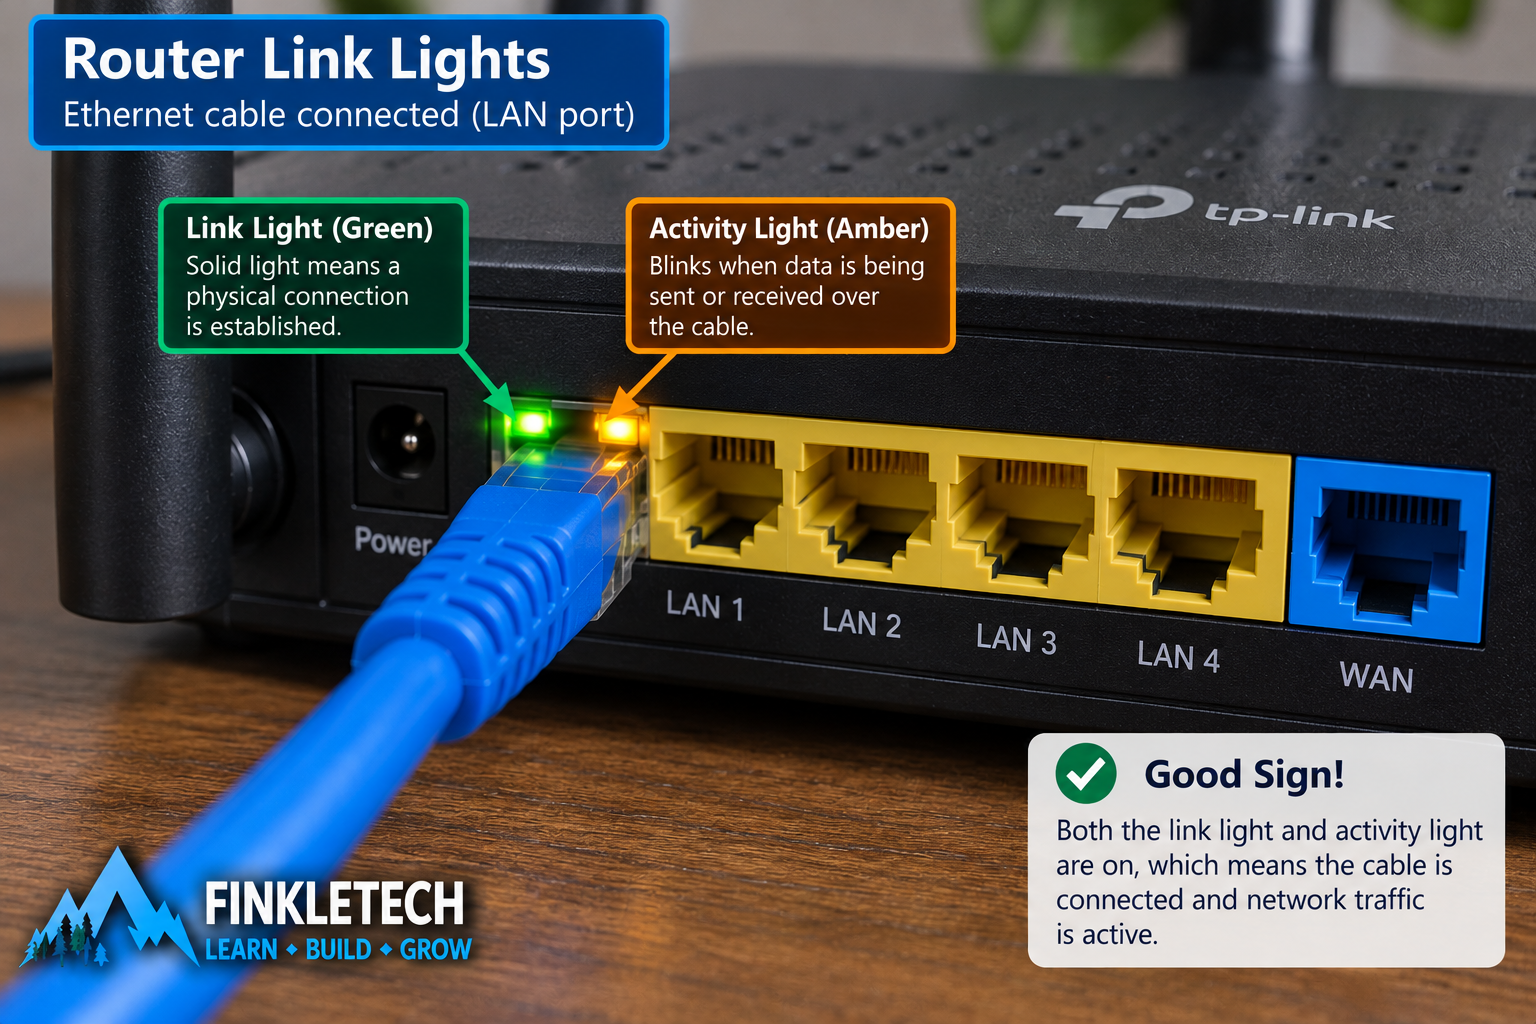
Most Ethernet ports have small lights near the port. These are often called link lights or activity lights.
The exact meaning depends on the device, but generally:
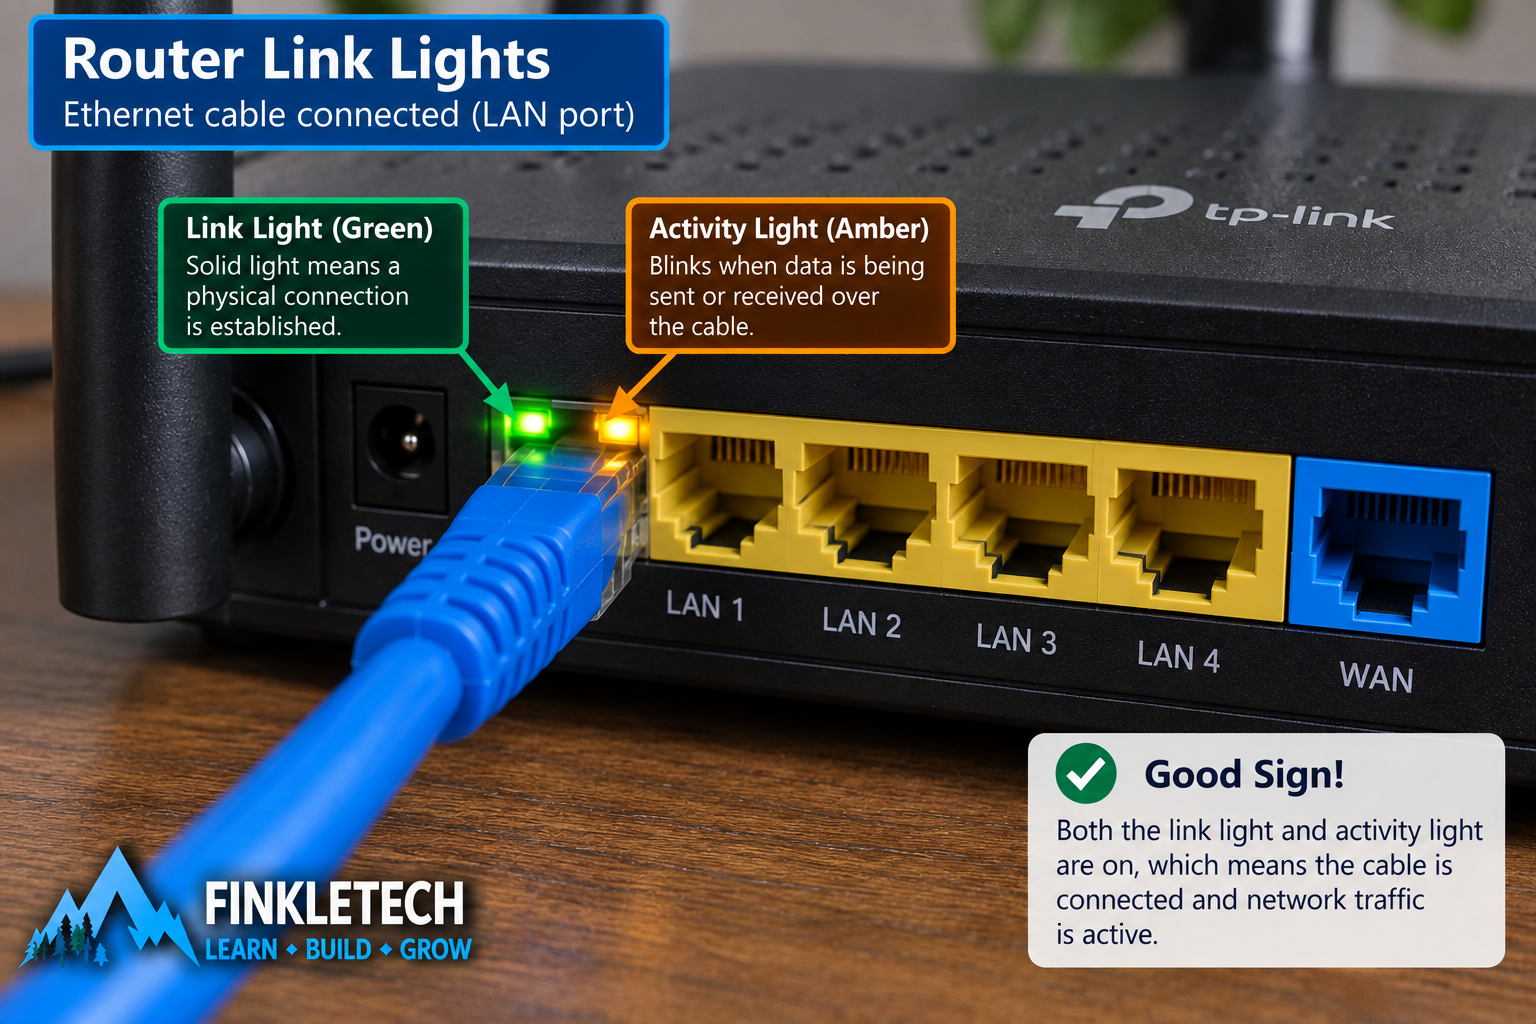
- a solid light often means a link is established
- a blinking light often means network activity
- different colors may indicate speed, such as 100 Mbps or 1 Gbps
- no light may mean no link, bad cable, disabled port, powered-off device, or wrong connection
Do not assume every router, switch, or computer uses the same light pattern. Manufacturers vary. But link lights still give useful clues. If both ends of a cable are plugged in and there is no link light, something in the physical path may be wrong.
Tools Needed
You will need:
- a laptop or desktop with an Ethernet port, or a USB-to-Ethernet adapter
- Ethernet cable
- router or network switch
- Command Prompt
- your networking notebook
- phone or camera for photos
- optional cable tester
- optional second Ethernet cable for comparison
If your laptop does not have an Ethernet port, a USB-to-Ethernet adapter is fine. That is actually useful practice because many modern laptops need adapters for wired networking.
Safety and Privacy Note Before Publishing Photos and Screenshots
Before publishing photos, check what is visible in the background. Router labels can show Wi-Fi names, passwords, serial numbers, MAC addresses, QR codes, or admin information. Do not publish those.
Before publishing screenshots, blur or crop device names, full MAC addresses, public IP information, or anything unrelated.
For this lab, safe public images could include:
- a close-up of an Ethernet cable end
- a cropped photo of link lights
- a notebook diagram
- a cropped Windows Ethernet status screen
- a cropped
ipconfigresult
Do not post the label on the bottom or back of your router unless you fully blur sensitive information.
Step 1: Inspect the Ethernet Cable
Start with the cable itself.
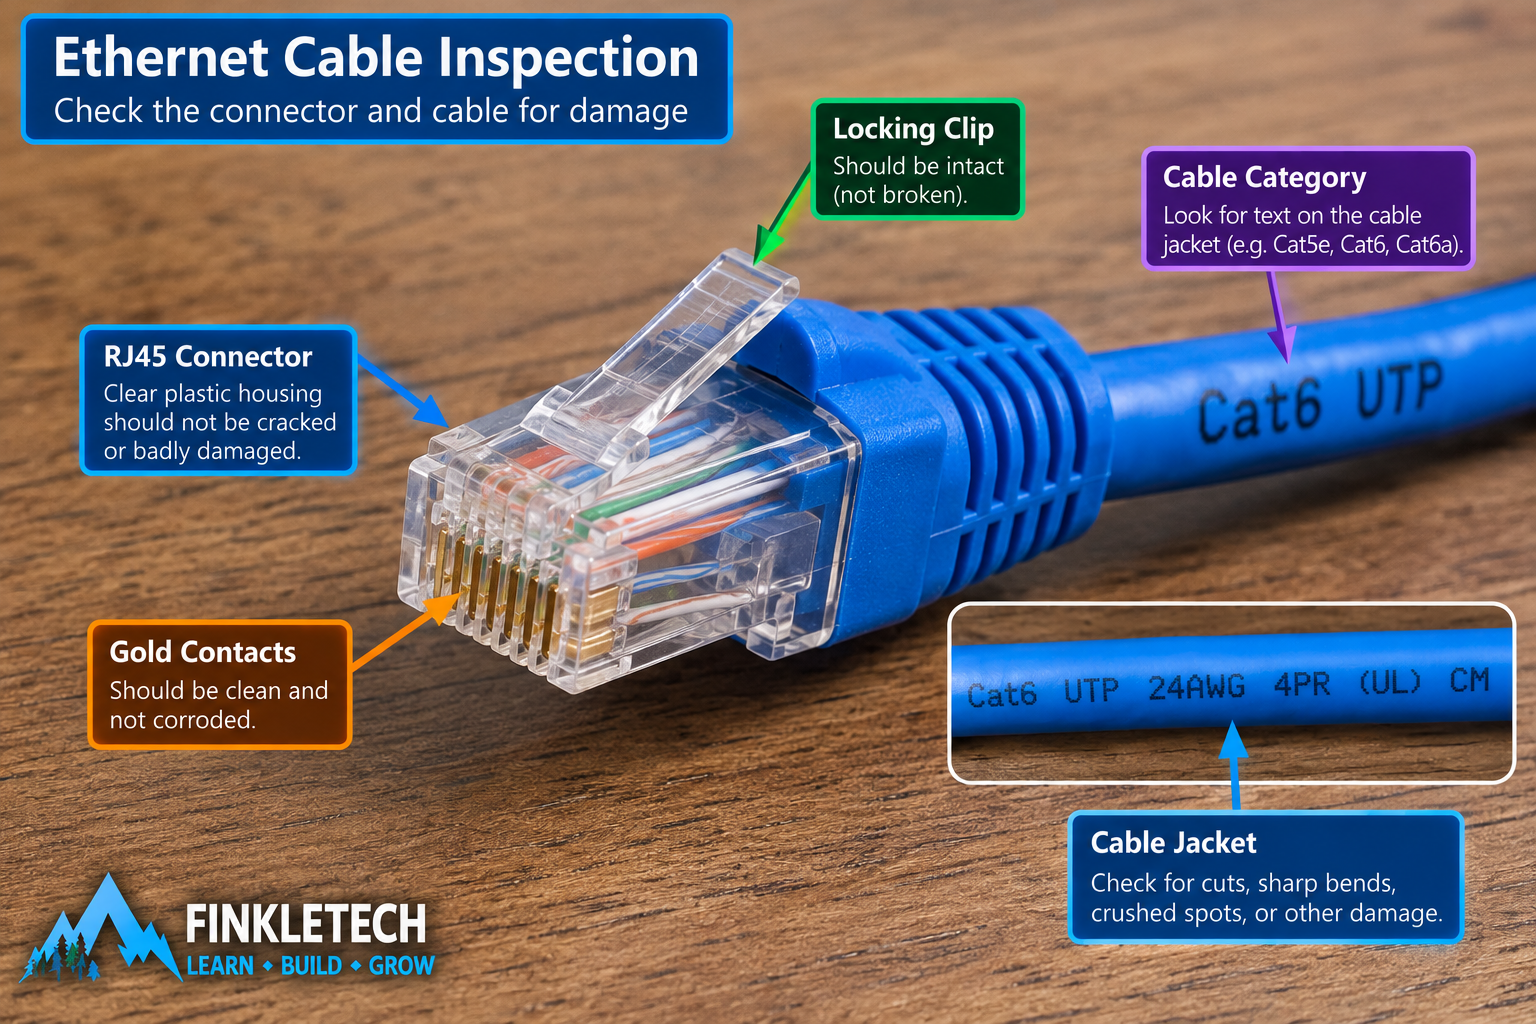
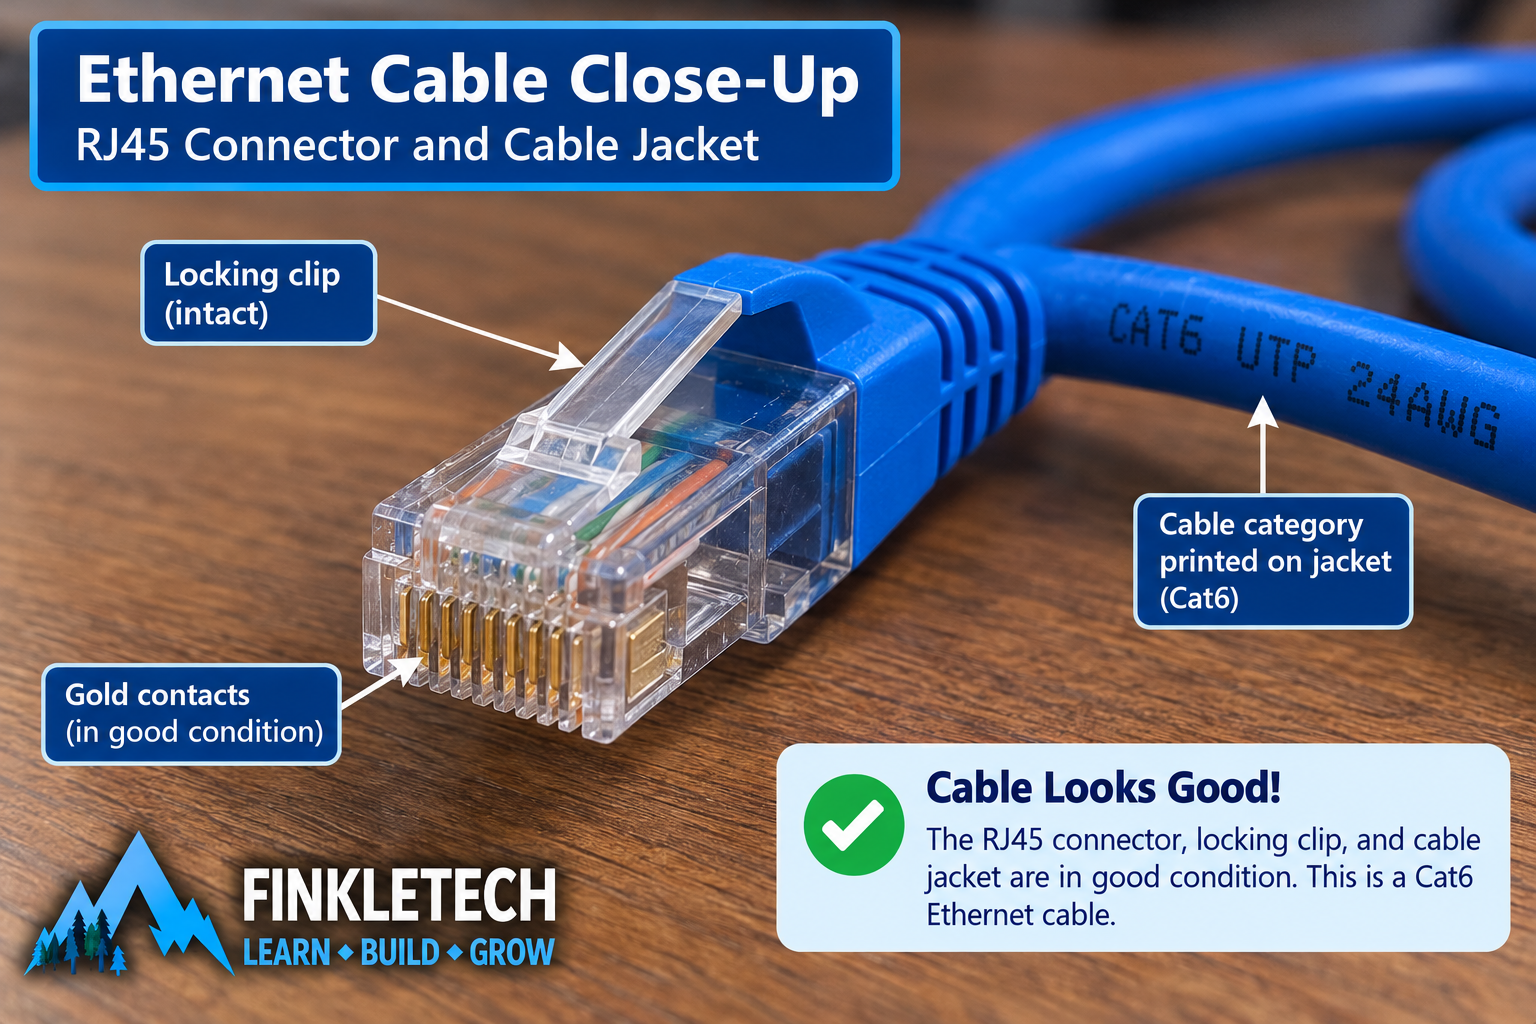
Look at both ends of the cable. Check the RJ45 connectors. The clear plastic connector should not be badly cracked. The gold contacts should not look damaged or corroded. The small locking clip should ideally still be intact, although a cable may still work even if the clip is broken.
Look along the cable jacket. Check for sharp bends, crushed spots, cuts, chew marks, or places where the cable looks badly kinked.
If the cable has text printed on it, look for the category rating. You may see Cat5e, Cat6, Cat6a, or something similar.
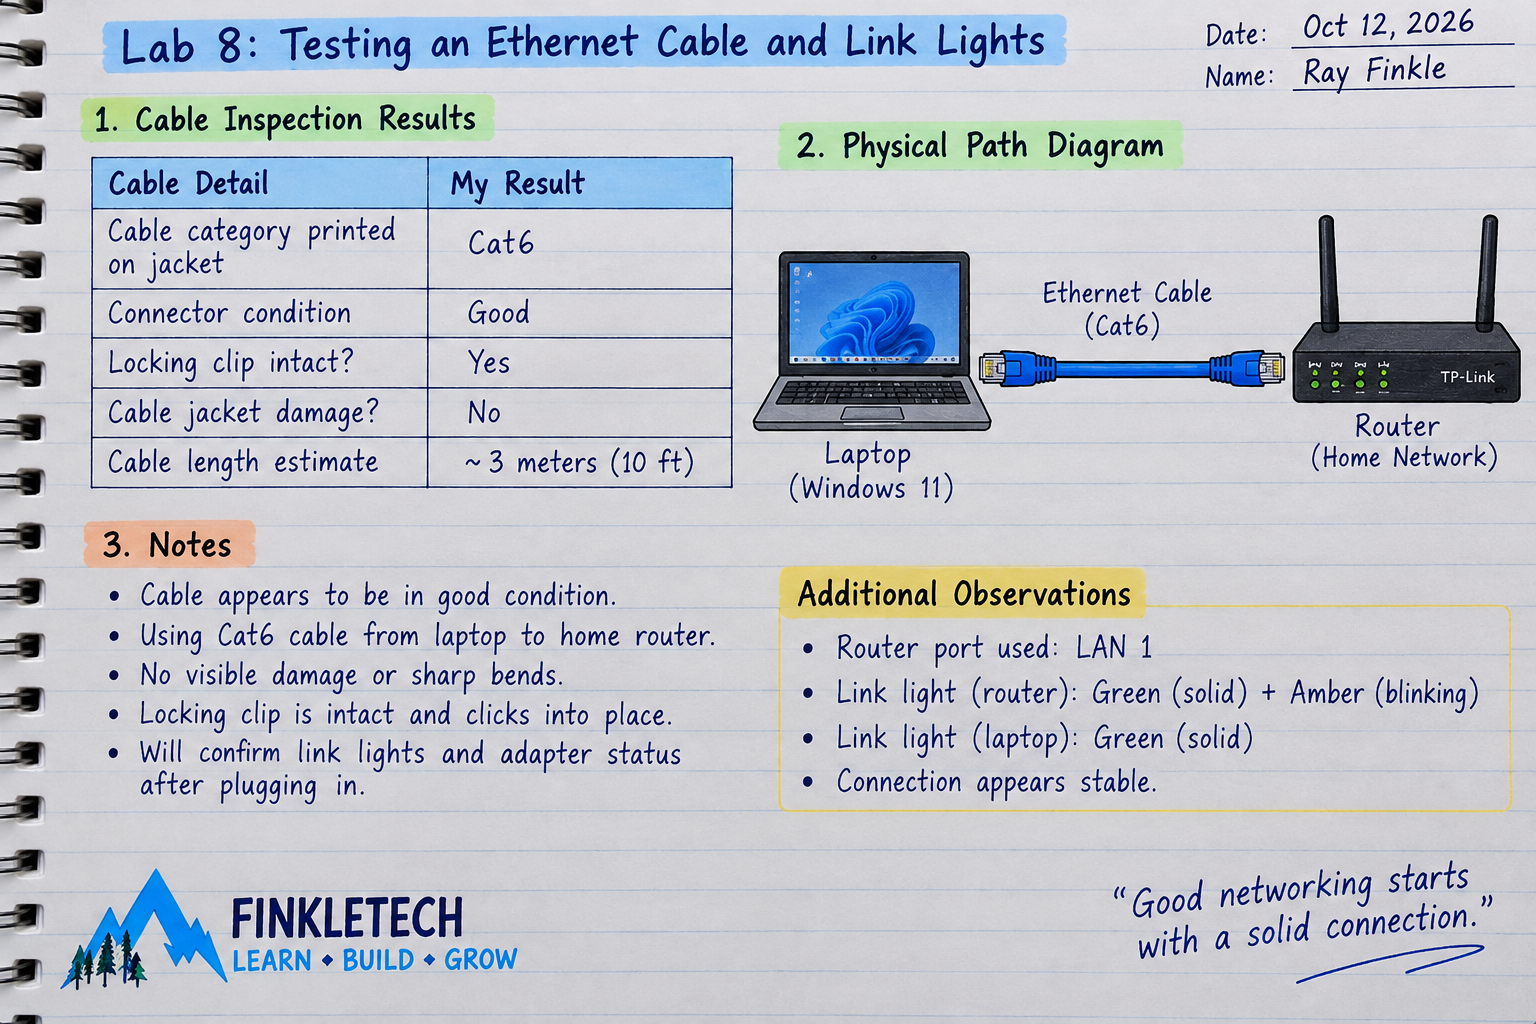
In your notebook, record:
| Cable Detail | My Result |
|---|---|
| Cable category printed on jacket | [Cat5e/Cat6/Unknown] |
| Connector condition | [Good/Damaged/Unsure] |
| Locking clip intact? | [Yes/No] |
| Cable jacket damage? | [Yes/No] |
| Cable length estimate | [Insert estimate] |
Step 2: Draw the Physical Path
Before plugging anything in, draw the path you are testing.
Example:
Laptop → Ethernet Cable → Router
Or:
Desktop PC → Ethernet Cable → Switch → Router
This helps you avoid vague troubleshooting. You are not just “testing the internet.” You are testing a specific physical connection between specific devices.
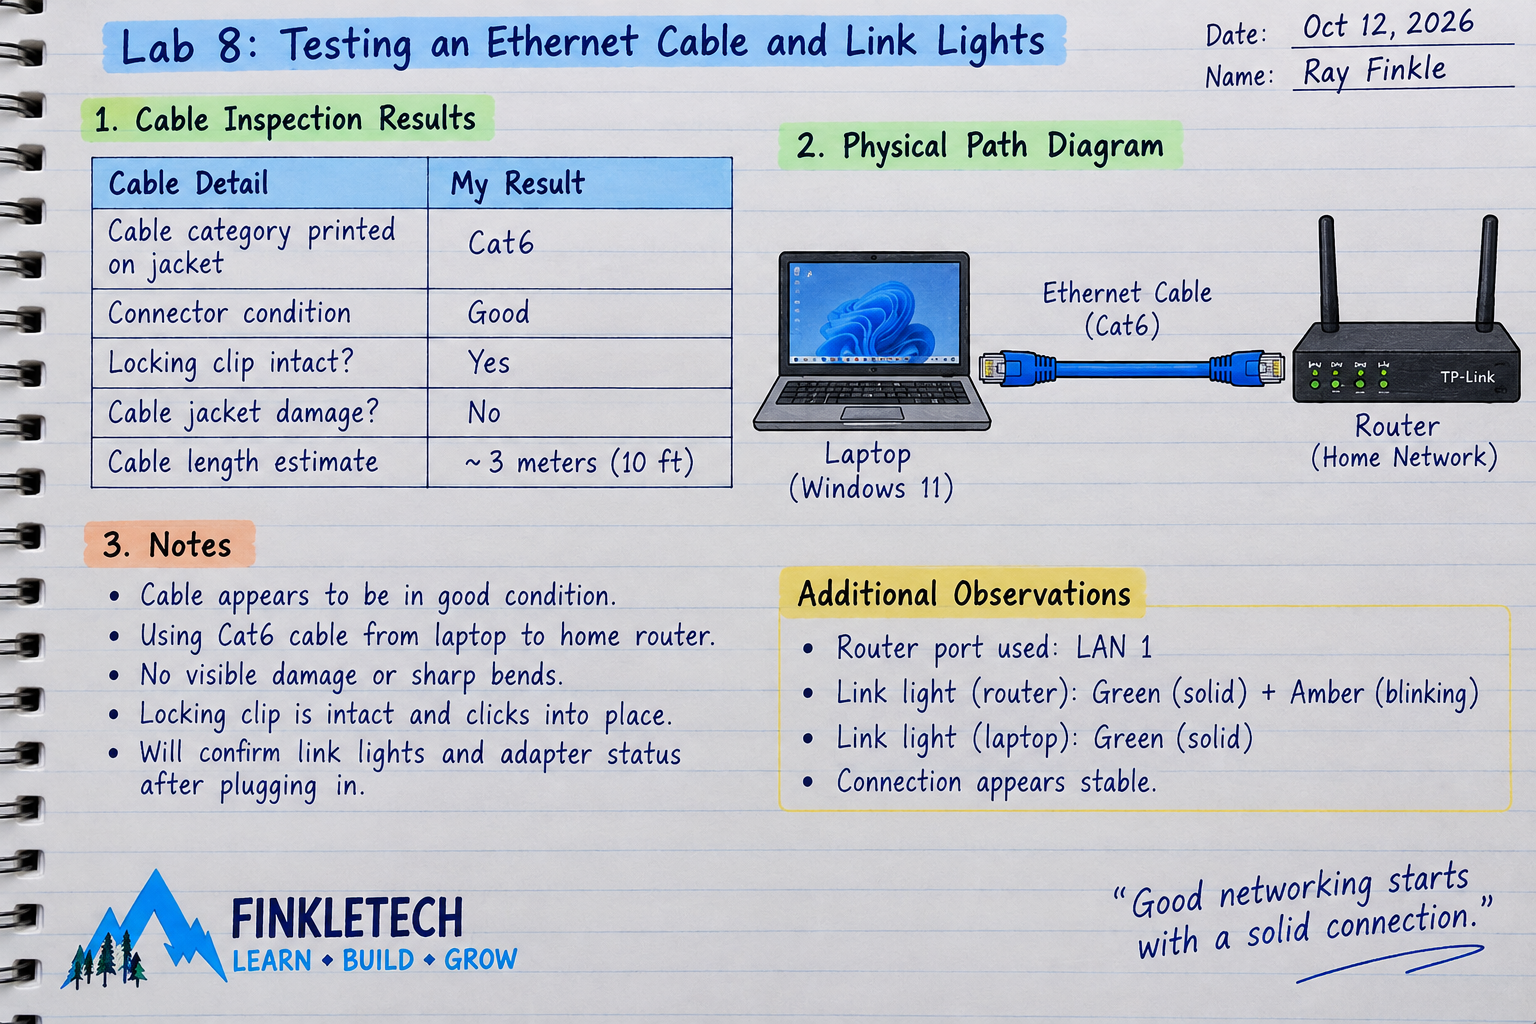
In your notebook, write:
Device 1: [Computer/laptop/desktop]
Cable: [Cable description]
Device 2: [Router/switch]
Port Used: [Router LAN port 1, switch port 3, etc.]
Step 3: Plug In the Ethernet Cable
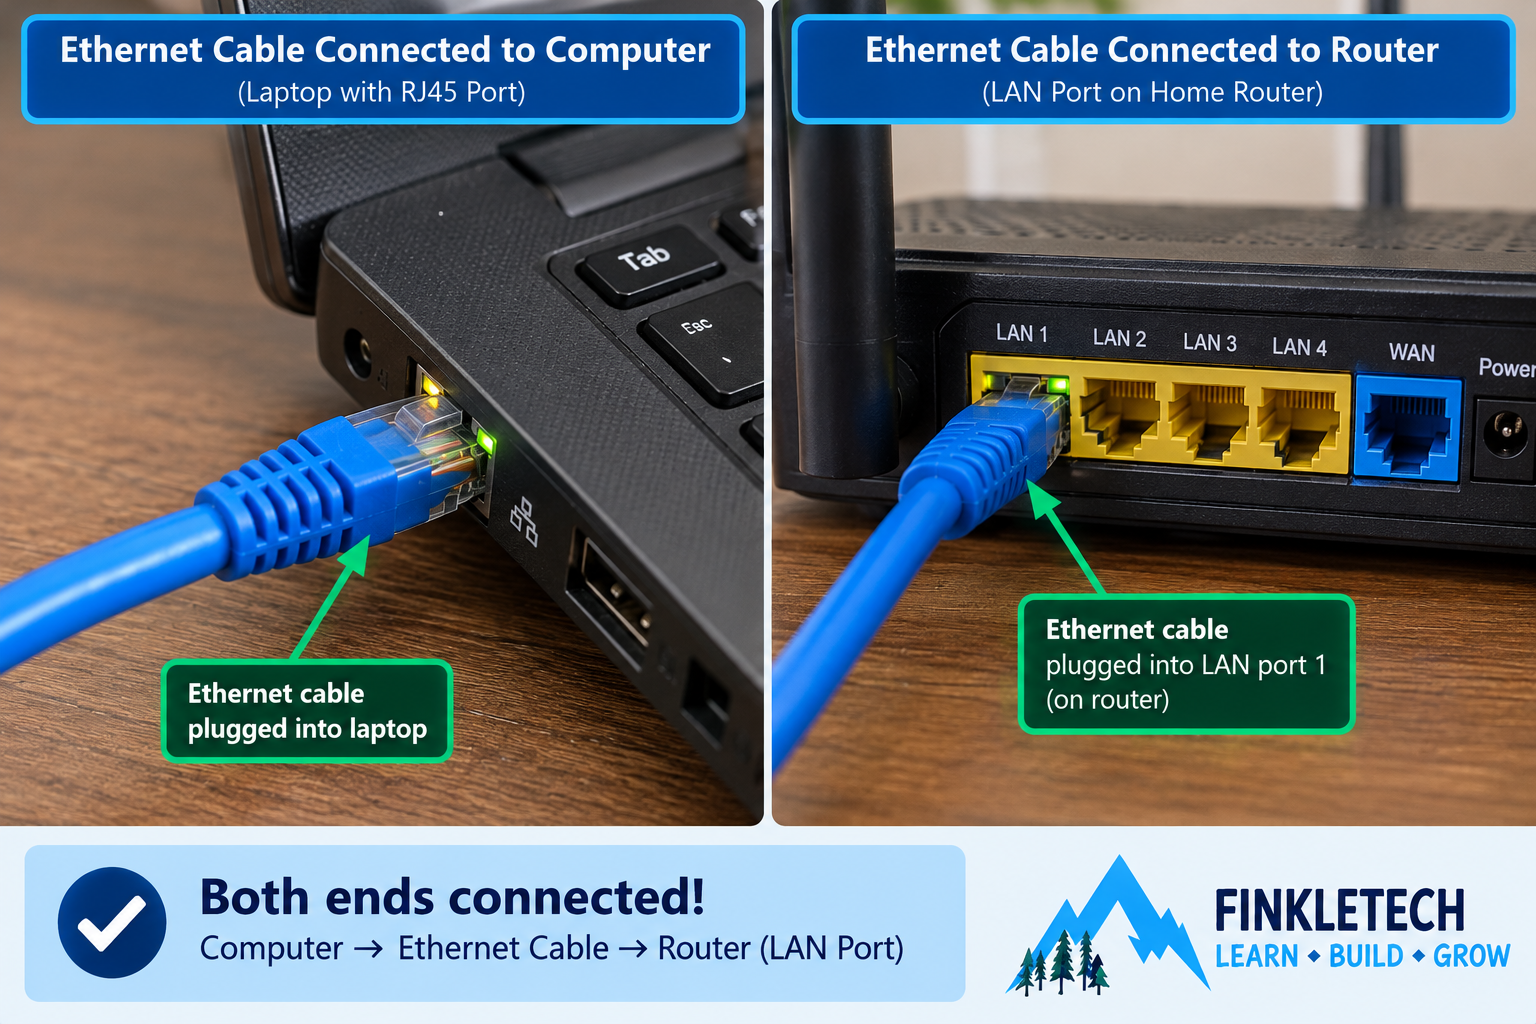
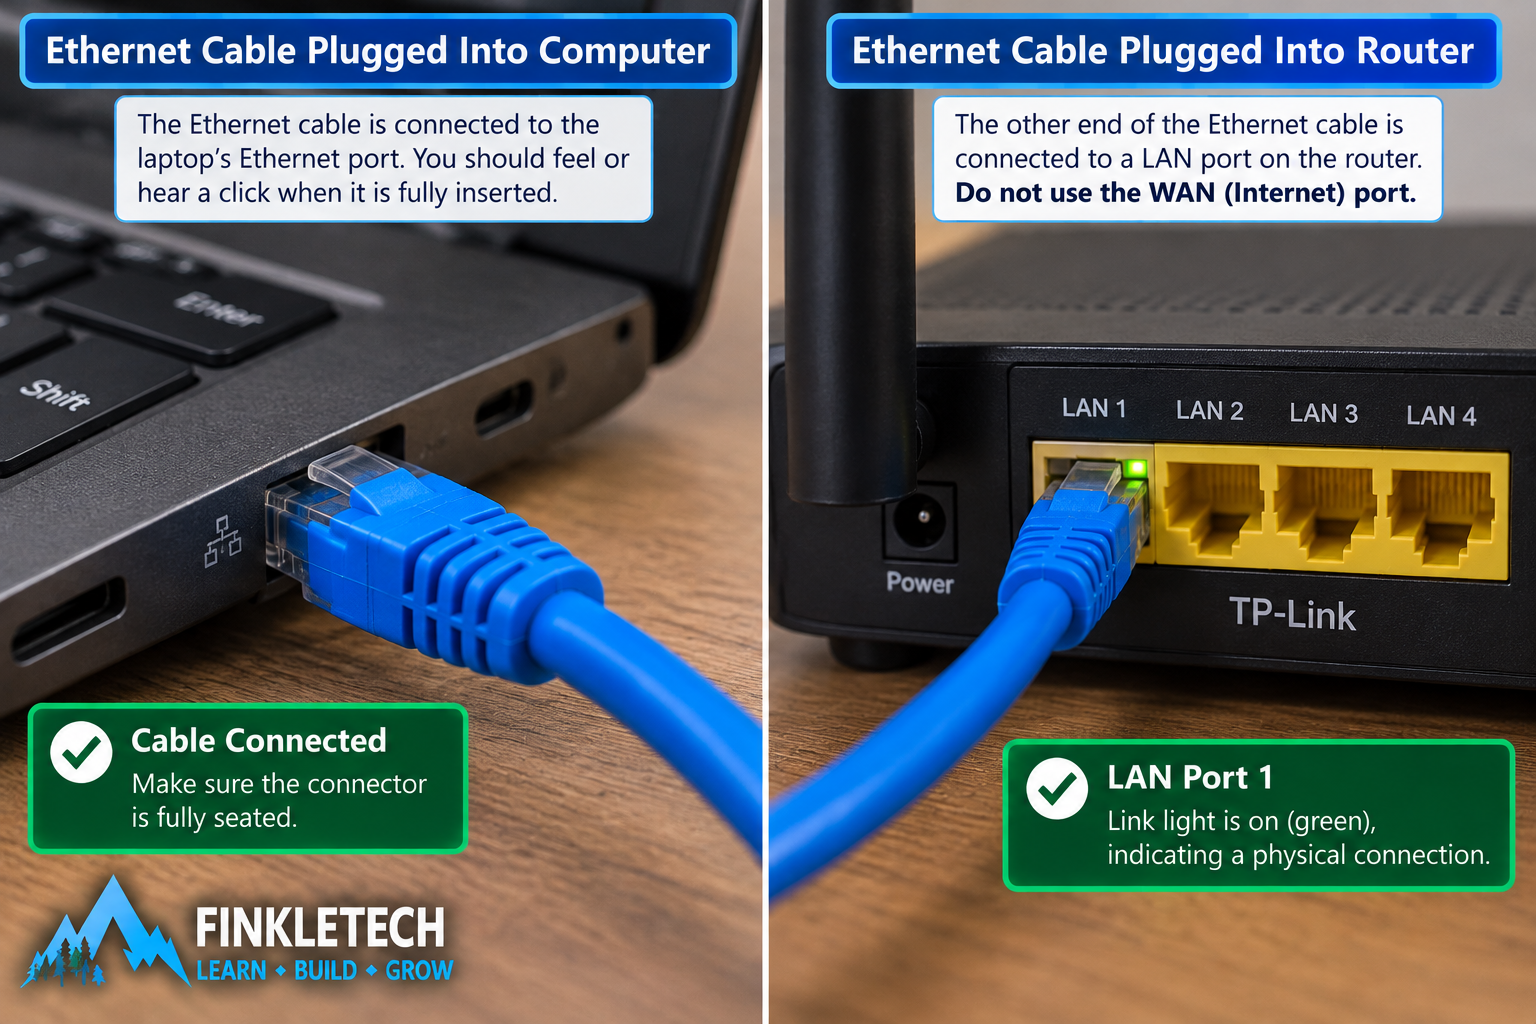
Plug one end of the Ethernet cable into your computer or adapter. Plug the other end into a LAN port on your router or switch.
Make sure you use a LAN port, not the WAN or internet port on the router. The WAN port is usually used to connect the router to the modem or internet source. LAN ports are usually for local devices.
Listen or feel for the connector clicking into place. If the clip is broken, the connector may not lock securely.
Step 4: Check the Link Lights
Look at the Ethernet port on your router, switch, adapter, or computer.
Do you see a light? Is it solid? Is it blinking? What color is it?
Blinking activity usually means traffic is passing. A solid link light usually means a physical connection is established. No light may mean there is no link.
In your notebook, record:
| Link Light Check | My Result |
|---|---|
| Light on computer/adapter port? | [Yes/No/Not visible] |
| Light on router/switch port? | [Yes/No] |
| Light color | [Green/Amber/Other] |
| Blinking or solid? | [Blinking/Solid/Both] |
| What I think it means | [Insert interpretation] |
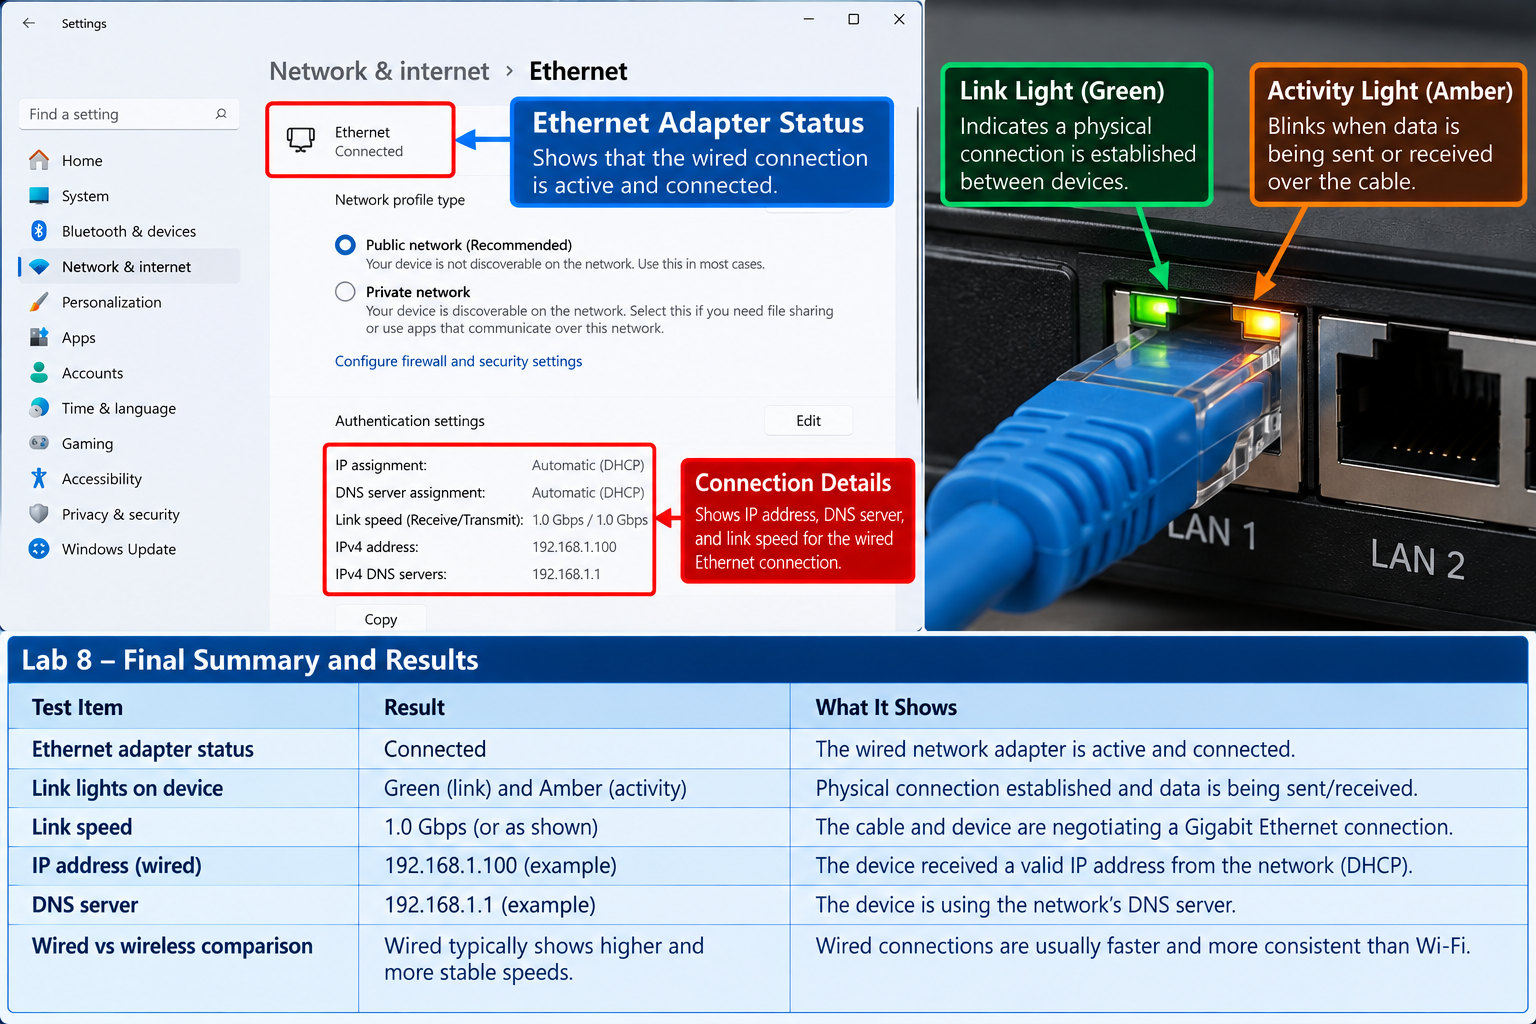
Step 5: Check Windows Network Status
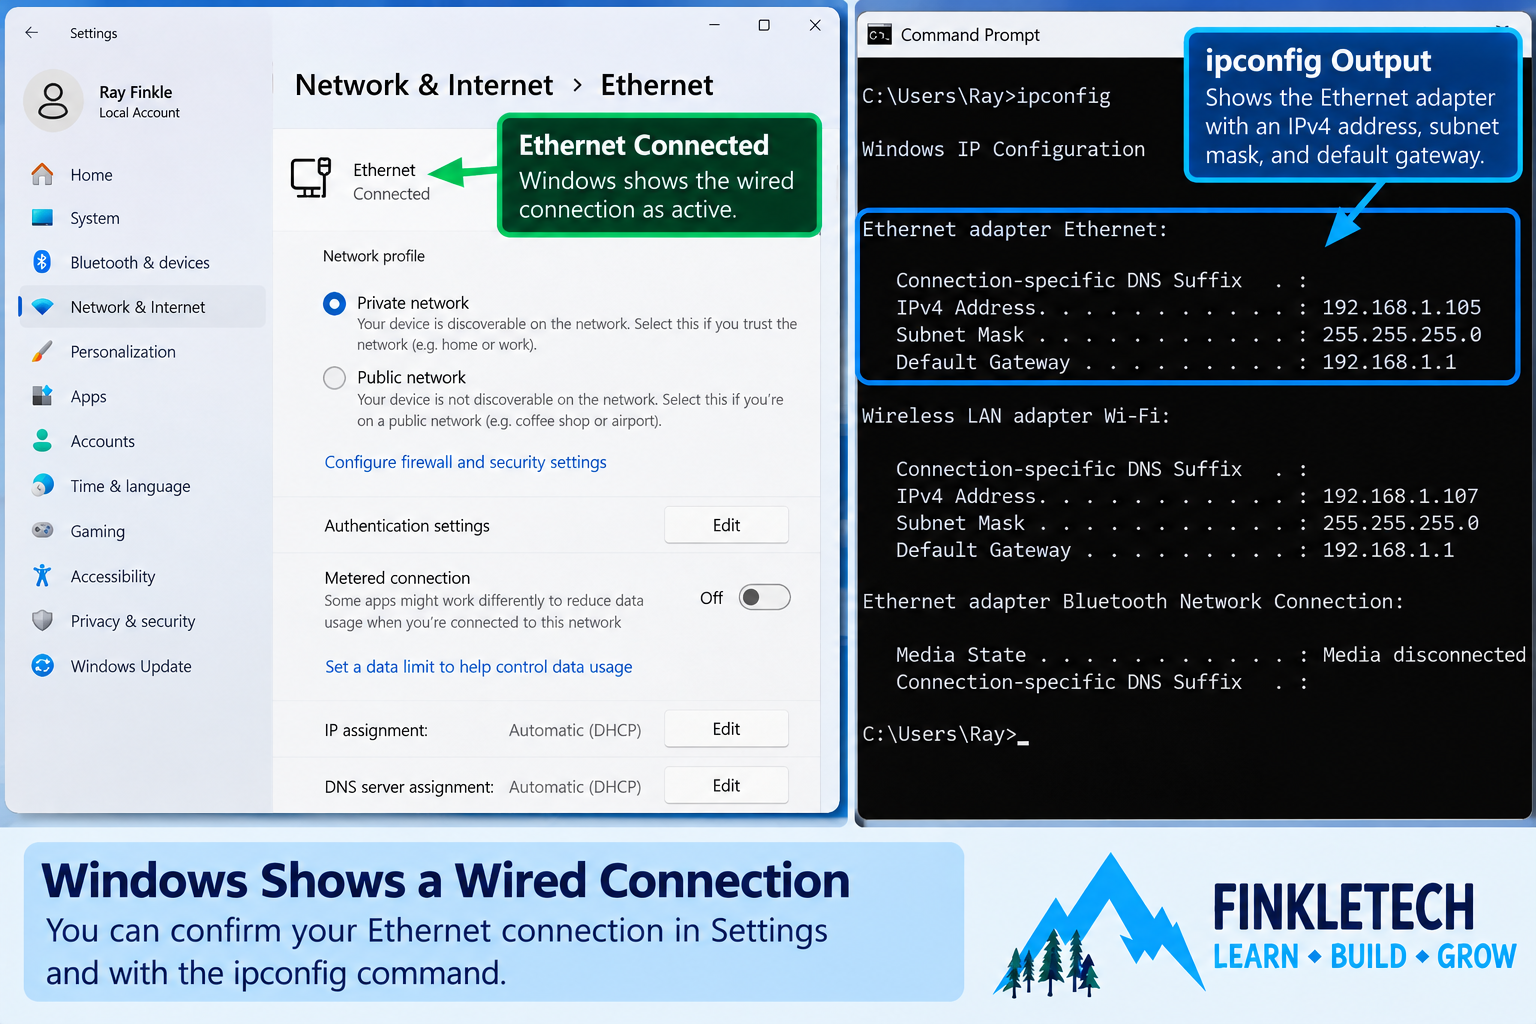
On Windows, check whether the wired connection appears.
You can go to:
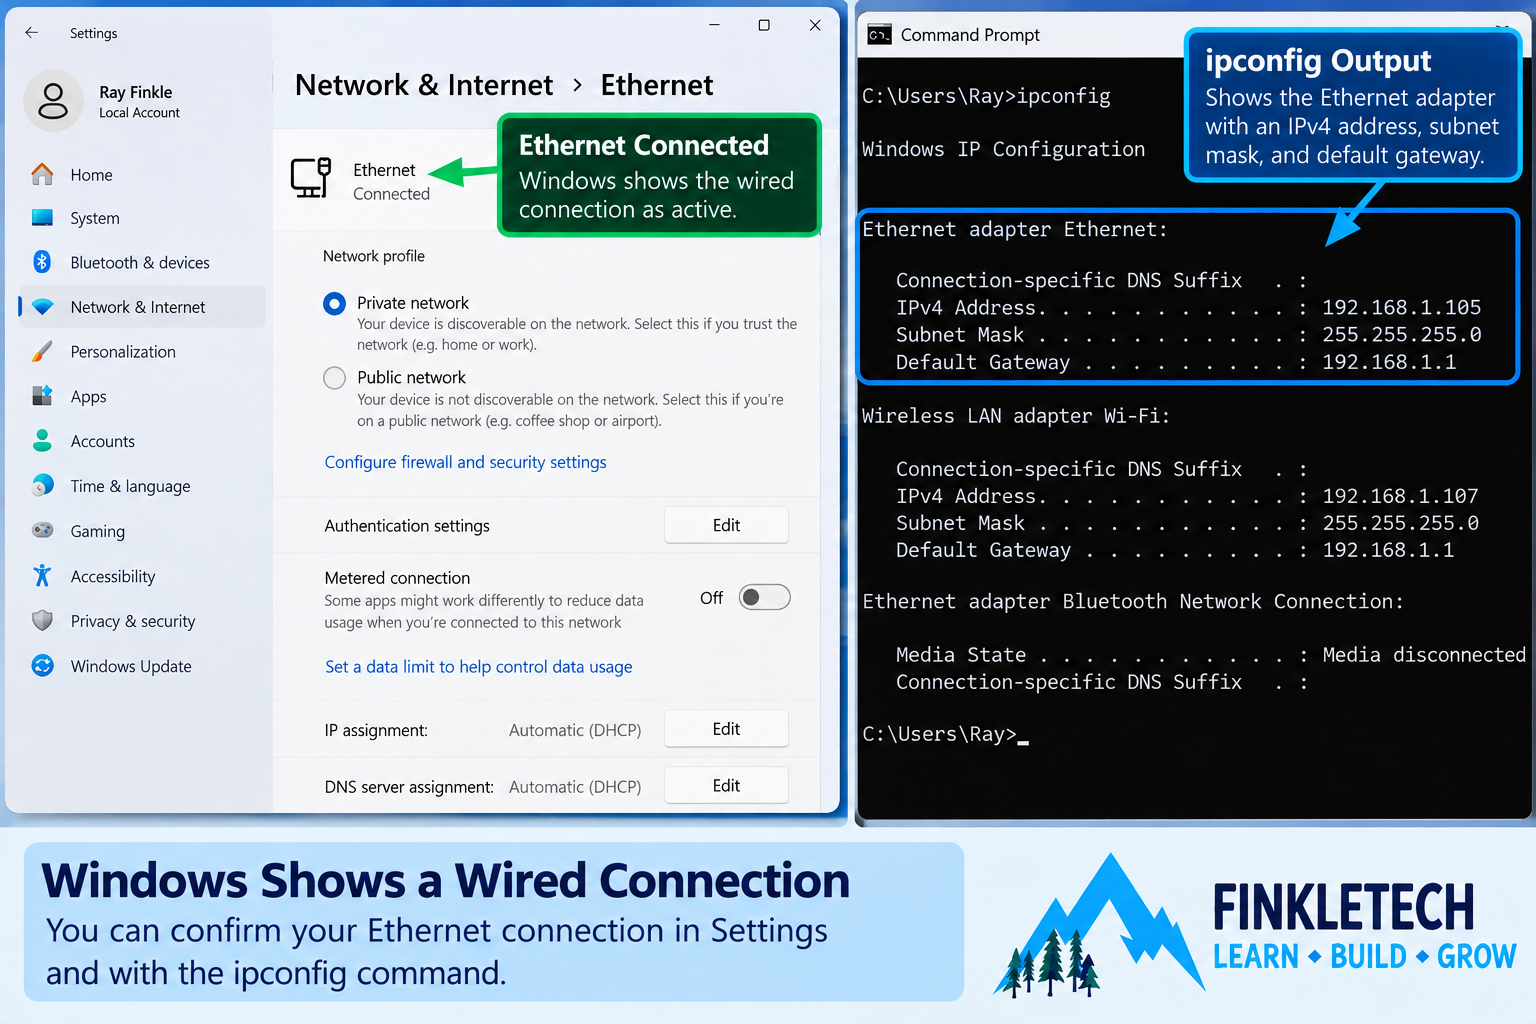
Settings → Network & Internet
Look for Ethernet status.
You can also open Command Prompt and run:
ipconfig
Look for an Ethernet adapter with an IPv4 address, subnet mask, and default gateway.
In your notebook, record:
| Ethernet Status | My Result |
|---|---|
| Ethernet adapter visible? | [Yes/No] |
| IPv4 address assigned? | [Yes/No] |
| Default gateway shown? | [Yes/No] |
| DHCP working? | [Likely yes/no based on result] |
If the Ethernet adapter has a valid IP address and default gateway, the wired connection is probably working at a basic level.
Step 6: Compare Wi-Fi and Ethernet
If your computer is also connected to Wi-Fi, compare Wi-Fi and Ethernet.
Run:
ipconfig
Look for both the Wi-Fi adapter and the Ethernet adapter. They may each have their own IP address. They are separate network interfaces.
This helps you understand that one computer can have multiple network adapters, each with its own MAC address and network settings.
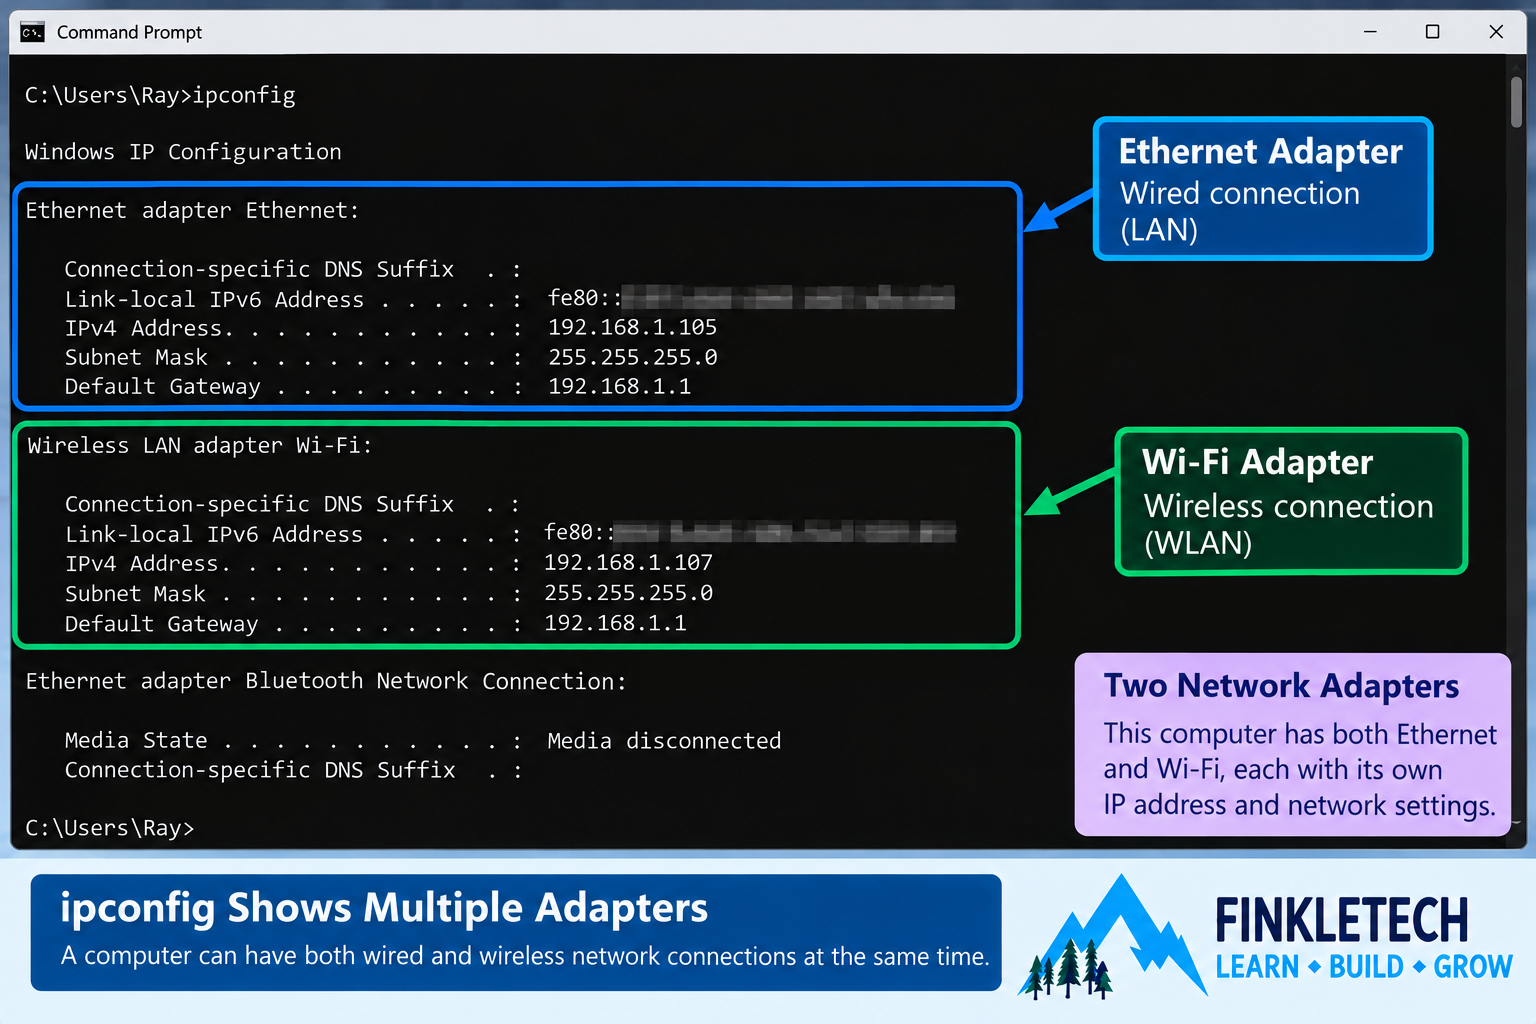
In your notebook, create this table:
| Adapter | IPv4 Address | Default Gateway | Connected? |
|---|---|---|---|
| Wi-Fi | [Insert result] | [Insert result] | [Yes/No] |
| Ethernet | [Insert result] | [Insert result] | [Yes/No] |
This is useful for Network+ because troubleshooting often depends on identifying the correct adapter.
Step 7: Test the Wired Connection
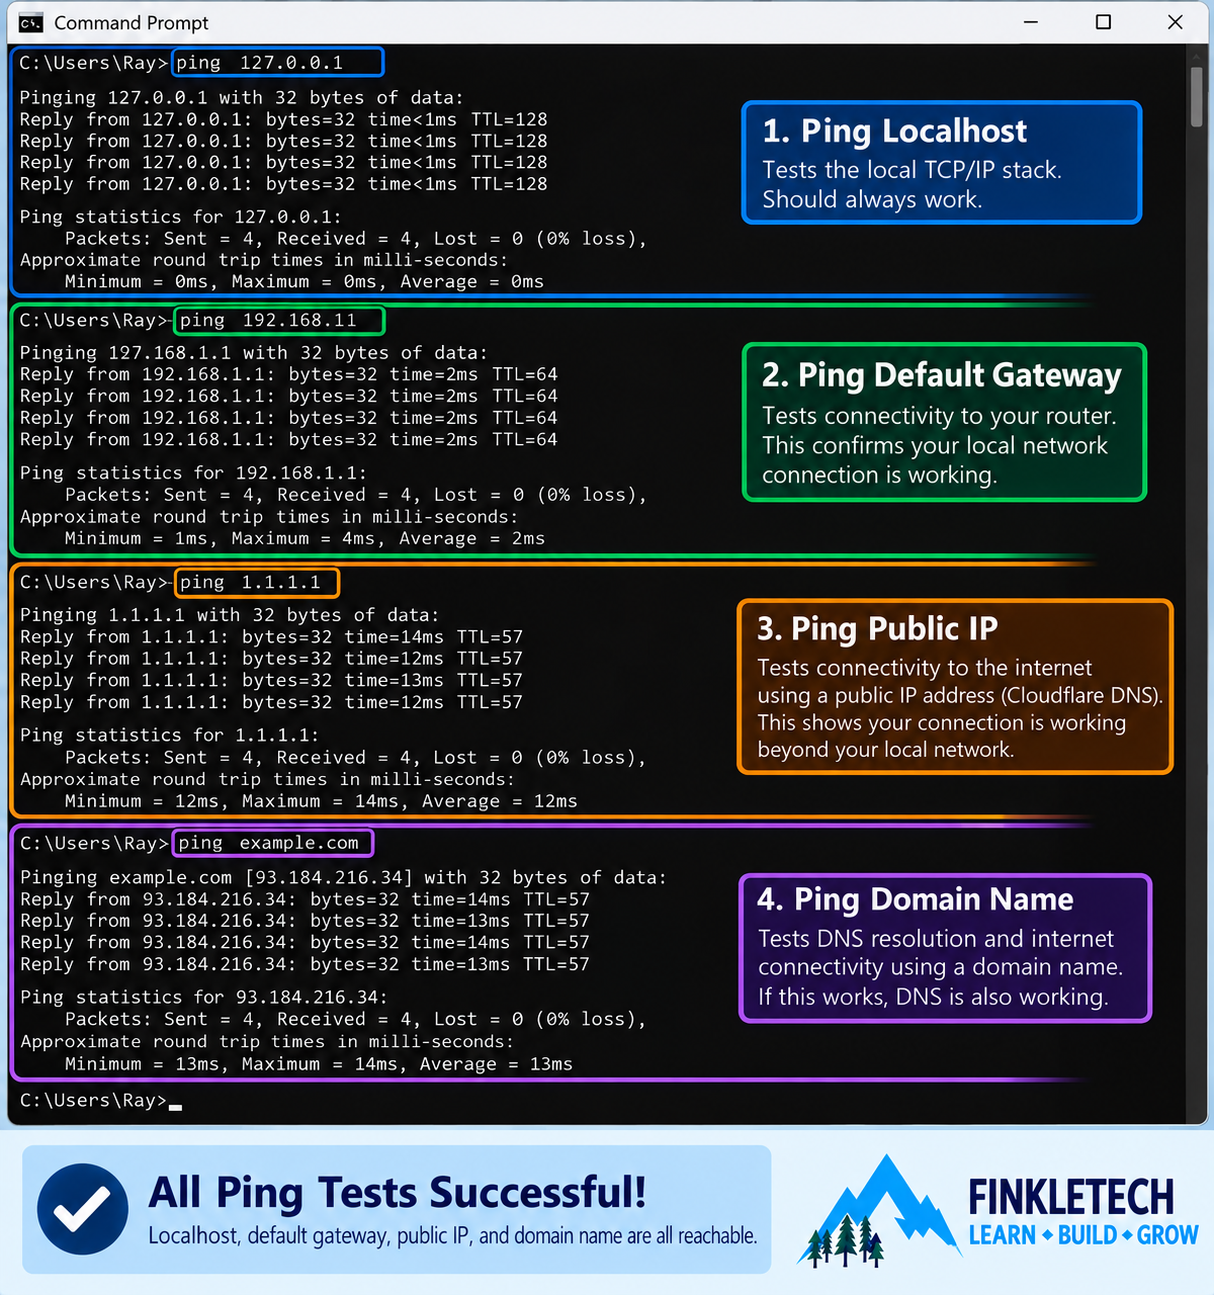
Now test basic connectivity while plugged in with Ethernet.
Run:
ping 127.0.0.1
Then ping your default gateway:
ping [your default gateway]
Then test a public IP:
ping 1.1.1.1
Then test a domain:
ping example.com
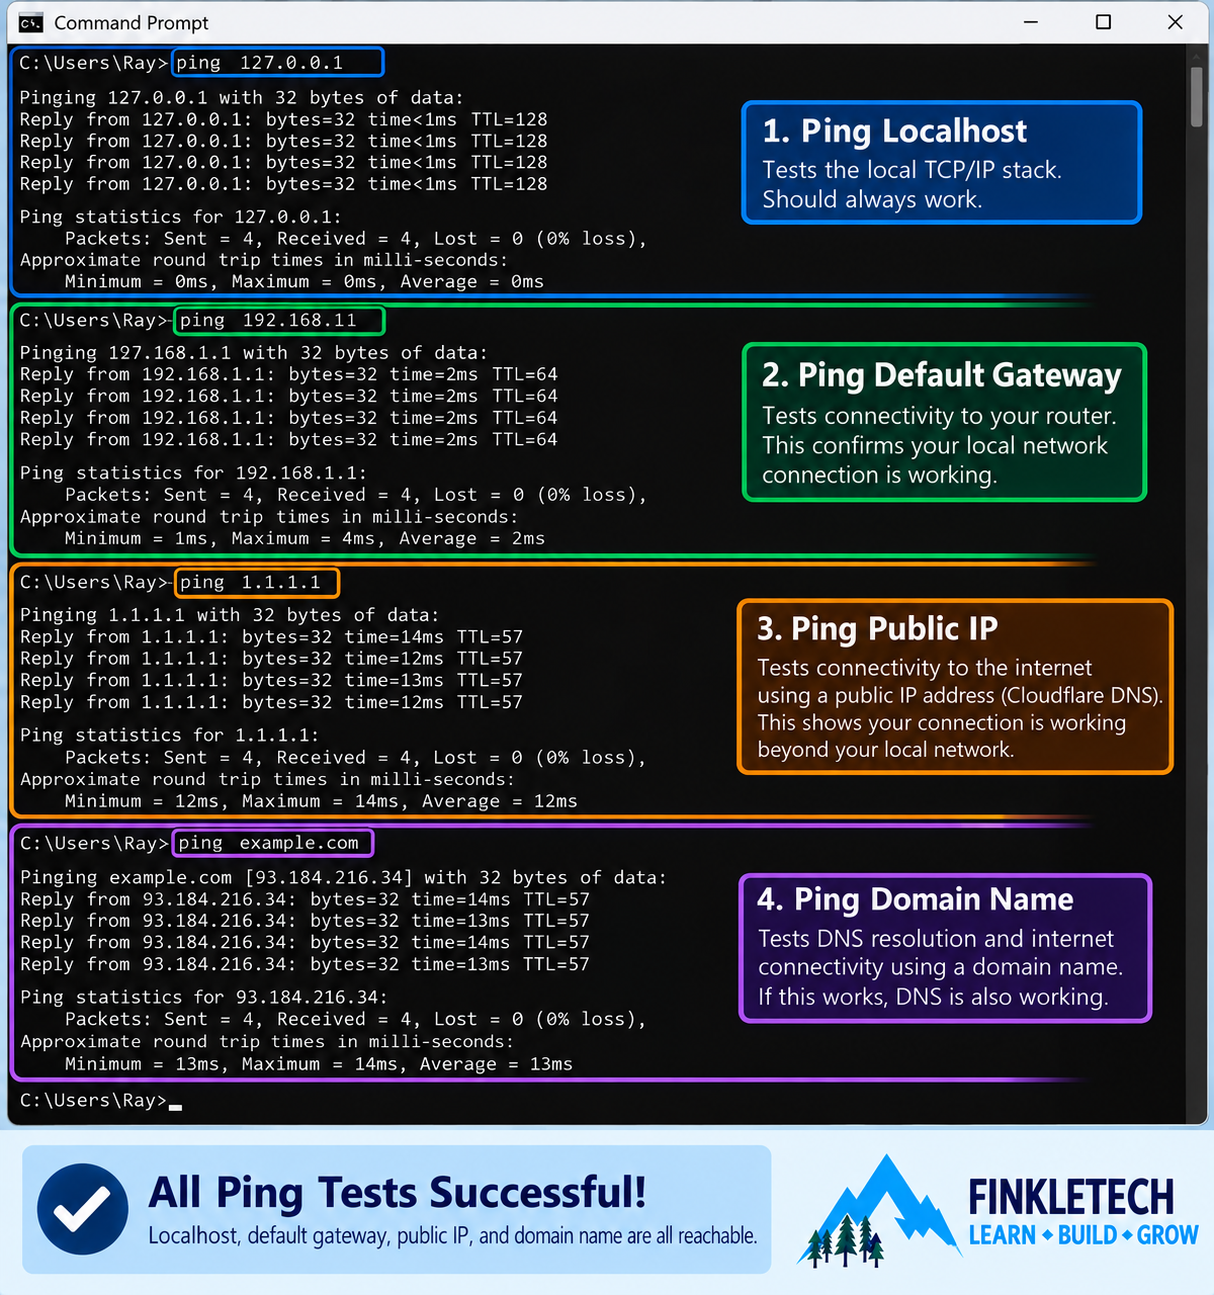
In your notebook, record:
| Test | Result |
|---|---|
| Ping loopback | [Success/Fail] |
| Ping default gateway | [Success/Fail] |
| Ping public IP | [Success/Fail] |
| Ping domain name | [Success/Fail] |
If these tests work over Ethernet, you have confirmed more than just a link light. You have confirmed that the computer can communicate through the wired connection.
Step 8: Optional Cable Tester Check
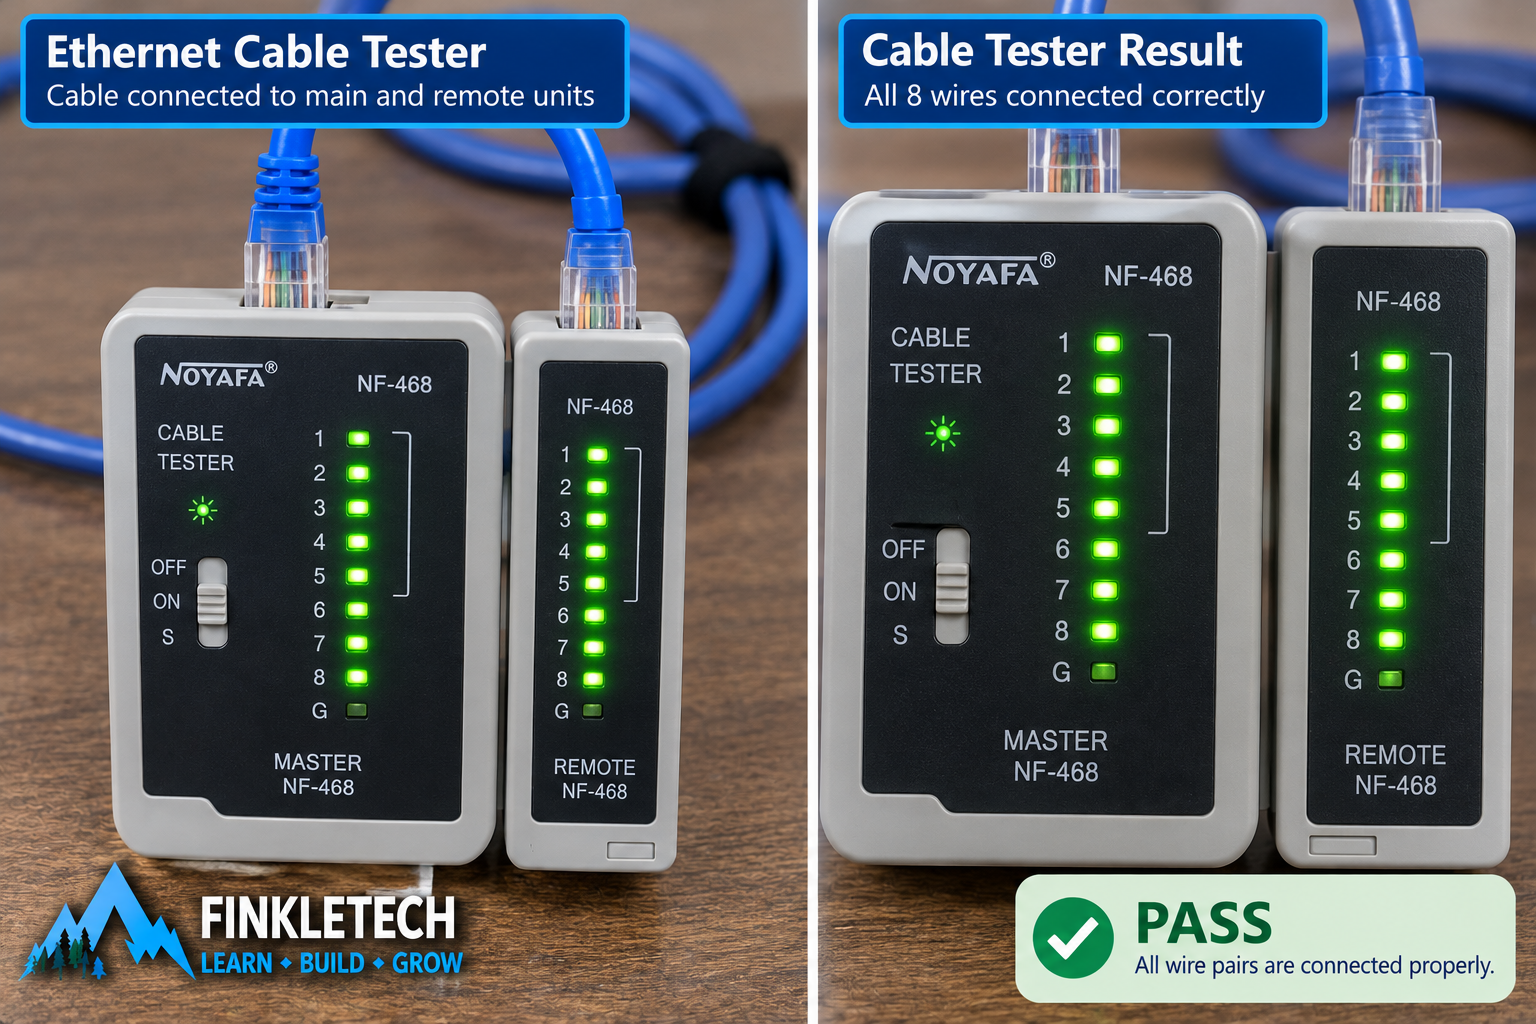
If you have an Ethernet cable tester, use it now.
A basic cable tester usually has a main unit and a remote unit. You plug one end of the cable into the main tester and the other end into the remote. The tester checks whether the internal wires are connected in the expected order.
Follow the instructions for your specific tester.
You may see lights numbered 1 through 8. Ideally, the wire pairs should test correctly. If the lights are missing, out of order, or inconsistent, the cable may be damaged or incorrectly terminated.
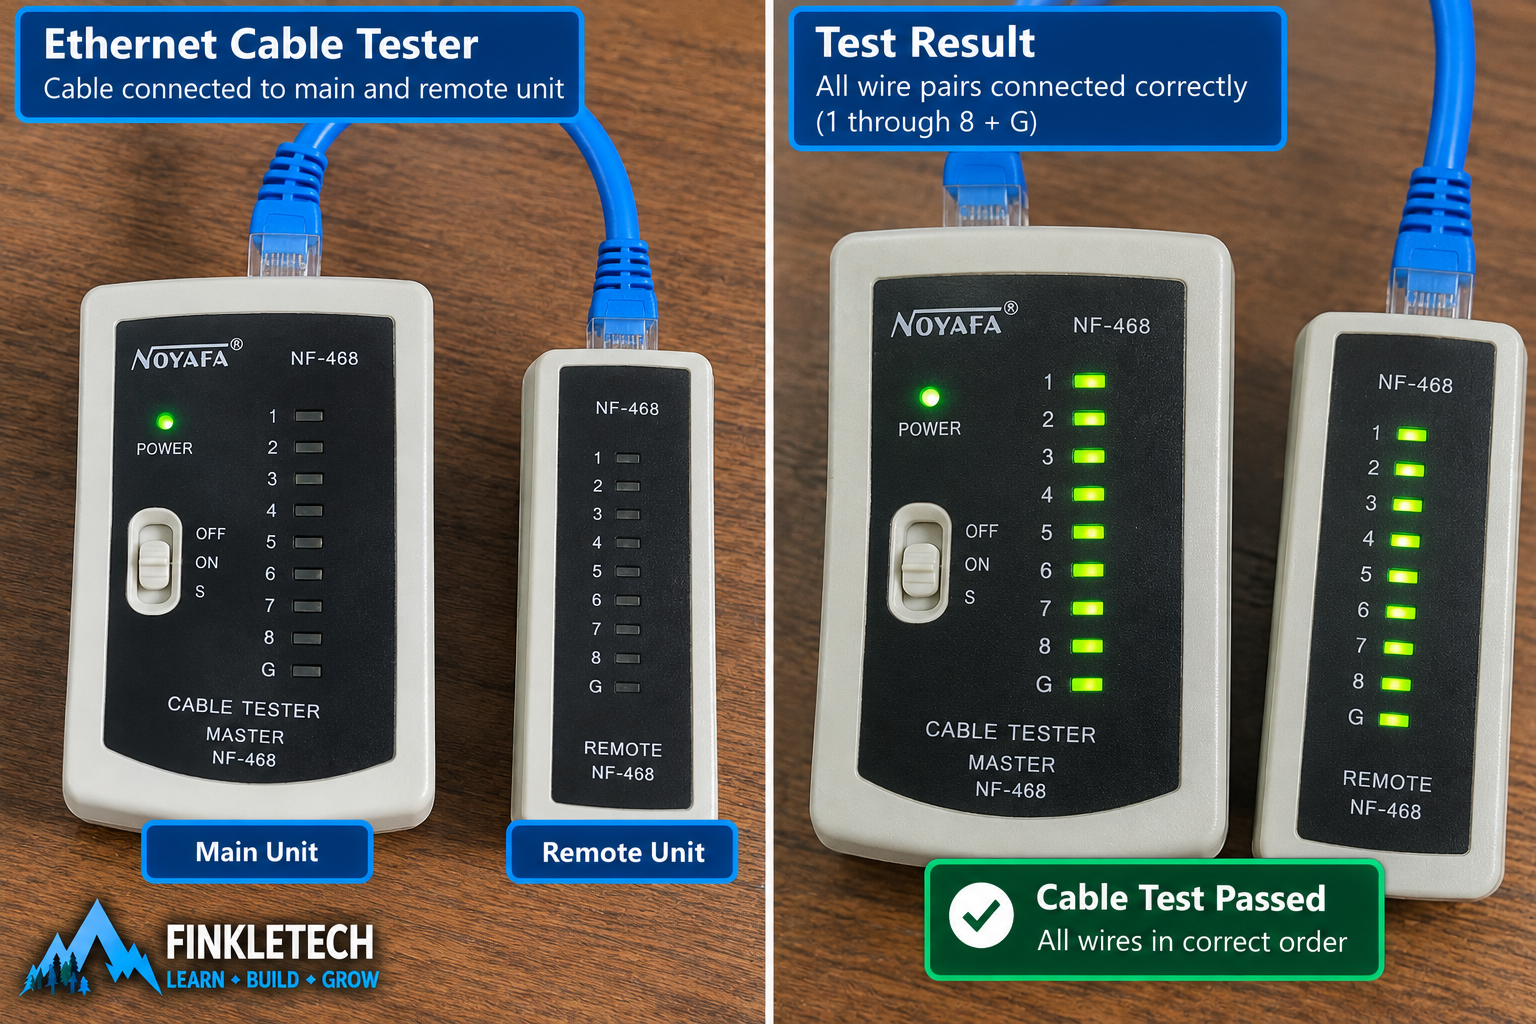
In your notebook, record:
| Cable Tester Detail | My Result |
|---|---|
| Tester used? | [Yes/No] |
| All pins passed? | [Yes/No] |
| Any missing lights? | [Yes/No] |
| Any crossed or incorrect order? | [Yes/No/Unsure] |
| Final cable result | [Pass/Fail/Unsure] |
If you do not have a cable tester, that is okay. You can still complete the main lab using inspection, link lights, adapter status, and ping tests.
Step 9: Optional Comparison with a Second Cable
If you have a second Ethernet cable, repeat the test.
Use the same computer and same router or switch port if possible. Only change the cable. This keeps the test controlled.
If one cable works and another does not, the cable becomes the likely problem. If neither cable works, the issue may involve the port, adapter, device, router, switch, or configuration.
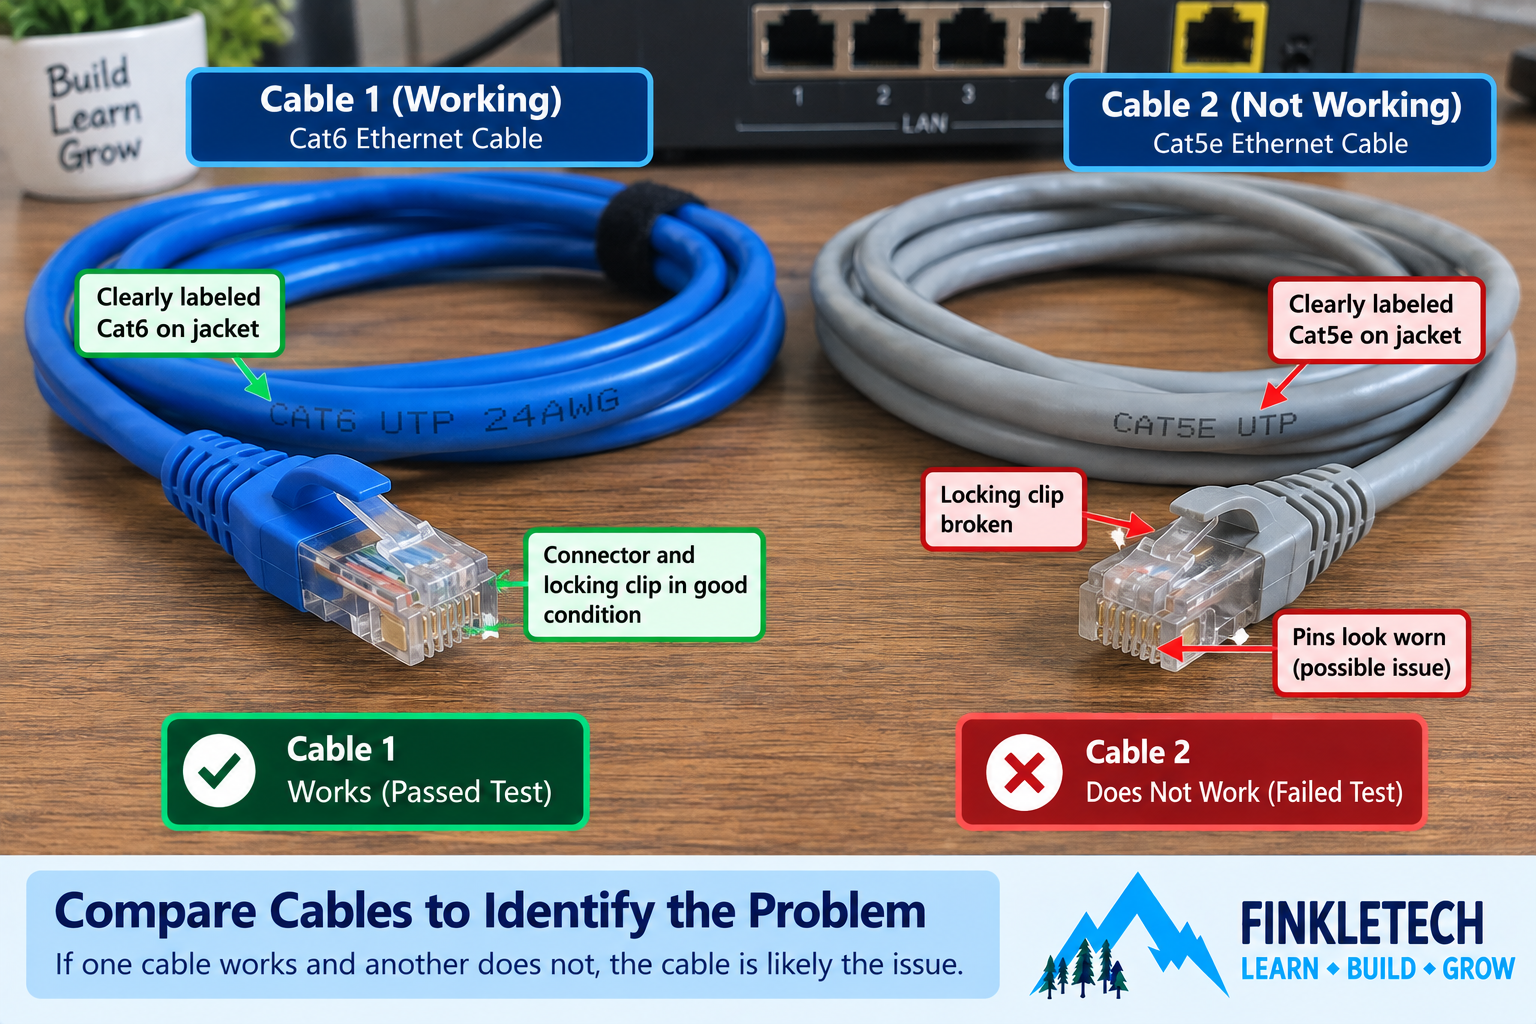
In your notebook, record:
| Cable Tested | Link Light? | IP Address? | Ping Gateway? | Result |
|---|---|---|---|---|
| Cable 1 | [Yes/No] | [Yes/No] | [Success/Fail] | [Good/Bad/Unsure] |
| Cable 2 | [Yes/No] | [Yes/No] | [Success/Fail] | [Good/Bad/Unsure] |
This is a strong troubleshooting habit: change one variable at a time.
Step 10: Understand Common Ethernet Problems
A wired connection can fail in several ways.
If there is no link light, the cable may be bad, unplugged, connected to the wrong port, or the device may be powered off. The Ethernet adapter may also be disabled.
If there is a link light but no IP address, the physical connection may exist, but DHCP may not be working properly. That moves the problem from physical layer toward network configuration.
If there is an IP address but no internet, the cable may not be the problem. You would then check gateway, DNS, router, modem, and upstream connectivity.
This layered thinking is important. A cable problem, DHCP problem, DNS problem, and ISP problem can all feel like “the internet is down” to a user. Your job is to separate them.
Step 11: Write Your Lab Notes
Use this section after you complete the lab.
My FinkleTech Lab Notes
For this lab, I tested a wired Ethernet connection using my [laptop/desktop] and a [Cat5e/Cat6/unknown] Ethernet cable. I inspected the cable, checked the connector, plugged it into my [router/switch], and observed the link lights.
After plugging in the cable, I checked Windows network status and used ipconfig to see whether the Ethernet adapter received an IPv4 address, subnet mask, and default gateway. I also ran basic ping tests to confirm whether the wired connection could reach the router and the internet.
One thing I noticed during this lab was [insert what stood out]. This helped me understand that physical-layer troubleshooting is not optional. Before blaming DNS, DHCP, or software, it makes sense to check the cable, port, adapter, and link lights.
What Your Results Mean
If the link lights turned on and Windows showed an Ethernet adapter with a valid IPv4 address, your wired connection likely worked at the physical and basic network configuration levels.
If the link lights were off, the problem may be physical. Check the cable, connector, port, adapter, and device power.
If the link lights were on but no IP address appeared, the physical link may exist, but the device may not be receiving DHCP settings.
If Ethernet worked better than Wi-Fi, that may suggest wireless interference, weak signal, or Wi-Fi configuration issues. If both Ethernet and Wi-Fi failed, the issue may be closer to the router, modem, ISP, DNS, DHCP, or device configuration.
The main lesson is that Ethernet troubleshooting starts with the physical path and then moves upward.
Common Problems
If your laptop does not have an Ethernet port, use a USB-to-Ethernet adapter.
If there is no link light, try a different LAN port on the router or switch. Also try a different cable if you have one.
If the connector feels loose, the locking clip may be broken. Replace the cable if it does not stay seated properly.
If Windows does not show Ethernet, check whether the adapter is disabled, whether drivers are installed, and whether the adapter is physically connected.
If Wi-Fi stays active while Ethernet is plugged in, Windows may prefer one connection over the other depending on settings. Focus on the Ethernet adapter output in ipconfig.
If your screenshots show router labels, serial numbers, or Wi-Fi passwords, blur them before publishing.
Network+ Concepts Practiced
This lab practices several important Network+ concepts:
- physical layer troubleshooting
- Ethernet
- RJ45 connectors
- twisted-pair cabling
- Cat5e / Cat6 awareness
- link lights
- wired vs wireless connections
- network adapters
- DHCP over Ethernet
- default gateway testing
- cable tester basics
- changing one troubleshooting variable at a time
- documentation and diagramming
The main skill is learning to check the physical connection before chasing higher-level problems. It sounds simple, but it is one of the habits that separates careful troubleshooting from random guessing.
Mini Review Questions
Use these questions after the lab to check your understanding.
- What does an Ethernet link light usually indicate?
- Why should you inspect the cable before troubleshooting DNS or DHCP?
- What kind of connector is commonly used on Ethernet cables?
- What command can show whether your Ethernet adapter received an IP address?
- What does it suggest if link lights are on but no IP address is assigned?
- Why is it useful to test a second cable?
- Why should router labels be blurred before publishing photos?
- What is the value of changing only one variable at a time?
Short Answers
- A link light usually indicates that a physical Ethernet link has been established.
- If the physical connection is broken, higher-level services like DNS and DHCP may not work properly.
- Ethernet cables commonly use RJ45 connectors.
ipconfigcan show whether the Ethernet adapter received an IP address.- It may suggest that the physical connection exists but DHCP or network configuration is failing.
- Testing a second cable helps determine whether the original cable is the problem.
- Router labels may reveal passwords, serial numbers, QR codes, MAC addresses, or private network details.
- Changing one variable at a time helps isolate the cause of the problem.