
Lab 5: How to Capture Basic Network Packets with Wireshark
Lab Goal
In this lab, you will use Wireshark to capture basic network traffic from your own computer. You will start a packet capture, generate simple traffic, apply basic filters, and identify examples of DNS, TCP, and ICMP packets.
Wireshark is a protocol analyzer. That means it lets you inspect network traffic in detail. Instead of only reading about packets, protocols, DNS queries, TCP connections, and ping traffic, you will actually see some of that activity on your screen.
By the end of this lab, you should understand what a packet capture is, how to choose the correct network adapter, how to start and stop a capture, and how to use simple filters to make the results easier to read.
Before You Start: Use Your Networking Notebook
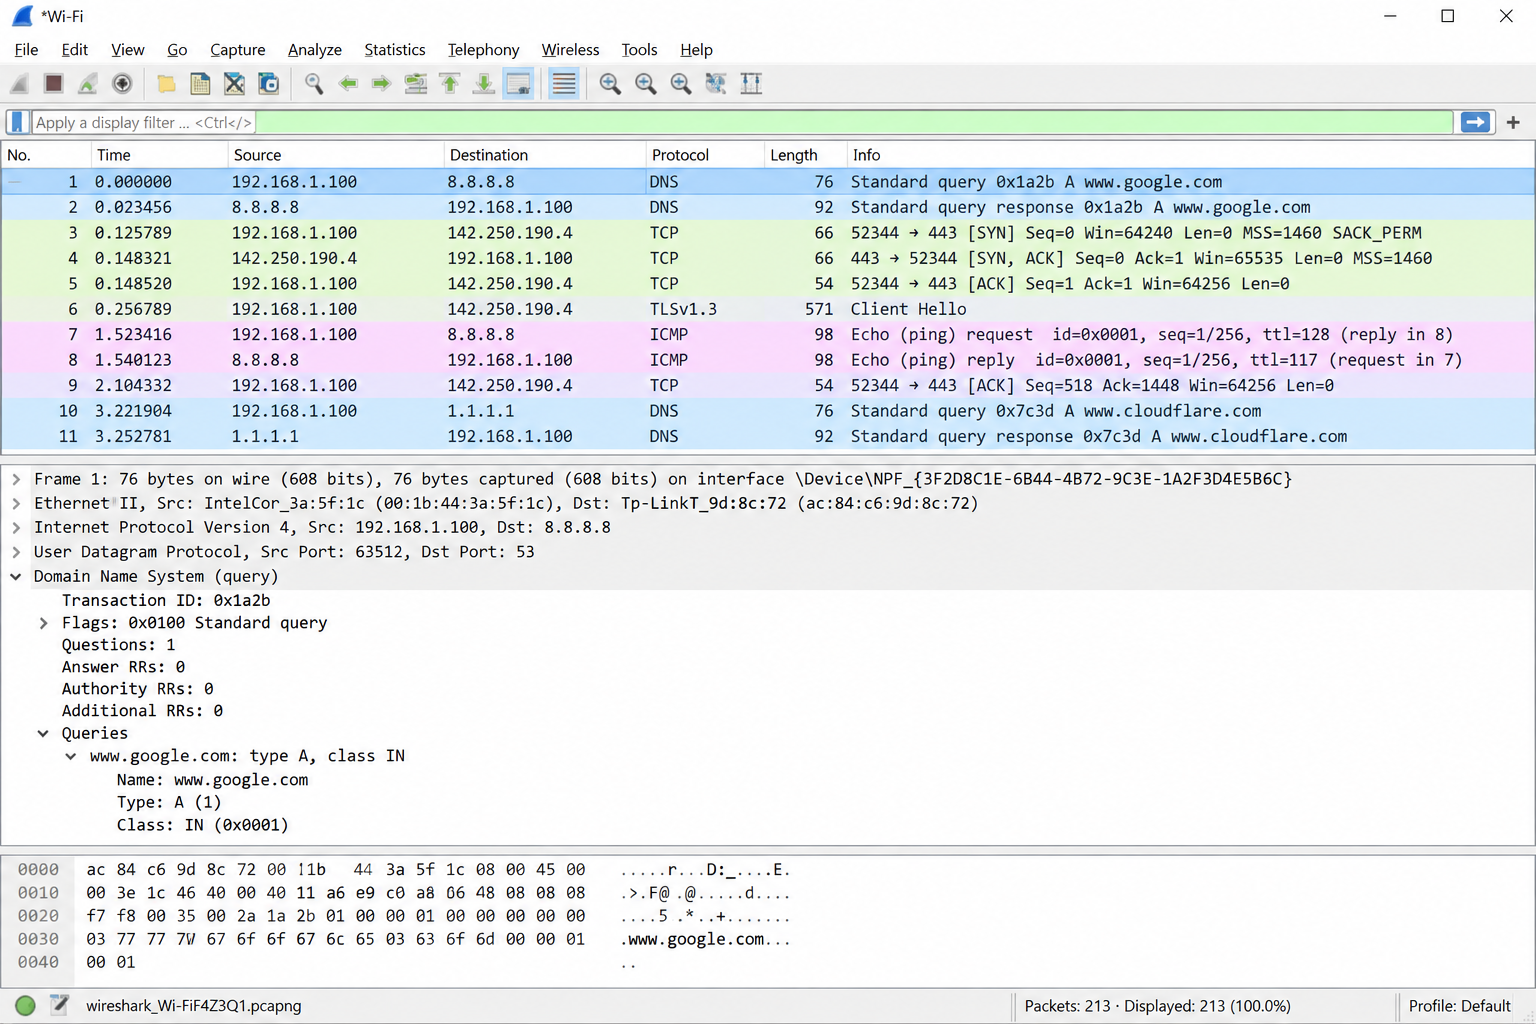
Open your networking notebook to a fresh page and write:
Lab 5: Wireshark Basic Packet Capture
Under that title, create sections for:
- network adapter used
- capture start time
- websites or commands tested
- DNS filter results
- TCP filter results
- ICMP filter results
- packet examples
- questions or confusing results
- screenshots to upload later
This lab can feel overwhelming the first time because Wireshark shows a lot of information. Your notebook keeps you grounded. Instead of trying to understand every packet, you are only looking for a few basic examples.
Write down what you observe in plain English. For example: “When I visited a website, I saw DNS traffic first, then TCP traffic.” That kind of sentence helps the concept stick.
Why This Lab Matters
Most networking happens invisibly. You click a website, send a message, join Wi-Fi, or run a ping command, and the computer handles the details in the background. That is convenient, but it can make networking feel abstract.
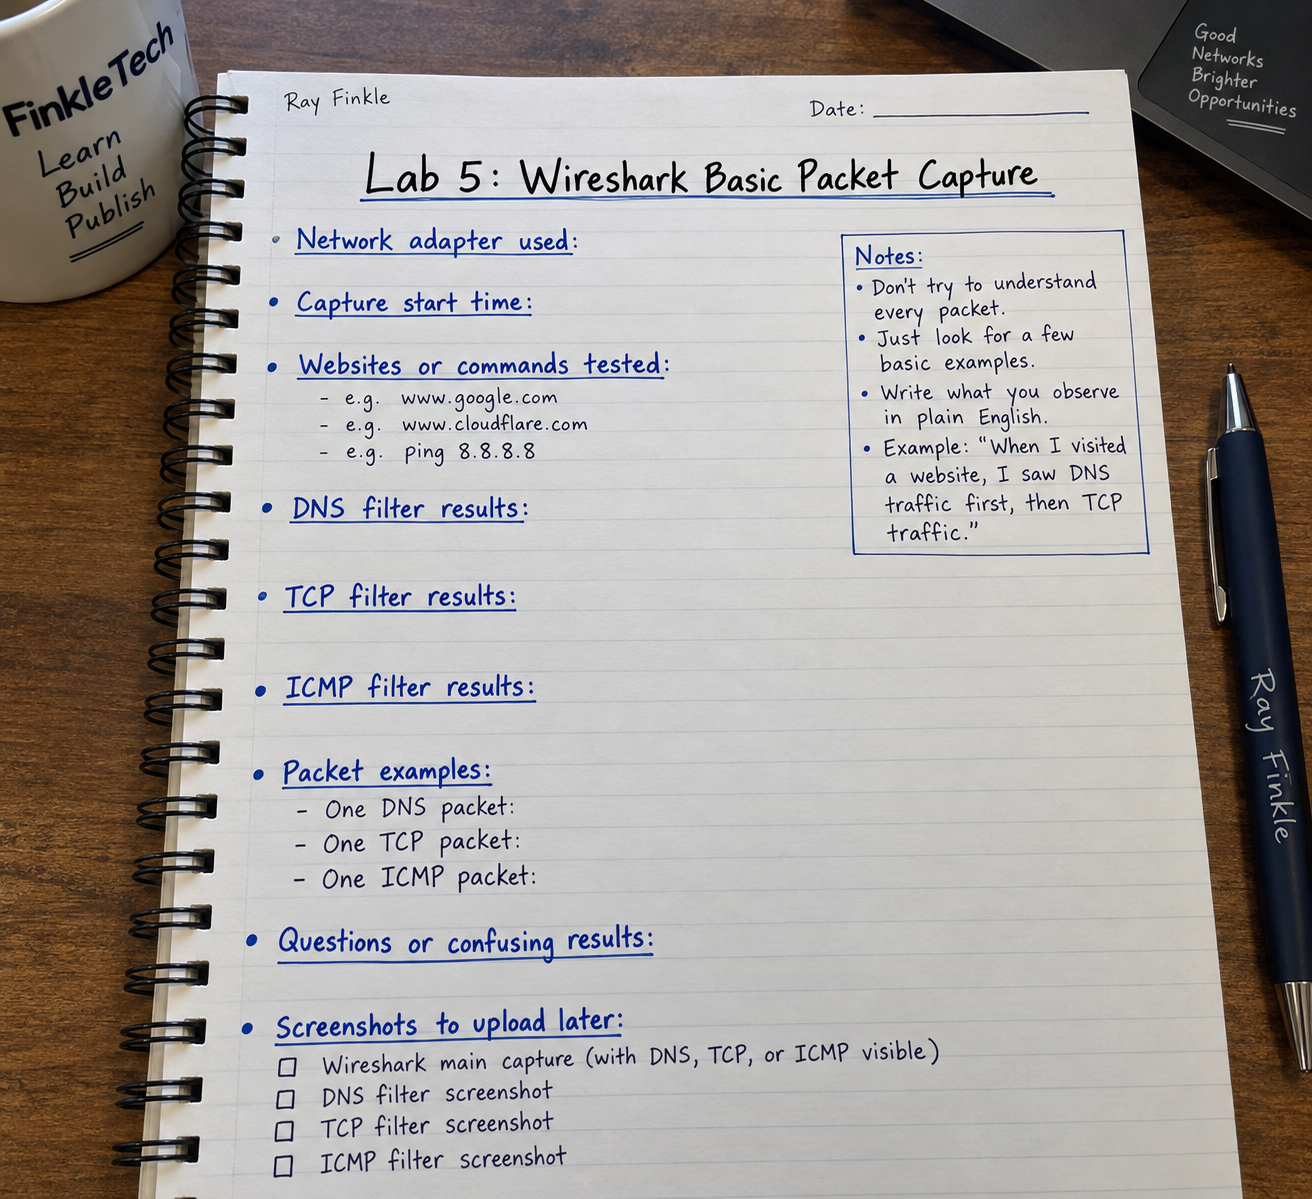
Wireshark changes that. It lets you see packets as they move through your network adapter. You can watch DNS queries, TCP conversations, ARP traffic, ICMP ping traffic, and many other protocol types. You do not need to understand all of it right away. The first goal is simply to realize that network communication is made of many small pieces.
For Network+ study, this lab helps reinforce protocols, ports, packet analysis, troubleshooting tools, DNS, ICMP, TCP, and basic monitoring. Even if you never become a full packet-analysis expert, knowing what Wireshark does makes you a stronger troubleshooter.
A beginner mistake is trying to understand everything on the screen at once. Do not do that. In this lab, you are only learning how to capture traffic and identify a few common packet types.
Quick Concept Refresher: What Is a Packet Capture?
A packet capture is a recorded view of network traffic seen by a network interface. A network interface could be your Wi-Fi adapter or Ethernet adapter.
Each packet contains information. Depending on the protocol, a packet may include source and destination addresses, protocol type, port numbers, timing, flags, queries, replies, or other details. Wireshark organizes these packets into rows and lets you inspect them.
Think of Wireshark like a microscope for network traffic. Without it, the traffic is still happening, but you cannot see much detail. With it, you can zoom in and inspect what your computer is sending and receiving.
For this beginner lab, you are not trying to decode every field. You are trying to recognize patterns. DNS is used for name lookup. TCP is used for reliable connection-based communication. ICMP is commonly seen when using ping.
Tools Needed
You will need:
- a Windows laptop or desktop
- internet connection
- Wireshark installed
- Npcap installed if prompted during Wireshark setup
- Command Prompt
- your networking notebook
- screenshot tool such as Snipping Tool
- optional browser window for generating web traffic
If Wireshark is not installed yet, download it from the official Wireshark website. On Windows, the installer usually includes or prompts for Npcap, which allows packet capture on Windows.
Do not install random packet capture tools from unknown websites. Use the official source.
Safety and Privacy Note Before Publishing Screenshots
Packet captures can contain sensitive information. Before publishing screenshots, review them carefully.
Do not publish private IP details, public IP addresses, device names, website activity you do not want public, MAC addresses, DNS queries that reveal private browsing, or anything unrelated to the lab.
For this lab, keep screenshots simple and educational. It is enough to show that you filtered for DNS, TCP, or ICMP. You do not need to expose your whole capture file.
Also, only capture traffic on networks you own or are authorized to use. Do not capture traffic on someone else’s network without permission. This lab is for your own computer and your own home network.
Step 1: Open Wireshark
Open Wireshark.
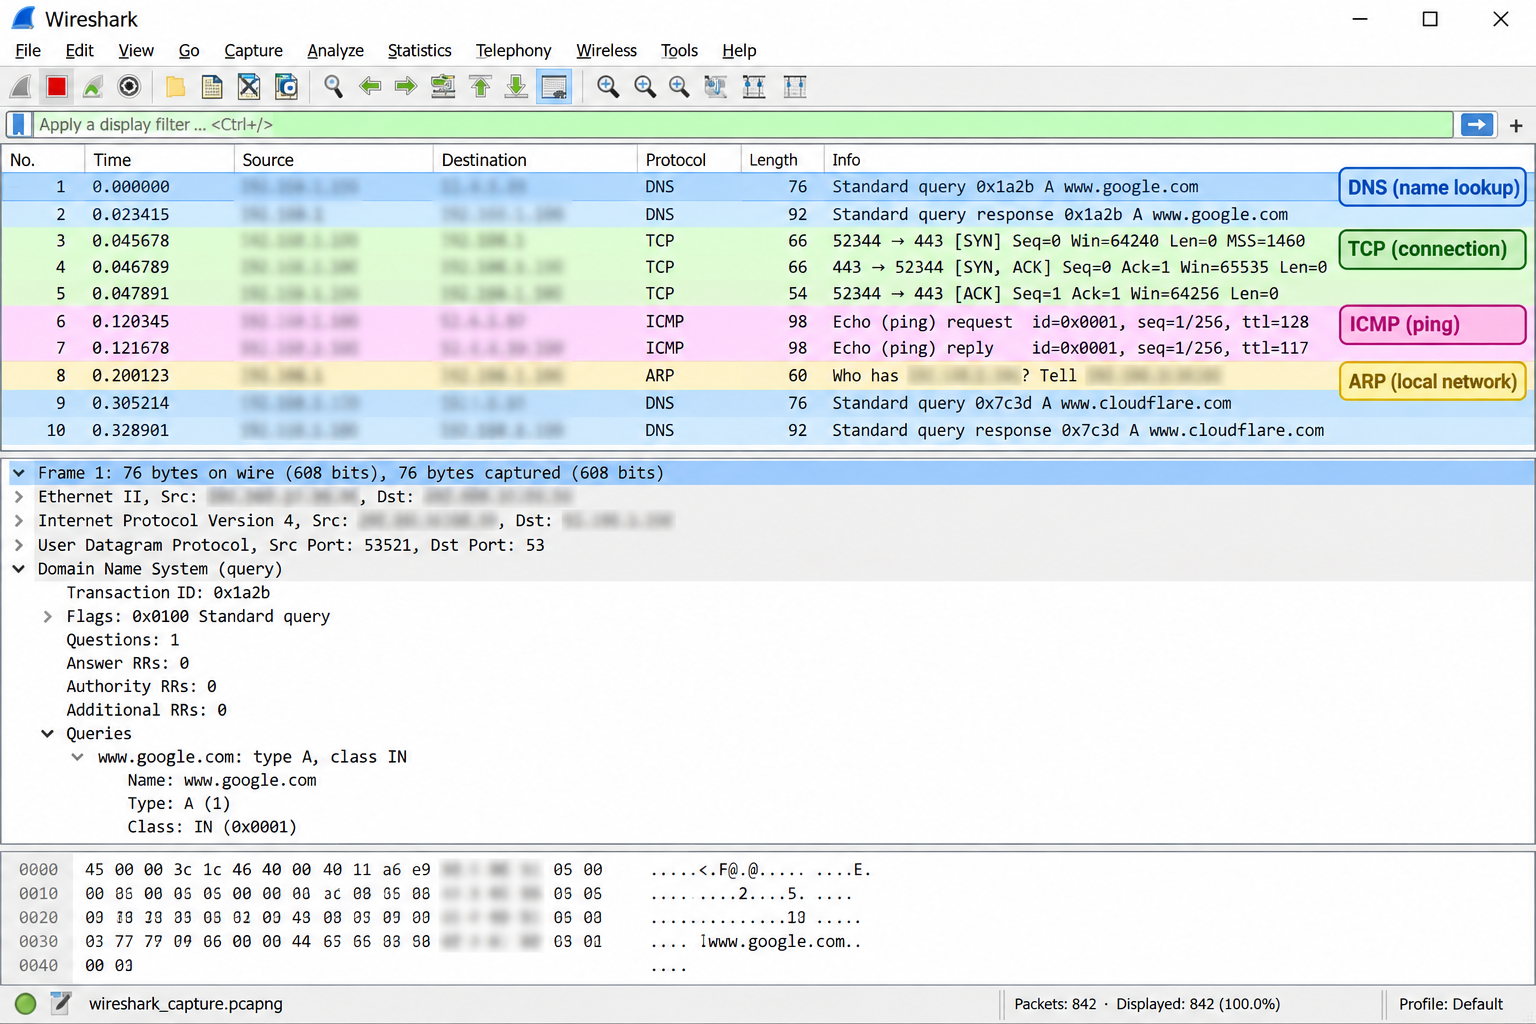
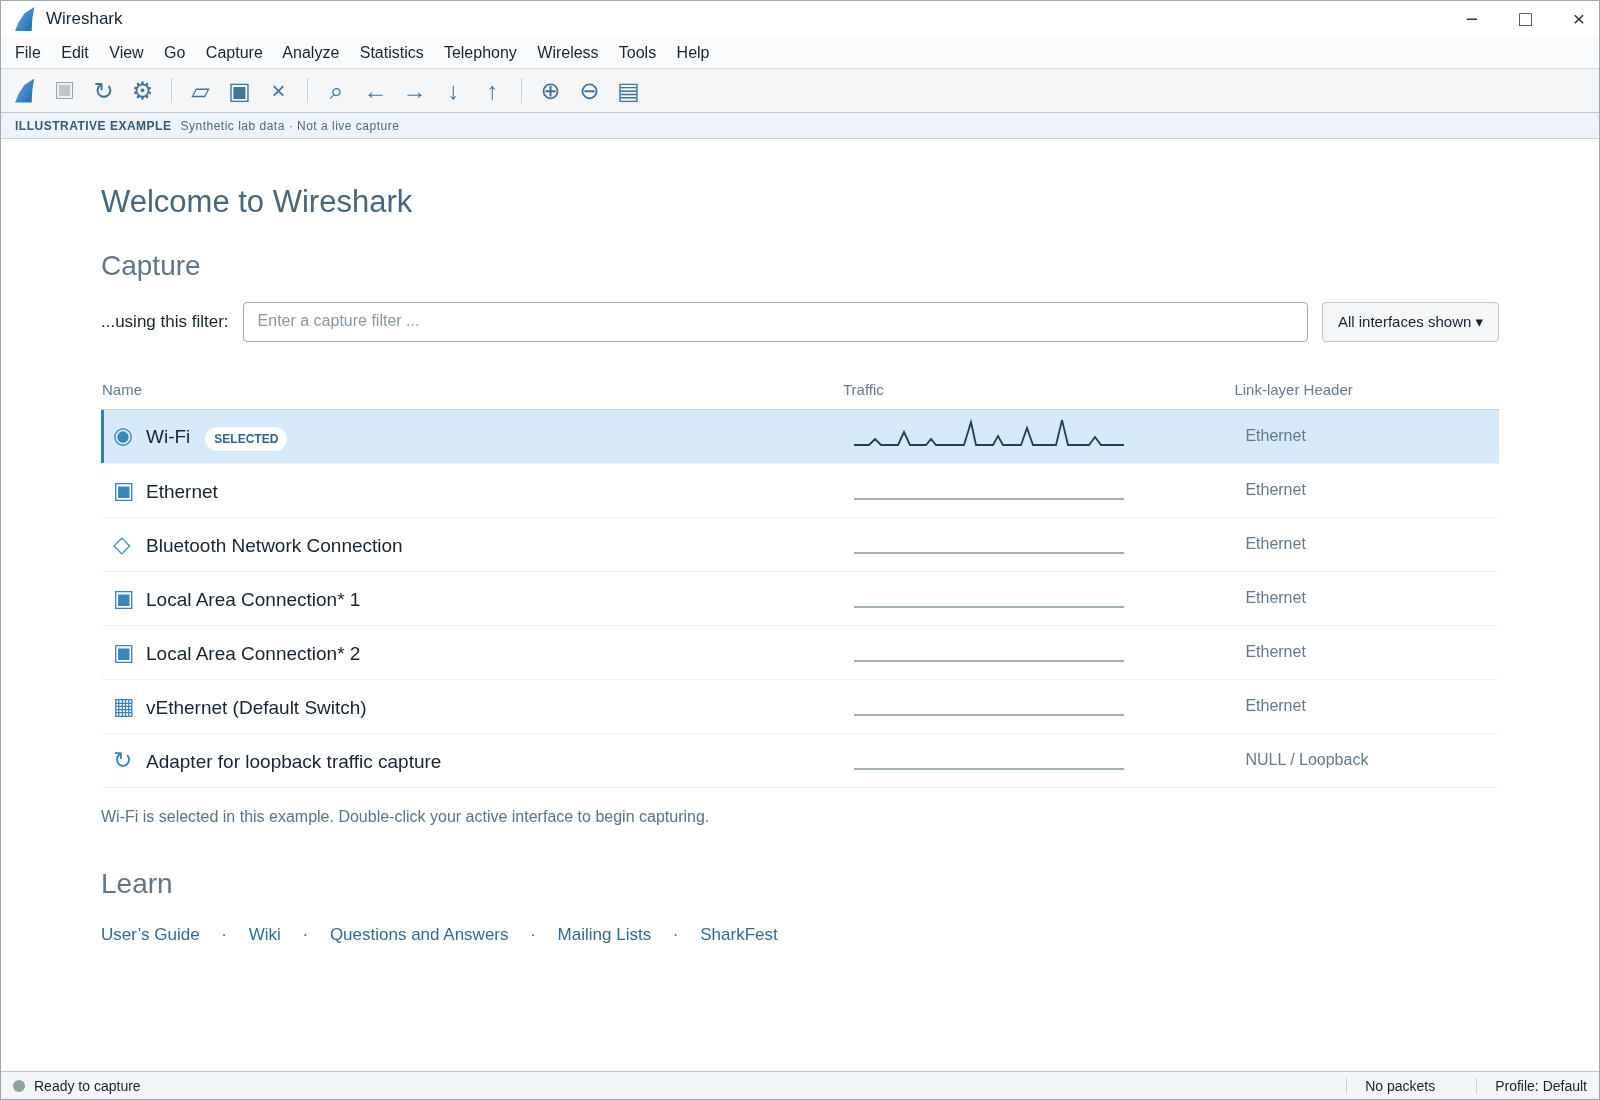
When Wireshark launches, you should see a list of available network interfaces. These may include Wi-Fi, Ethernet, Bluetooth, loopback, virtual adapters, or other interfaces.
Do not start randomly. First, identify the adapter you are actually using.
If you are connected by Wi-Fi, your active interface will usually show traffic moving beside the Wi-Fi adapter. If you are connected by Ethernet, the Ethernet adapter should show activity.
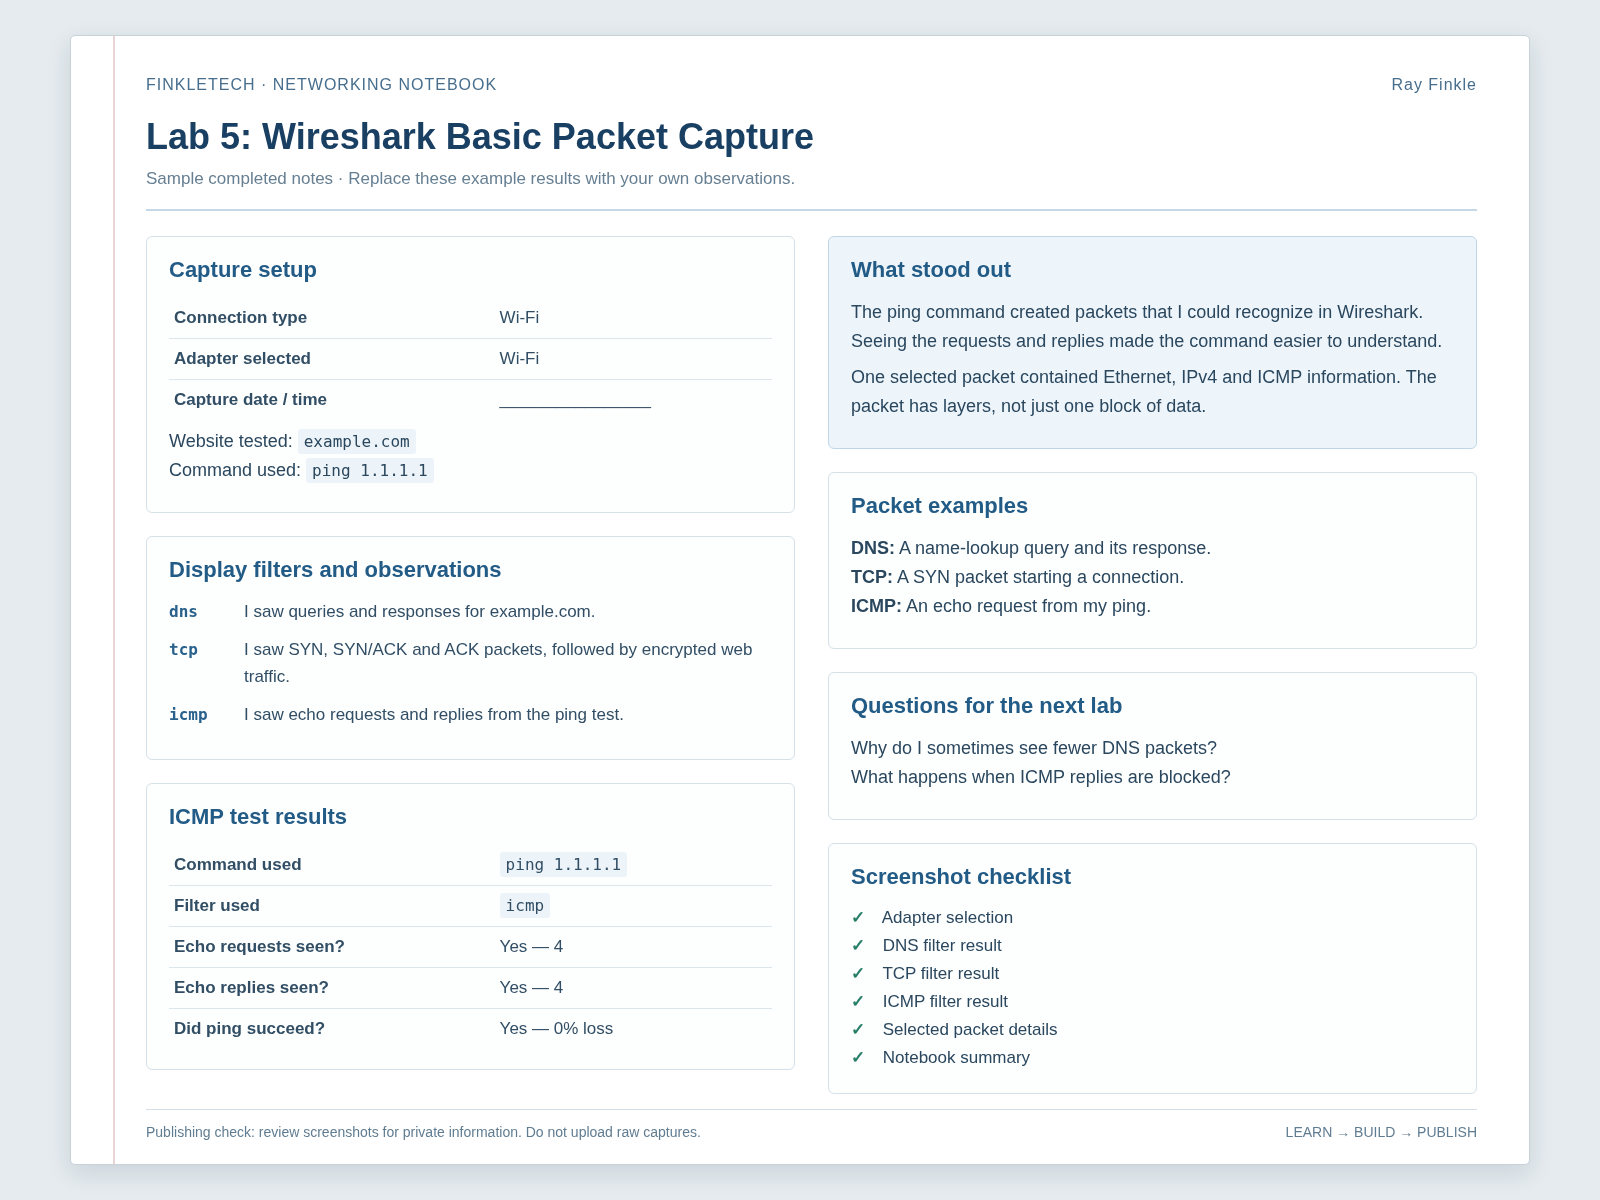
In your notebook, write:
| Detail | My Result |
|---|---|
| Connection Type | [Wi-Fi or Ethernet] |
| Adapter Selected | [Insert adapter name] |
| Capture Date | [Insert date] |
Step 2: Start a Packet Capture
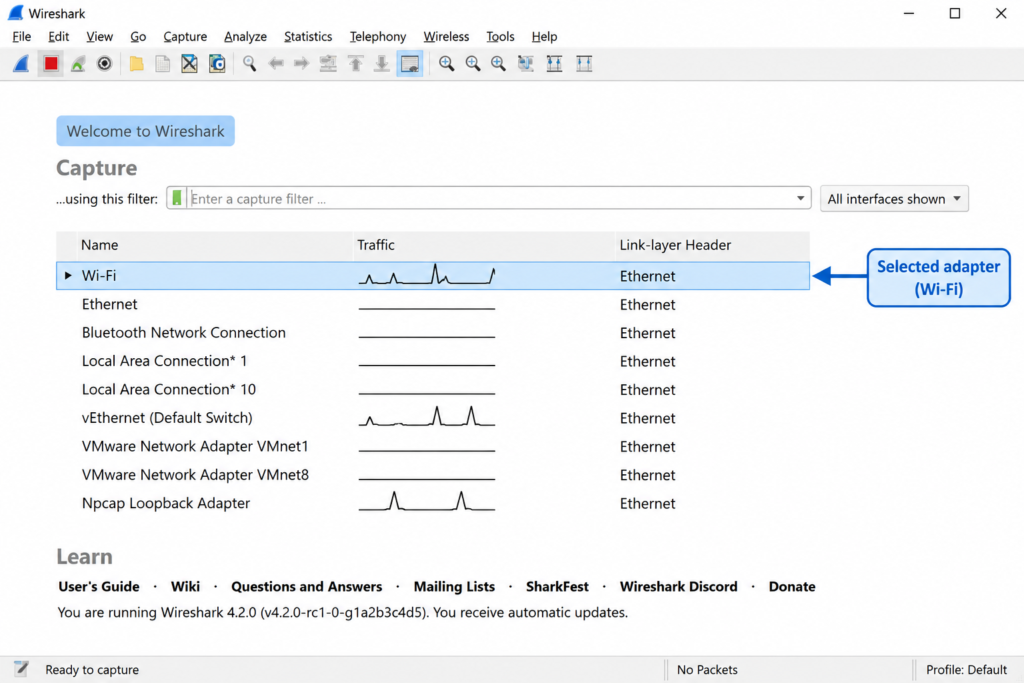
Double-click your active adapter to start capturing packets.
You will probably see packets appear immediately. That is normal. Computers are often communicating in the background even when you are not actively browsing.
Let the capture run for about 20 to 30 seconds without doing anything special. This gives you a first look at background traffic.
Then stop the capture using the red stop button.
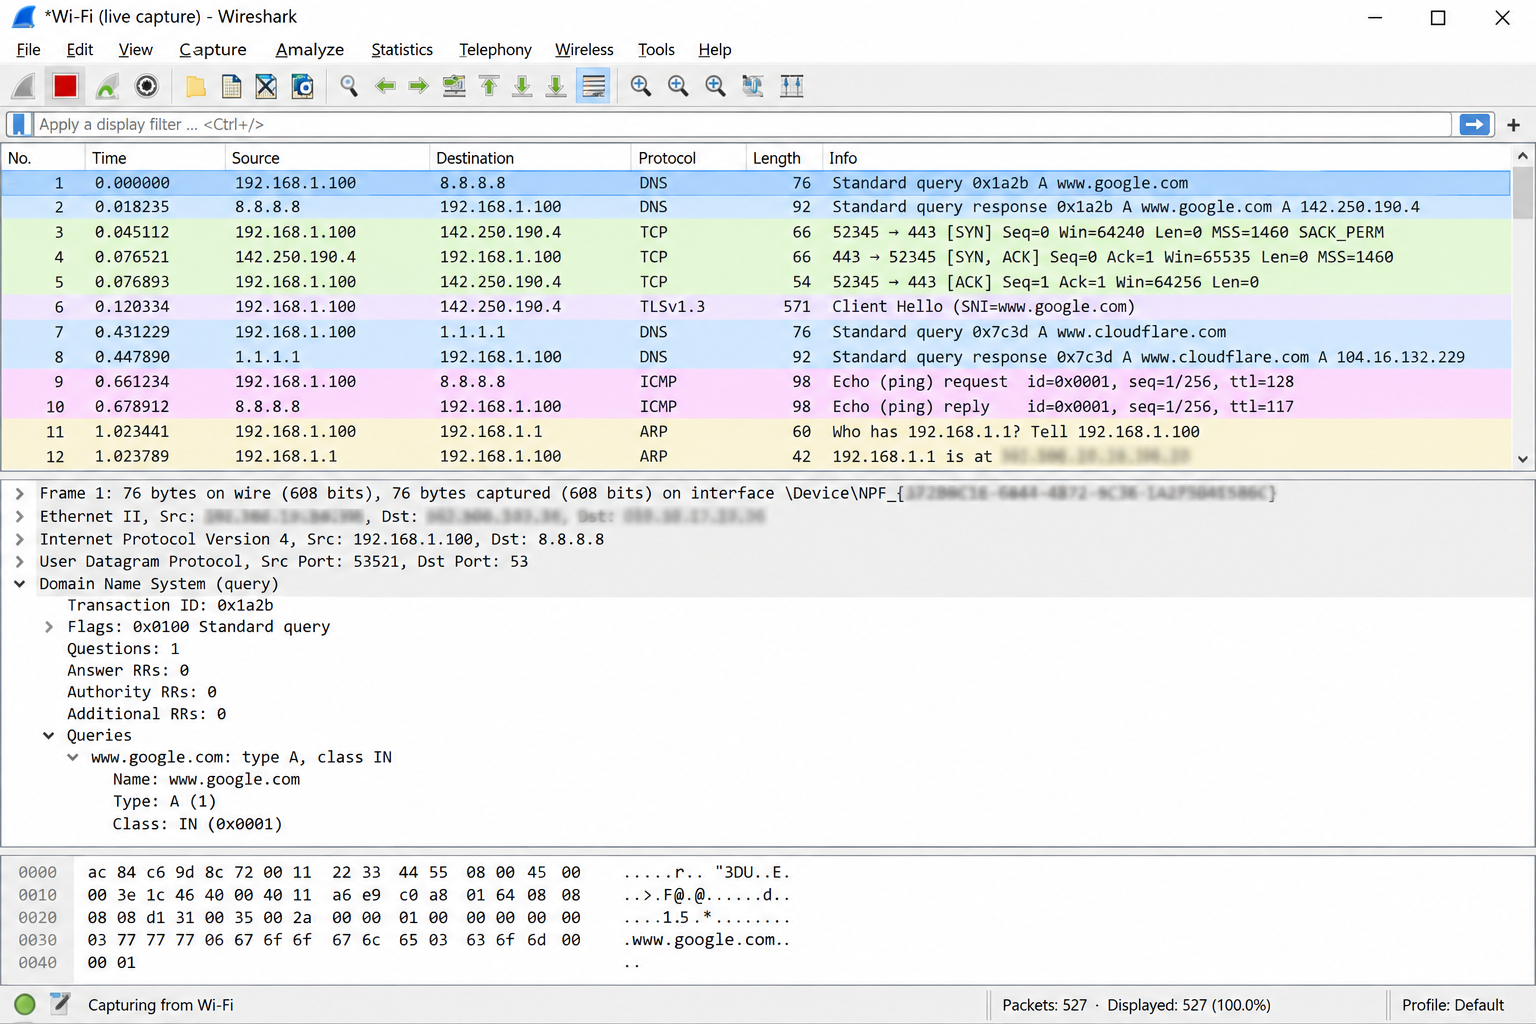
In your notebook, write down:
- approximate number of packets captured
- whether traffic appeared immediately
- any protocol names you noticed
- anything that looked confusing
Do not worry if most of it looks unfamiliar. That is expected.
Step 3: Start a Clean Capture
Now start a cleaner capture for the actual lab.
Click the shark fin or start button again on your active adapter. If Wireshark asks whether to save the previous capture, you can choose not to save it unless you want to keep it.
This time, while the capture is running, open a browser and visit a simple website. Use a normal public website. Do not open anything private or logged-in for this screenshot.
Let the page load, then stop the capture.
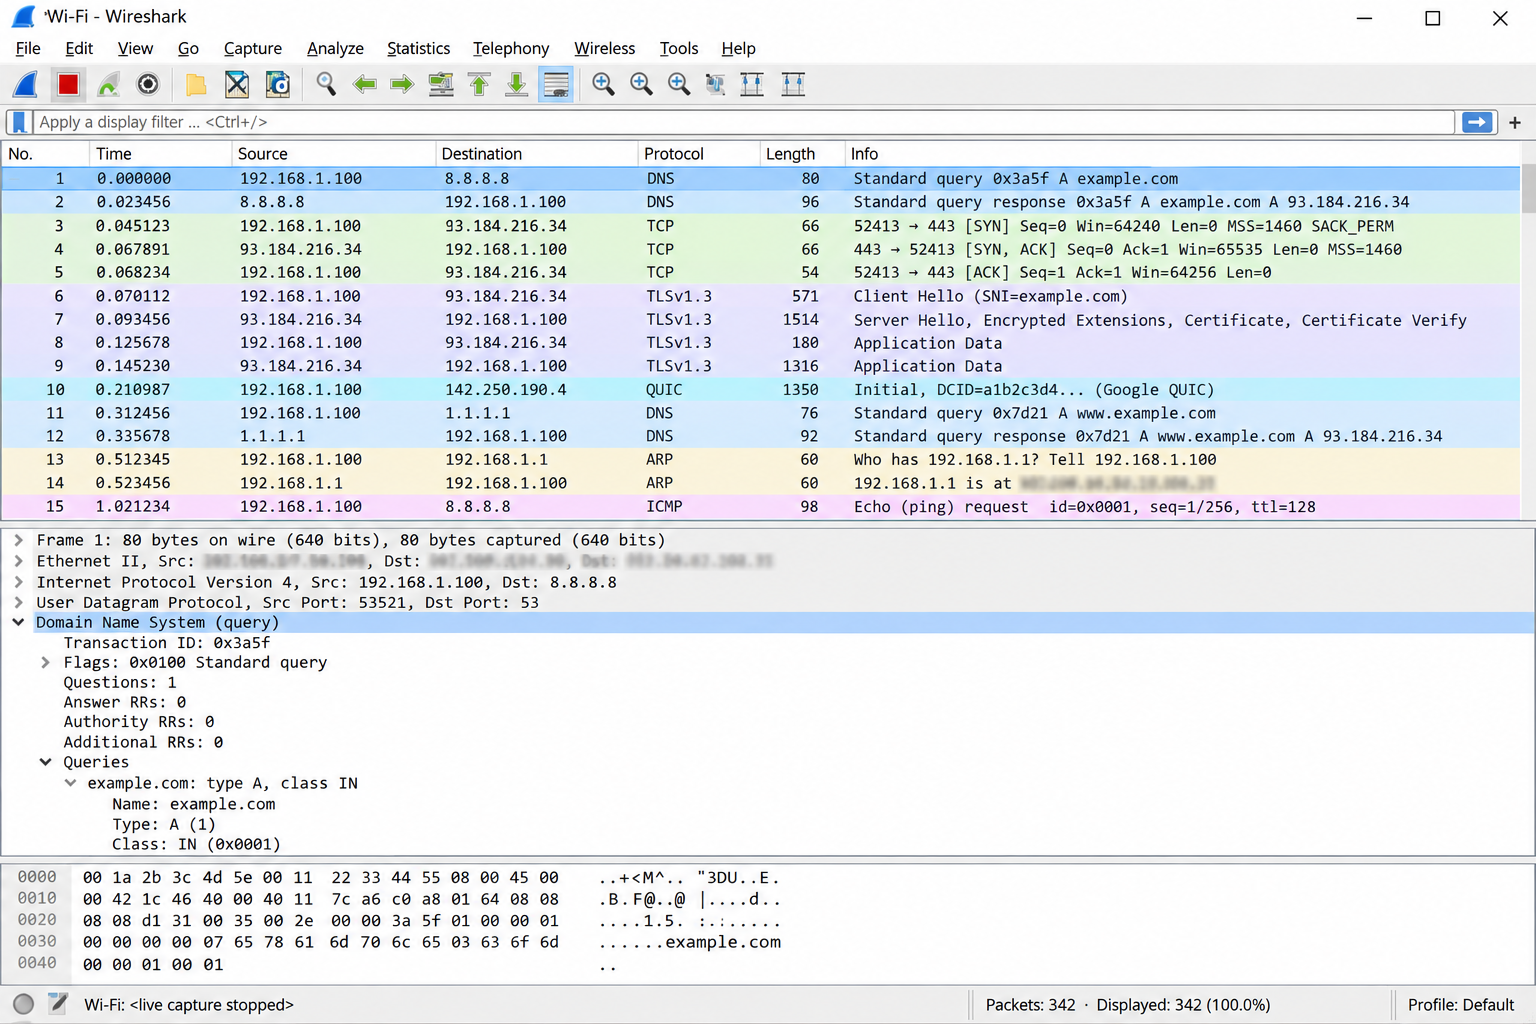
This capture should include a mix of traffic. You may see DNS, TCP, TLS, QUIC, HTTP-related traffic, ARP, or other protocols depending on your network and browser.
Step 4: Filter for DNS Traffic
At the top of Wireshark, find the display filter bar.
Type:
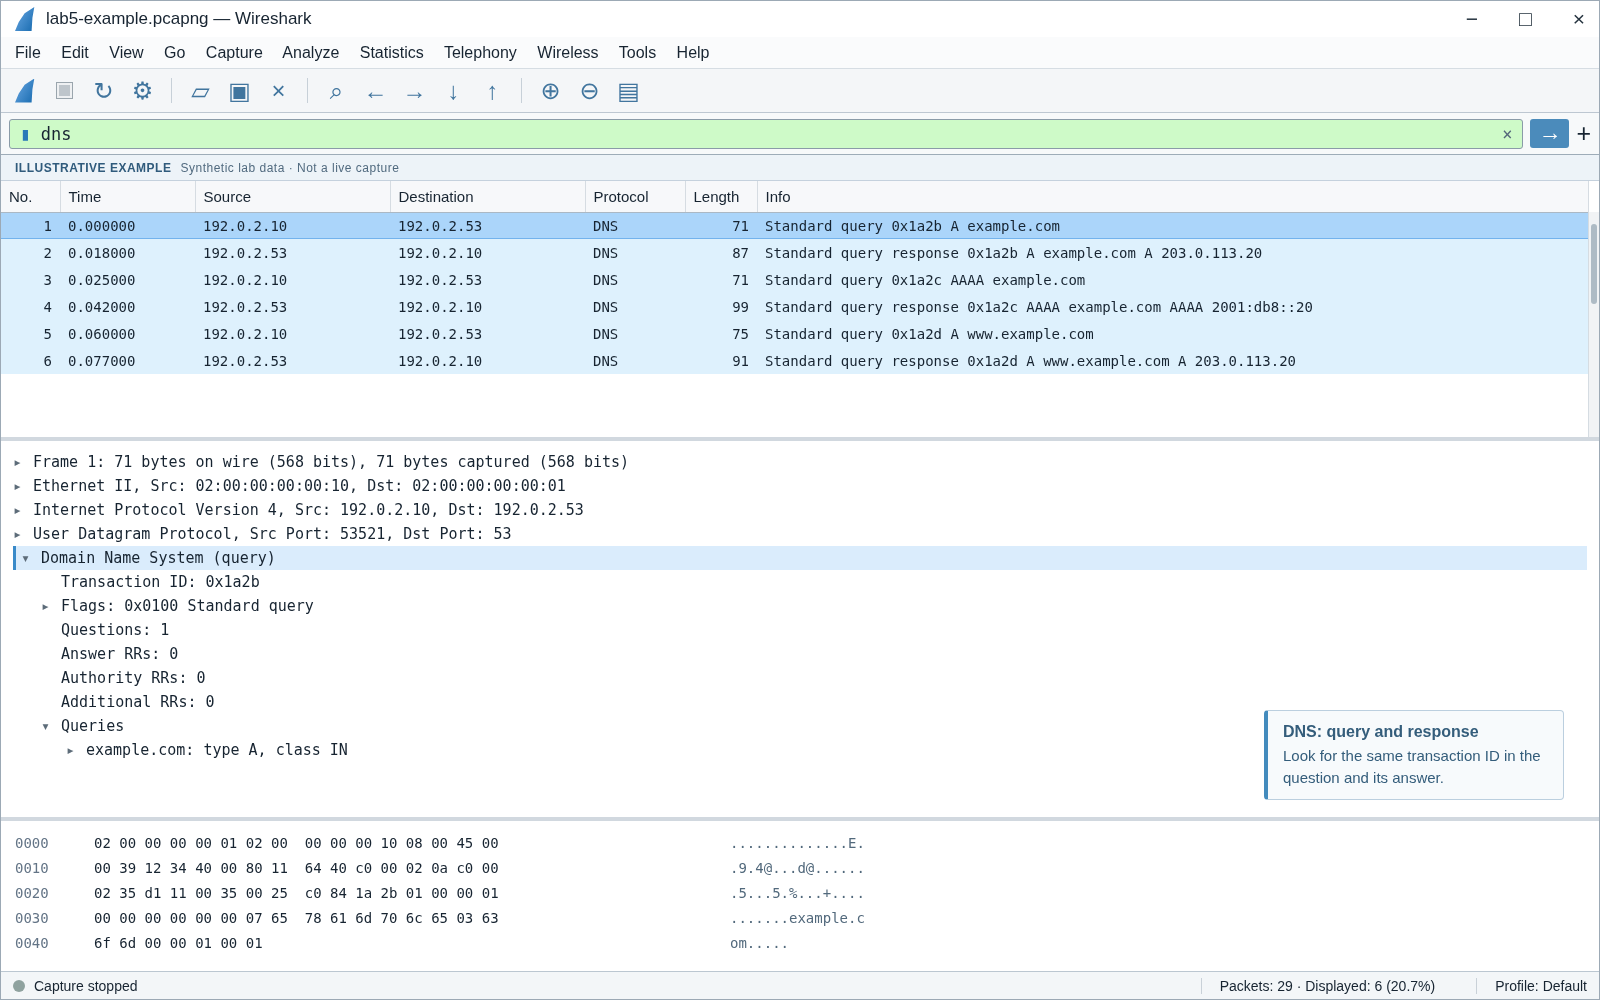
dns
Press Enter.
This filters the view so you only see DNS-related traffic.
DNS traffic often includes queries and responses. A query asks for the IP address of a domain name. A response provides an answer.
Look for rows where the Info column shows a query or response. You may see domain names related to the website you visited. You may also see background DNS requests from apps or services running on your computer.
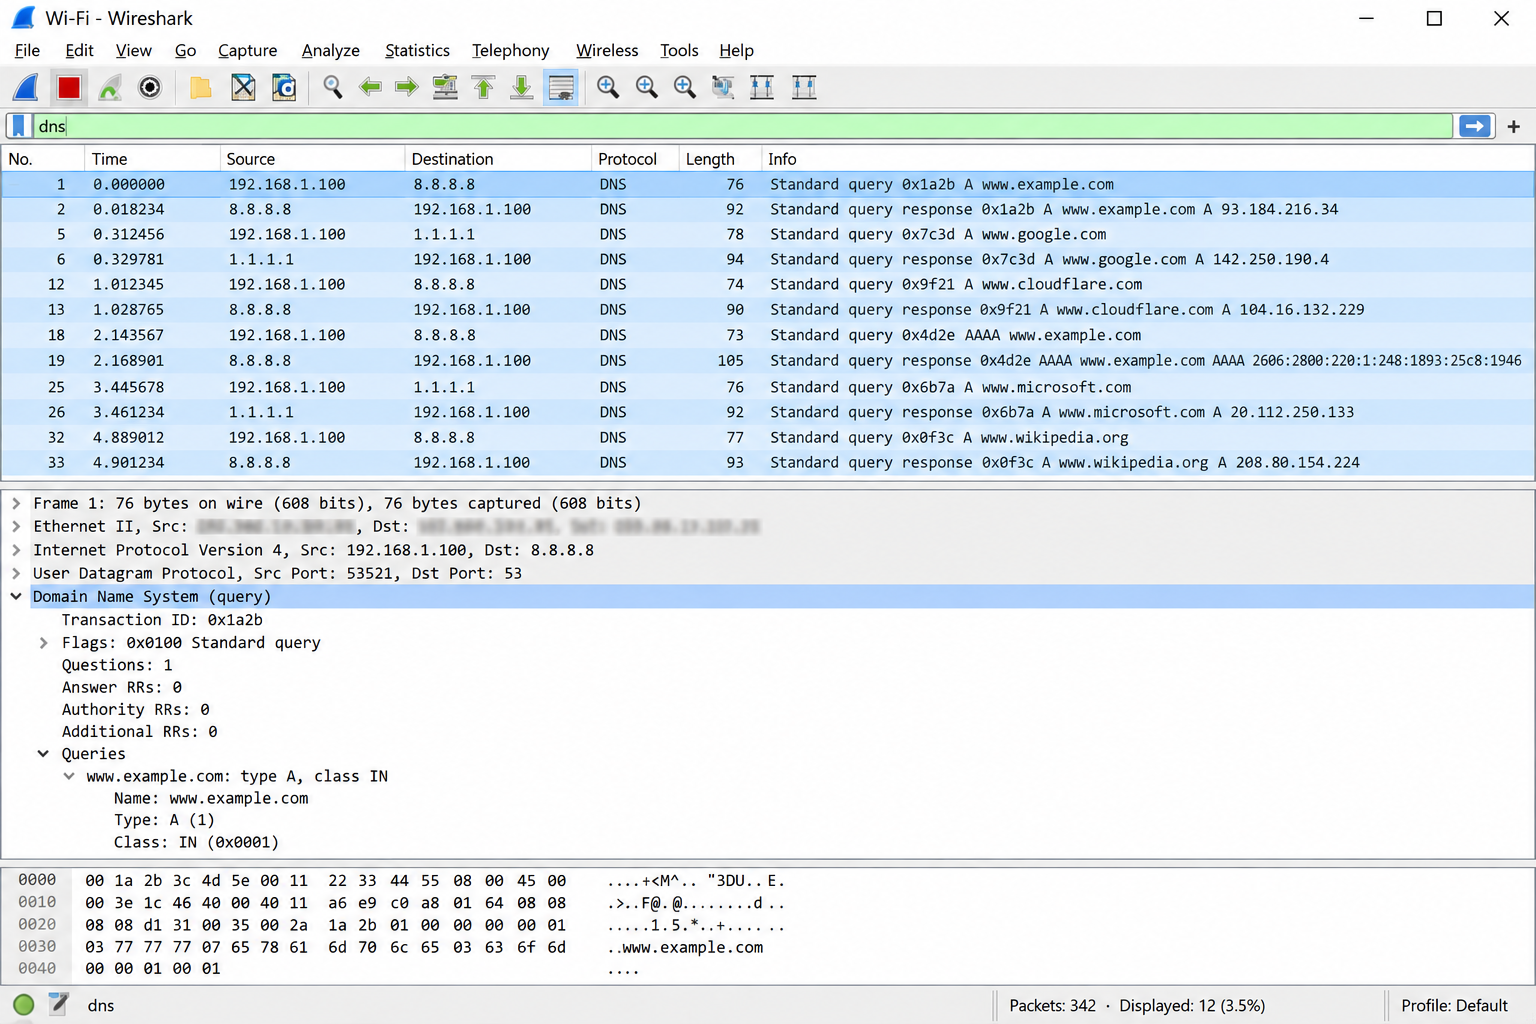
In your notebook, record:
| DNS Detail | My Result |
|---|---|
| Filter Used | dns |
| Example Domain Seen | [Insert domain or blur if private] |
| Query or Response? | [Insert result] |
| Did DNS traffic appear? | [Yes/No] |
Step 5: Understand What DNS Traffic Means
DNS is name resolution. When you type a domain name into a browser, your computer usually needs to find the IP address associated with that name.
In Wireshark, DNS traffic helps you see that process. Your computer asks a DNS server a question, and the DNS server answers. This is one reason DNS is so important in troubleshooting. A device can have internet connectivity but still struggle if DNS is broken.
For Network+ study, connect this back to Lab 4. In the troubleshooting lab, nslookup tested DNS from the command line. In this lab, Wireshark lets you actually see DNS traffic.
That connection matters. nslookup shows the test result. Wireshark shows the traffic underneath.
Step 6: Filter for TCP Traffic
Clear the filter or replace it with:
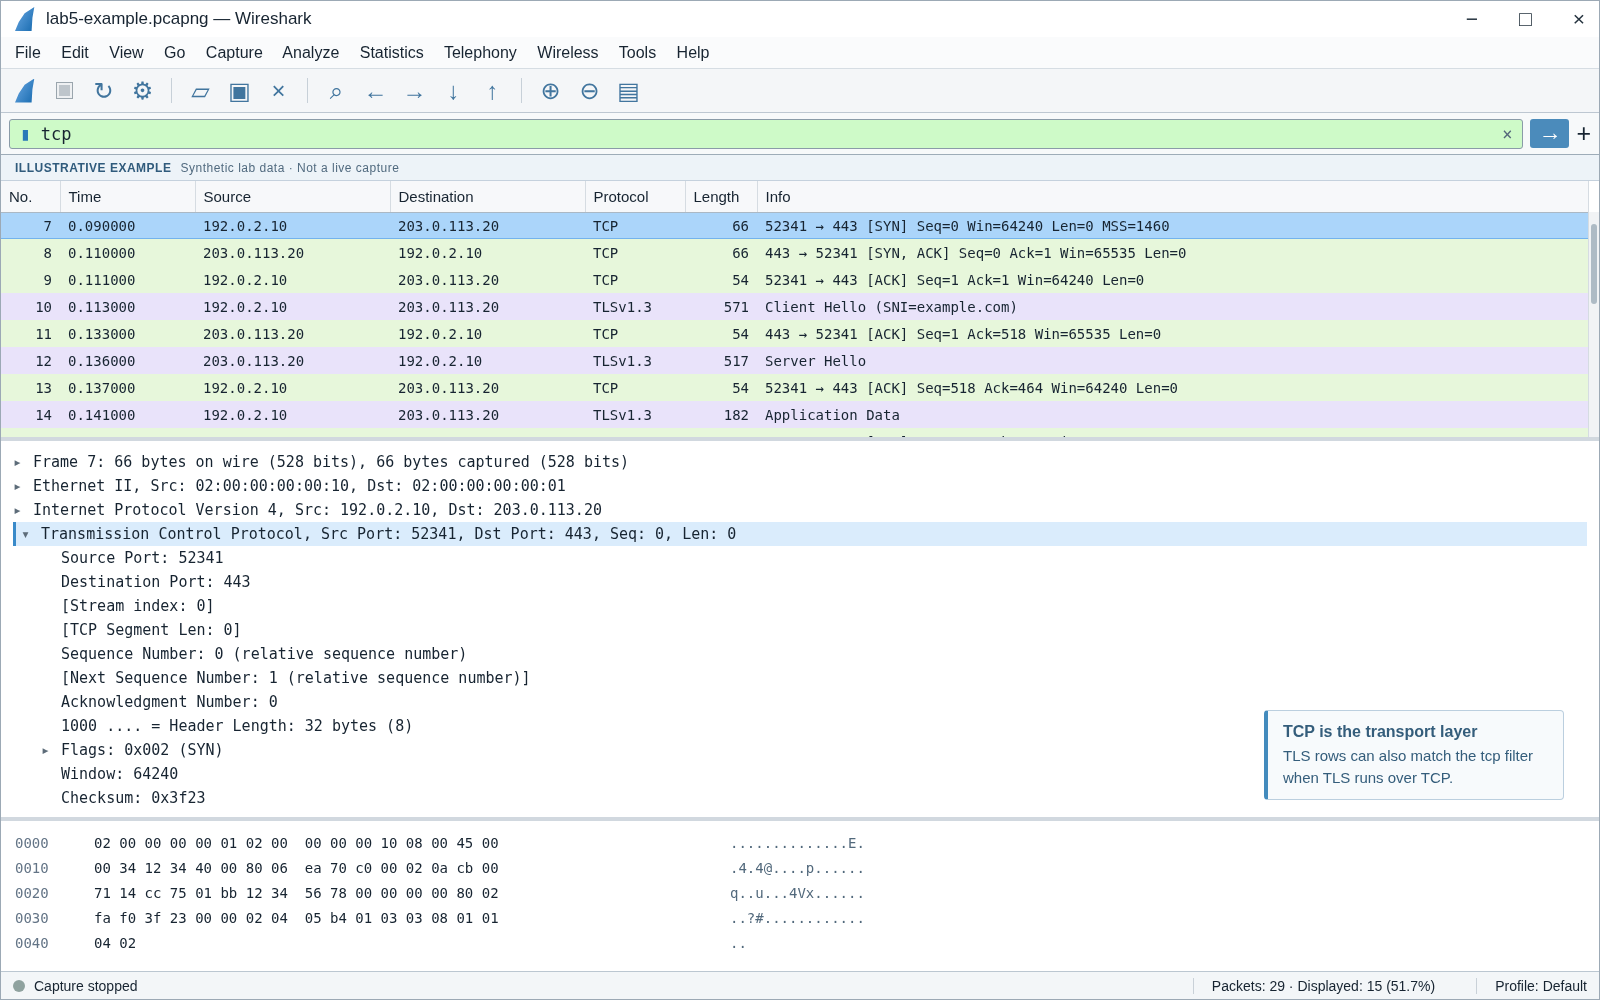
tcp
Press Enter.
TCP stands for Transmission Control Protocol. It is a connection-oriented protocol used by many applications. TCP focuses on reliable delivery, ordering, acknowledgments, and sessions.
You may see a lot of TCP packets. That is normal.
Click on one TCP packet and look at the middle details pane. You may see sections such as Ethernet, Internet Protocol, and Transmission Control Protocol.
Do not try to understand every field yet. Just notice that one packet contains multiple layers of information.
In your notebook, write:
| TCP Detail | My Result |
|---|---|
| Filter Used | tcp |
| Did TCP packets appear? | [Yes/No] |
| Example Source IP | [Blur or simplify] |
| Example Destination IP | [Blur or simplify] |
| Any Port Numbers Visible? | [Yes/No] |
Step 7: Understand TCP at a Beginner Level
TCP is used when reliability matters. It helps devices establish a connection and keep track of communication. Many web, email, file transfer, and application services use TCP.
In Wireshark, TCP traffic may look busy because one website visit can involve many connections. Modern websites often load scripts, images, security connections, analytics, fonts, and other resources. That means a simple page load can create a surprisingly large amount of traffic.
For Network+ study, remember this: TCP is not just “a protocol.” It is a major part of how reliable network communication works. Seeing it in Wireshark makes it less abstract.
Step 8: Generate ICMP Traffic with Ping
Now you will create traffic that is easier to recognize.
Open Command Prompt while Wireshark is ready.
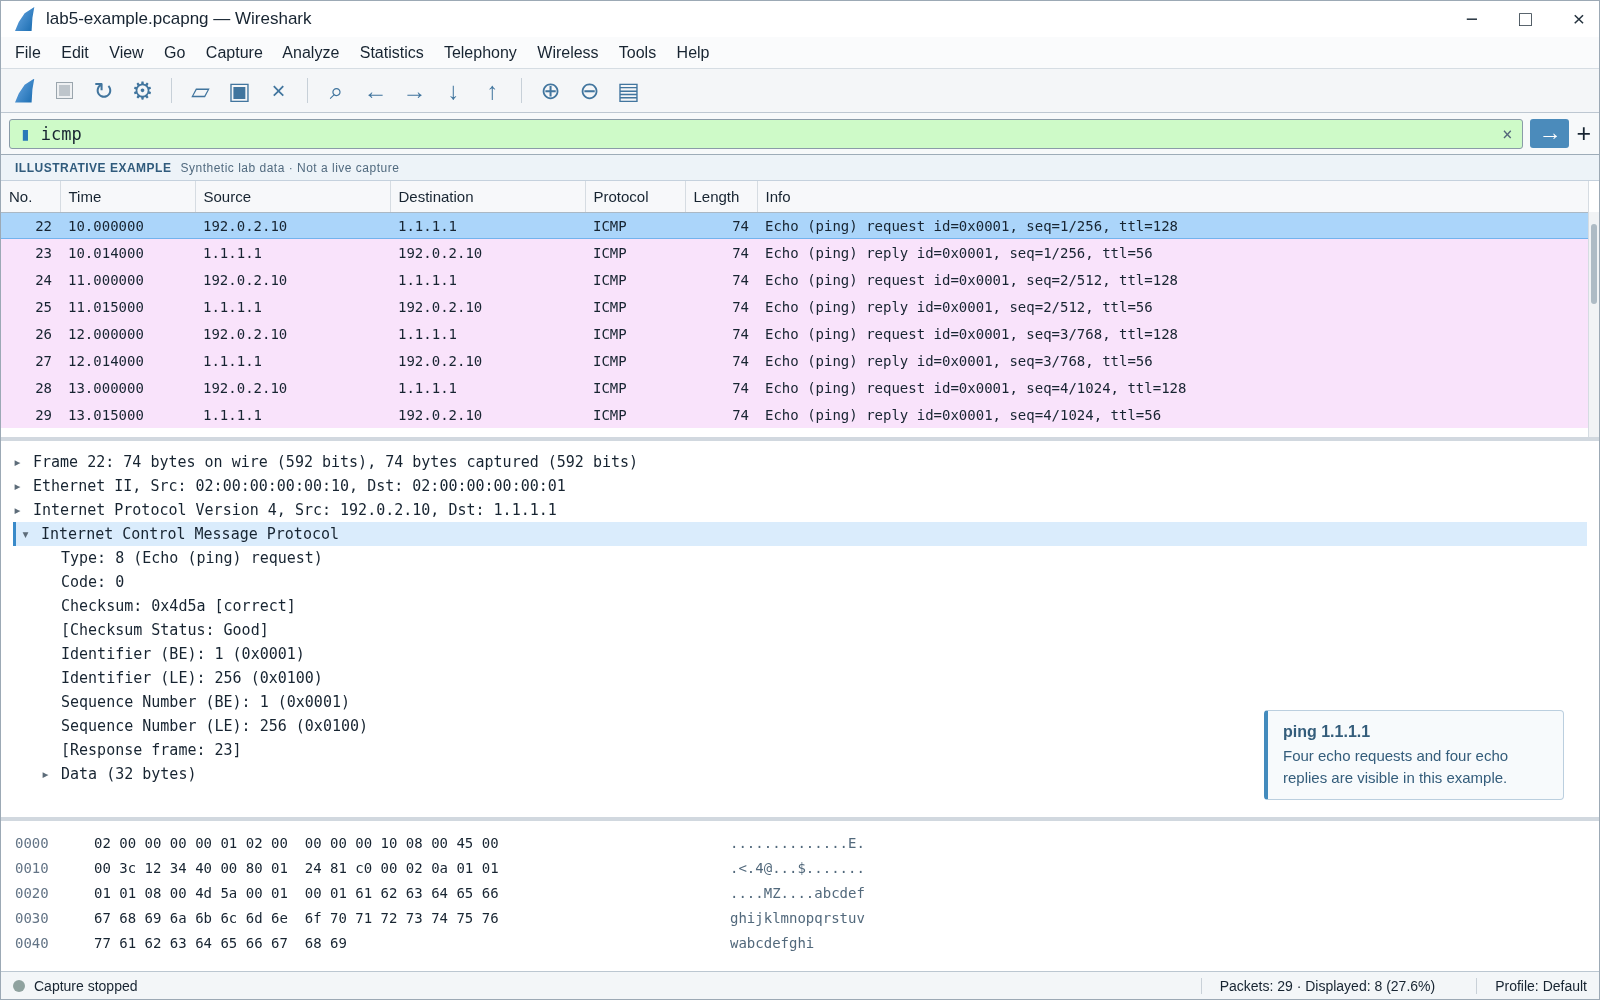
Start a new capture in Wireshark, then run this command in Command Prompt:
ping 1.1.1.1
After the ping finishes, stop the Wireshark capture.
Now use this Wireshark filter:
icmp
You should see ICMP traffic if the ping packets were captured successfully. Look for echo request and echo reply packets.
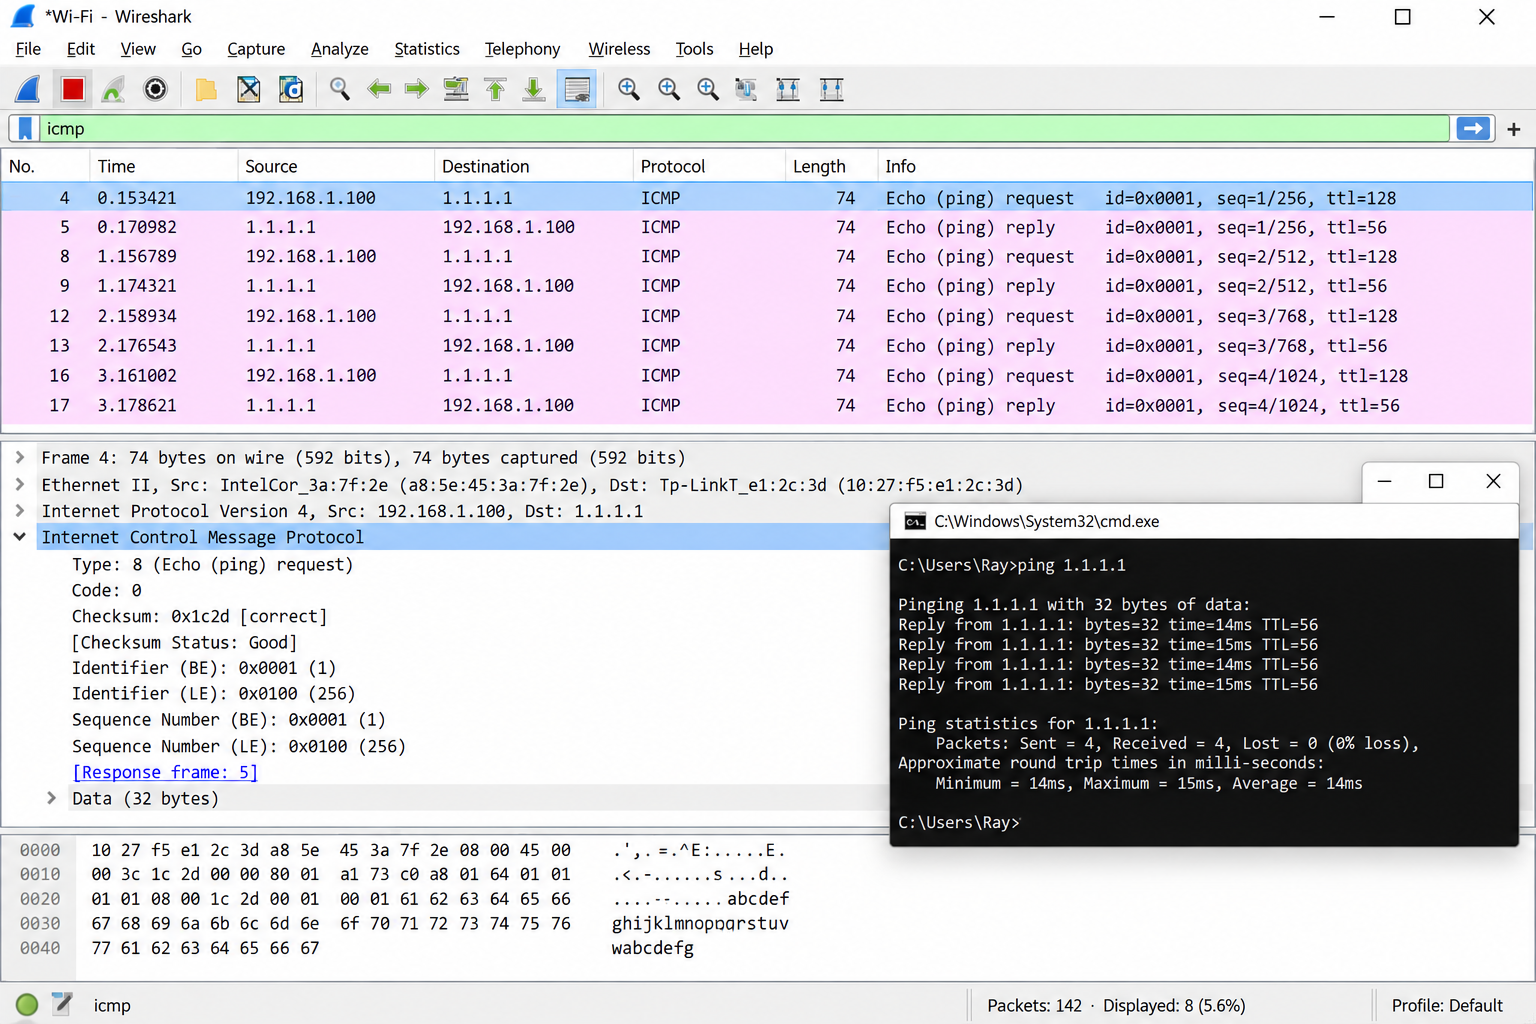
In your notebook, record:
| ICMP Detail | My Result |
|---|---|
| Command Used | ping 1.1.1.1 |
| Filter Used | icmp |
| Echo Requests Seen? | [Yes/No] |
| Echo Replies Seen? | [Yes/No] |
| Did Ping Succeed? | [Yes/No] |
Step 9: Understand ICMP and Ping Traffic
ICMP stands for Internet Control Message Protocol. It is commonly associated with tools like ping.
When you run a ping command, your computer sends ICMP echo requests. If the destination responds, you receive ICMP echo replies. This is useful for testing reachability, but remember that some systems block ICMP. A failed ping does not always prove a device is completely offline.
In this lab, ICMP is useful because it gives you clear traffic to find. You create the ping, then you look for the packets. That makes the relationship between command-line troubleshooting and packet capture much easier to understand.
Step 10: Click a Packet and Inspect the Layers
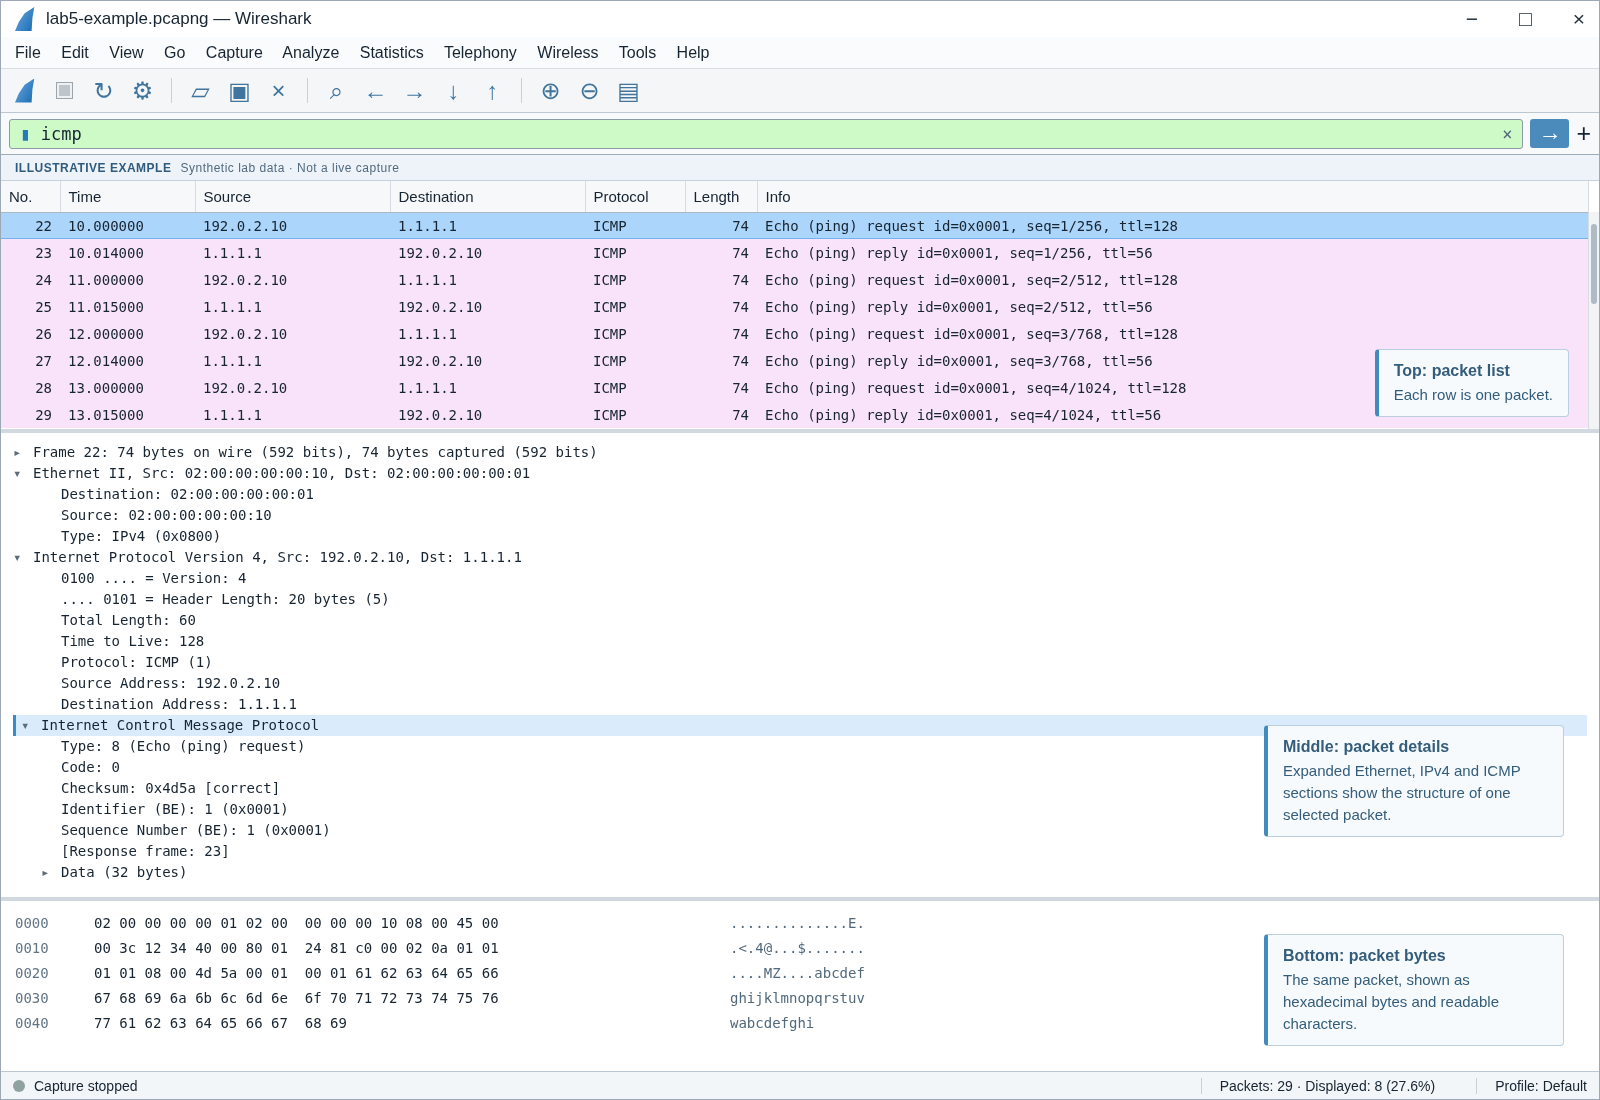
Click one packet in Wireshark.
Look at the three main areas:
- top pane: packet list
- middle pane: packet details
- bottom pane: raw packet bytes
For now, focus mostly on the packet list and packet details.
In the details pane, expand a few sections. You may see Ethernet information, IP information, TCP information, UDP information, DNS information, or ICMP information depending on the packet.
This is your first glimpse into encapsulation. Network data is wrapped with different layers of information as it moves across the network.
[Insert screenshot here: One selected packet with the details pane expanded.]
Do not worry about memorizing every field. Just notice that a packet has structure.
Step 11: Save or Export Screenshots, Not Full Captures
For your public page, screenshots are better than uploading raw capture files.
A .pcap or .pcapng file may contain much more information than you realize. It can reveal traffic patterns, addresses, domain names, device details, and other private data.
For FinkleTech, use carefully cropped screenshots instead. Show enough to teach the lab, but not enough to expose your entire network activity.
Recommended screenshots for this page:
- Wireshark adapter selection
- basic capture running
- DNS filter result
- TCP filter result
- ICMP filter result
- selected packet details
- notebook summary page
Step 12: Write Your Lab Notes
Use this section after you complete the lab.
My FinkleTech Lab Notes
For this lab, I used Wireshark on my [Wi-Fi/Ethernet] adapter. I started with a basic capture and noticed that my computer was already sending and receiving traffic in the background.
After visiting a simple website, I filtered the capture for DNS and saw name lookup traffic. Then I filtered for TCP and saw connection-based traffic related to normal network communication. Finally, I ran a ping command and used the ICMP filter to find echo request and echo reply packets.
One thing I noticed during this lab was [insert what stood out]. This helped me understand that network traffic is not just an abstract textbook idea. It is visible, structured, and constantly moving.
What Your Results Mean
If you captured DNS traffic, you saw name resolution in action. Your computer or an application asked for information about a domain name, and a DNS server responded.
If you captured TCP traffic, you saw connection-based communication. TCP is used by many services that need reliable delivery.
If you captured ICMP traffic after running ping, you saw command-line troubleshooting traffic inside Wireshark. This is a powerful moment for beginners because it connects the ping command with the actual packets being sent and received.
The main lesson is simple: protocols are not just definitions. They produce real traffic that can be captured, filtered, and analyzed.
Common Problems
If you see no packets, you may have selected the wrong adapter. Go back to the Wireshark start screen and choose the adapter with active traffic.
If the dns filter shows nothing, your browser or system may have cached the DNS result, or the traffic may be using a different DNS-related method. Try visiting a different simple website or clearing the filter and capturing again.
If the icmp filter shows nothing after pinging, make sure the capture was running while you ran the ping command. Also confirm you selected the correct adapter.
If Wireshark feels overwhelming, that is normal. Do not try to understand everything. Focus only on DNS, TCP, and ICMP for this beginner lab.
If you are on a VPN, the traffic may look different. For beginner practice, it may be easier to disconnect from the VPN temporarily if it is safe and appropriate to do so.
Network+ Concepts Practiced
This lab practices several important Network+ concepts:
- protocol analyzers
- packet capture
- Wireshark basics
- DNS
- TCP
- ICMP
- ping traffic
- packet filtering
- troubleshooting tools
- network monitoring
- encapsulation basics
- traffic analysis
- privacy and safe handling of captures
The most important skill is learning to observe network traffic without getting overwhelmed. Start simple, filter aggressively, and connect what you see back to the protocols you are studying.
Mini Review Questions
Use these questions after the lab to check your understanding.
- What is Wireshark used for?
- What is a packet capture?
- What Wireshark filter can show DNS traffic?
- What protocol is commonly associated with ping?
- What filter can you use to look for ping traffic?
- Why should you avoid publishing raw packet capture files?
- Why might the wrong Wireshark adapter show little or no useful traffic?
- What is the main difference between seeing
pingresults in Command Prompt and seeing ICMP packets in Wireshark?
Short Answers
- Wireshark is used to capture and analyze network traffic.
- A packet capture is a recorded view of network packets seen by a network interface.
- The filter is
dns. - Ping commonly uses ICMP.
- The filter is
icmp. - Raw captures may contain private network details, addresses, domain names, and other sensitive traffic.
- If you select the wrong adapter, you may not capture the traffic your computer is actually using.
- Command Prompt shows the ping test result, while Wireshark shows the actual ICMP packets involved in the test.