
Lab 1: How to Map Your Home Network
Lab Goal
In this lab, you will create a simple map of your home network. The goal is to identify the main devices on your network, understand how they connect, and document the basic information that helps with troubleshooting.
This is one of the best first networking labs because it turns abstract Network+ terms into something real. Instead of only reading about routers, default gateways, IP addresses, Wi-Fi devices, Ethernet connections, and network documentation, you will find those things on your own network.
By the end of this lab, you should have a basic network diagram showing your internet connection, modem or router, wireless devices, wired devices, and any unknown devices you may need to investigate.
[Insert screenshot here: Finished home network map or diagram]
Why This Lab Matters
A lot of networking starts with one simple question: what is actually connected?
When a user says “the internet is down,” a technician does not magically know where the problem is. The issue could be the computer, Wi-Fi adapter, Ethernet cable, switch, router, modem, ISP connection, DNS server, DHCP service, or even one misconfigured device. Before you can troubleshoot properly, you need to understand the layout of the network.
That is why network documentation matters. A basic network map helps you see the relationship between devices. It also gives you a starting point when something breaks. If you know your router’s IP address, which devices are wired, which devices use Wi-Fi, and which devices are normally connected, you can troubleshoot faster and with less guessing.
For Network+ study, this lab helps connect several important ideas: LAN structure, IP addressing, default gateways, DHCP, wireless clients, wired clients, device identification, and basic documentation. These are not just exam terms. They are real things sitting on your desk, in your router settings, and inside your operating system.
What You Will Learn
In this lab, you will learn how to identify the main parts of a small home network. You will find your computer’s IP information, locate your default gateway, check your router’s connected device list if available, and create a simple network map.
You will also practice thinking like a technician. Instead of just saying “my laptop is connected to Wi-Fi,” you will ask better questions. What IP address did it receive? What router is it using as a gateway? Is it using DHCP? What other devices are on the same network? Are there any devices you do not recognize?
This lab is not about making a perfect enterprise-level diagram. It is about building the habit of documenting what you see.
Tools Needed
For this lab, you only need basic tools. You do not need expensive hardware or a professional networking rack.
You will need:
- A Windows laptop or desktop
- Access to your home Wi-Fi or Ethernet network
- Command Prompt or PowerShell
- Access to your router admin page if possible
- A notes app, notebook, spreadsheet, or diagram tool
- Optional: phone or tablet to compare another device
- Optional: draw.io, Canva, PowerPoint, Google Slides, or paper for your map
If you do not know your router login, that is okay. You can still complete most of this lab using your computer’s network settings and command-line tools.
Safety and Privacy Note Before You Start
Before publishing screenshots online, review them carefully. Network screenshots can reveal information you may not want public.
Do not publish your public WAN IP address, router serial number, Wi-Fi password, full MAC addresses, or anything that identifies your exact home network. If a screenshot shows sensitive information, blur it or crop it before uploading it to your page.
It is okay to show private local IP addresses like 192.168.x.x or 10.x.x.x in an educational context, but you should still avoid exposing more detail than needed. The goal is to teach the lab, not leak your home network information.
[Insert screenshot here: Example of a blurred or cropped safe screenshot]
Quick Concept Refresher: What Is a Home Network?
A home network is a small local area network, often called a LAN. It connects your devices together so they can communicate with your router and reach the internet.
In many homes, the router is the center of the network. Sometimes the modem and router are separate devices. Sometimes they are combined into one box from the internet provider. The modem connects your home to your internet service provider. The router manages your local devices, assigns IP addresses, handles Wi-Fi, and acts as the default gateway for devices leaving the local network.
Your laptop, phone, smart TV, game console, printer, security camera, and smart home devices may all be clients on the network. Some connect using Wi-Fi. Others may connect using Ethernet cables. Your job in this lab is to identify as many of them as possible and organize them into a simple map.
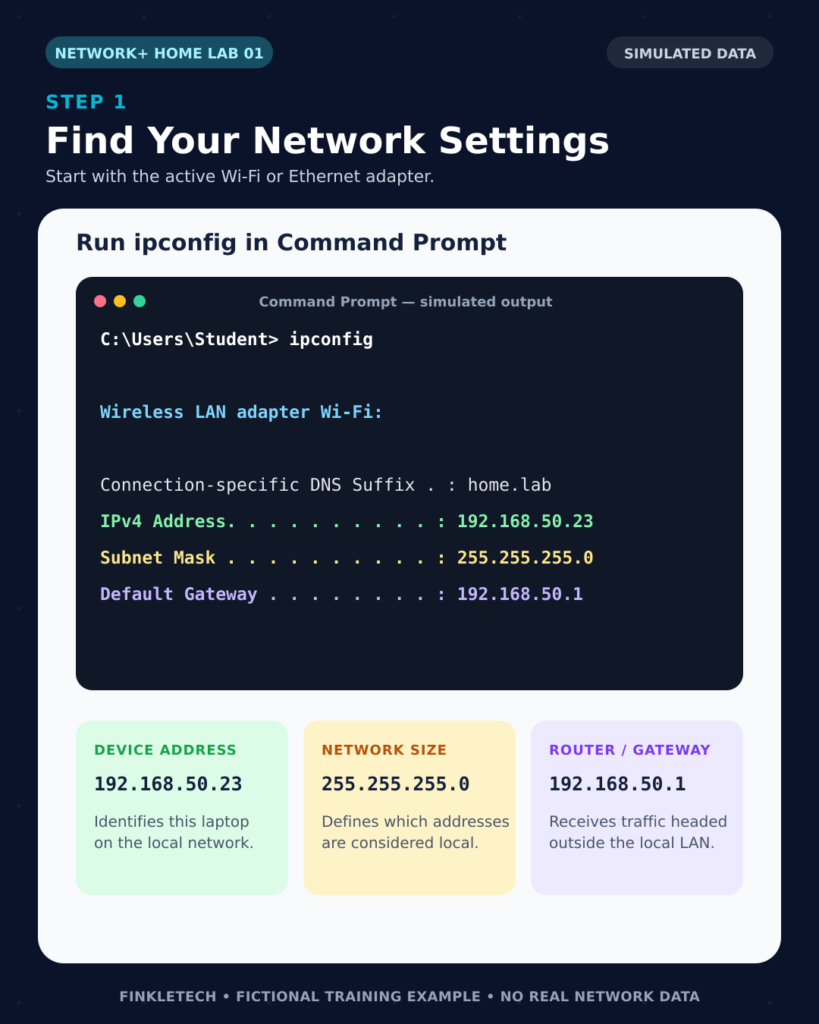
Step 1: Find Your Own Network Settings
Start with your own computer. This is the easiest device to inspect because you can directly view its network configuration.
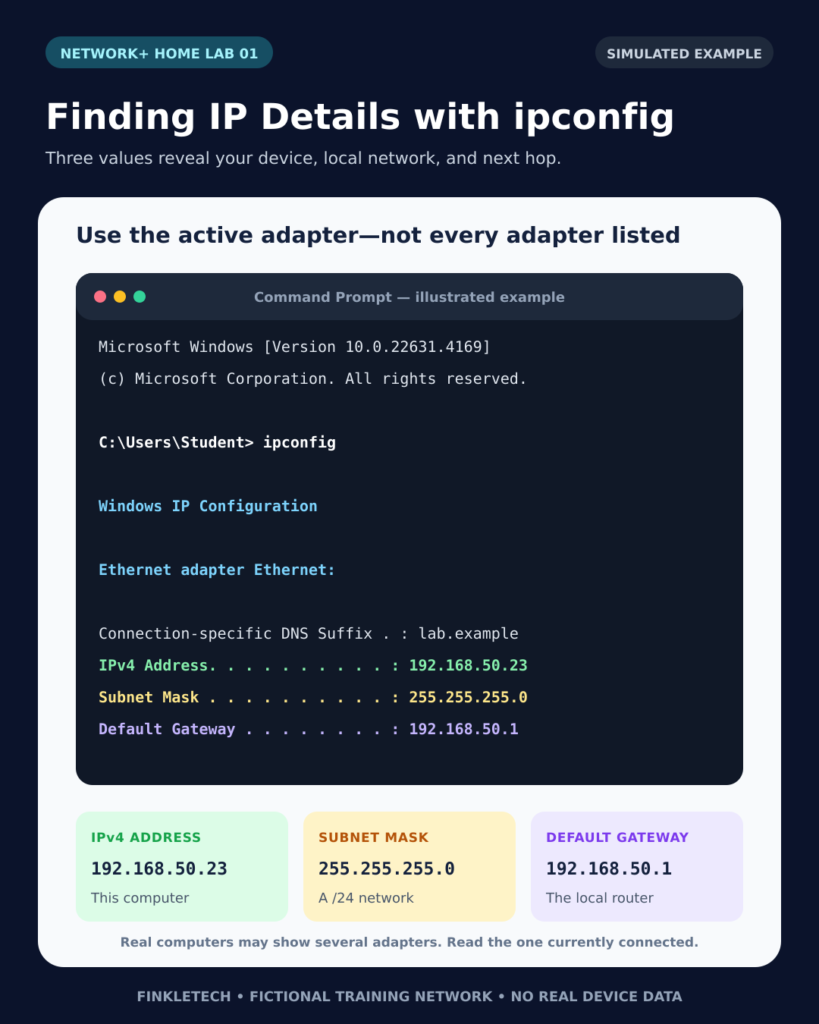
On Windows, open Command Prompt. You can do this by pressing the Windows key, typing cmd, and opening Command Prompt.
Run this command:
ipconfig
Look for your active adapter. If you are on Wi-Fi, it may say something like “Wireless LAN adapter Wi-Fi.” If you are plugged in with Ethernet, it may say something like “Ethernet adapter Ethernet.”
Write down the following:
- IPv4 Address
- Subnet Mask
- Default Gateway
The IPv4 address is your computer’s local network address. The subnet mask helps define the size of the network. The default gateway is usually your router’s local IP address.
Step 2: Understand What Those Values Mean
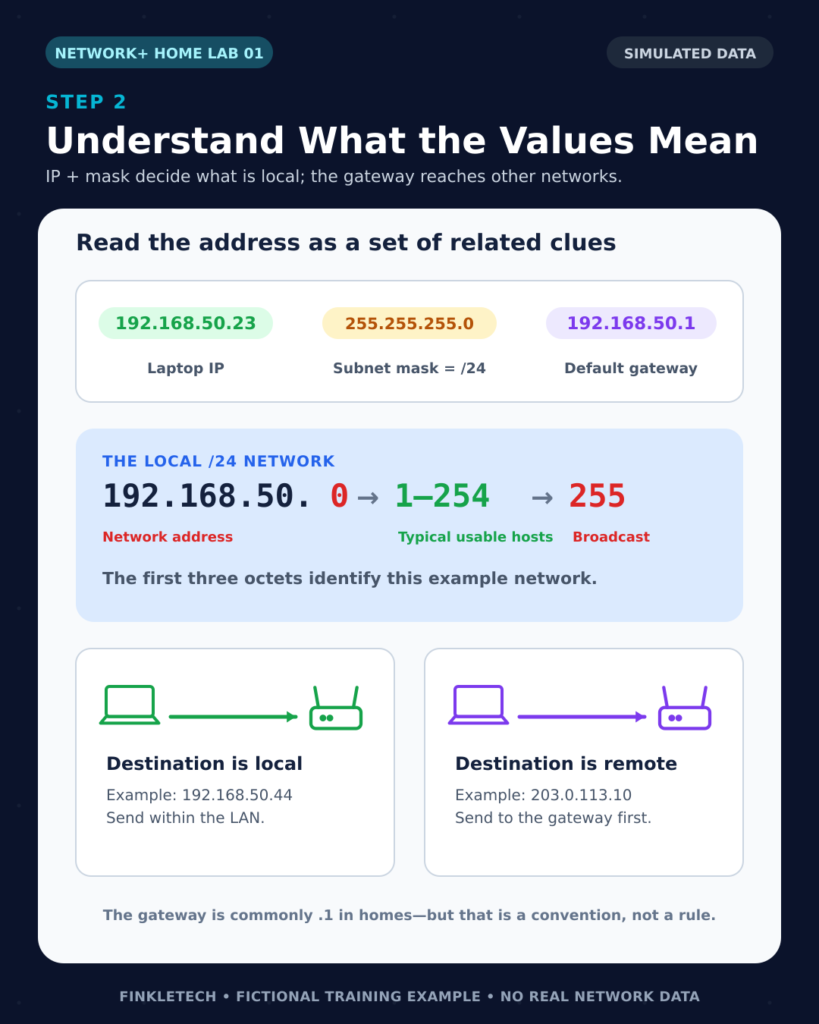
Do not just copy the values and move on. This is where the lab becomes useful for Network+ study.
Your IPv4 address is the address your computer uses on the local network. In many home networks, it will look something like 192.168.1.25, 192.168.0.40, or 10.0.0.15. These are private IP address ranges commonly used inside local networks.
Your default gateway is usually the router. If your computer wants to reach something outside your local network, such as a website, it sends traffic to the default gateway. The gateway then forwards that traffic toward the internet.
The subnet mask helps your computer understand which addresses are local and which addresses are outside the local network. For many home networks, you may see 255.255.255.0. That usually means the local network has addresses in a range like 192.168.1.1 through 192.168.1.254.
You do not need to master subnetting in this lab, but you should start connecting the pieces. Your IP address identifies your device. Your gateway points to your router. Your subnet mask helps define the local network boundaries.
Step 3: Find More Details with IPConfig All
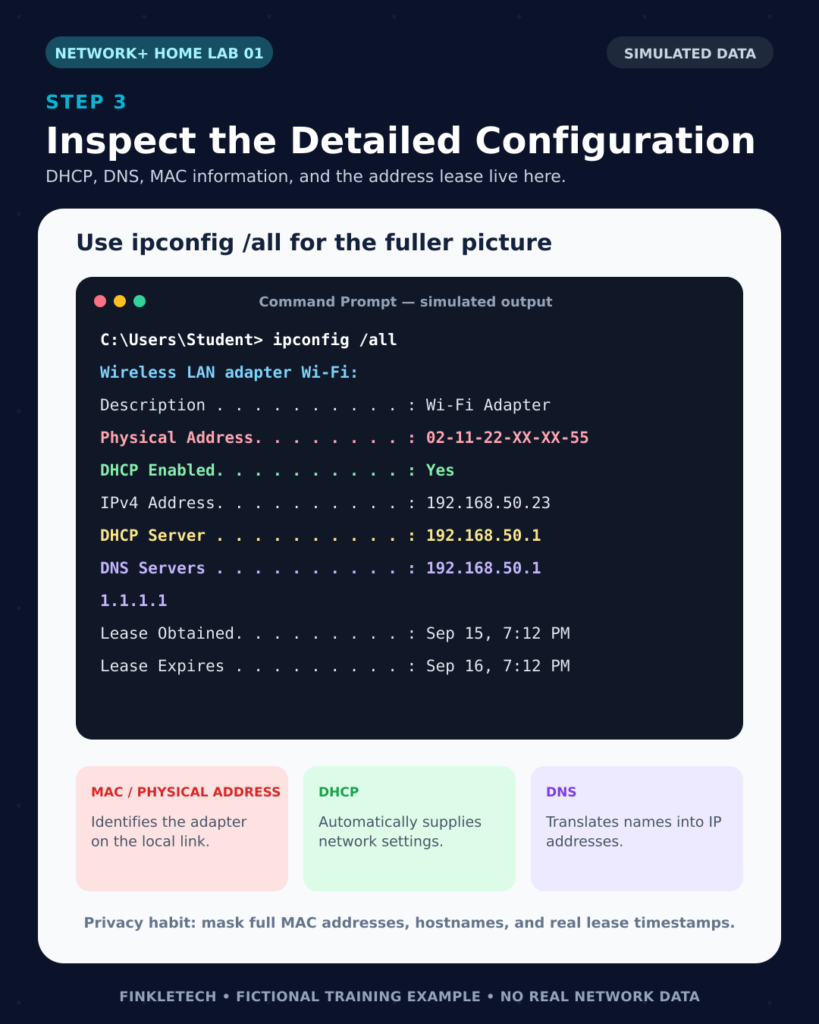
Now run:
ipconfig /all
This gives you more detailed information.
Look for:
- Physical Address
- DHCP Enabled
- DHCP Server
- DNS Servers
- Lease Obtained
- Lease Expires
The physical address is your MAC address. This is a hardware address associated with your network adapter. For privacy, do not publish your full MAC address online.
DHCP tells you whether your computer received its network settings automatically. In most home networks, DHCP is enabled. Your router usually acts as the DHCP server and gives your laptop an IP address, subnet mask, gateway, and DNS settings.
DNS servers help translate domain names into IP addresses. When you type a website name into a browser, DNS helps your computer find where that website lives.
Step 4: Log Into Your Router if Possible
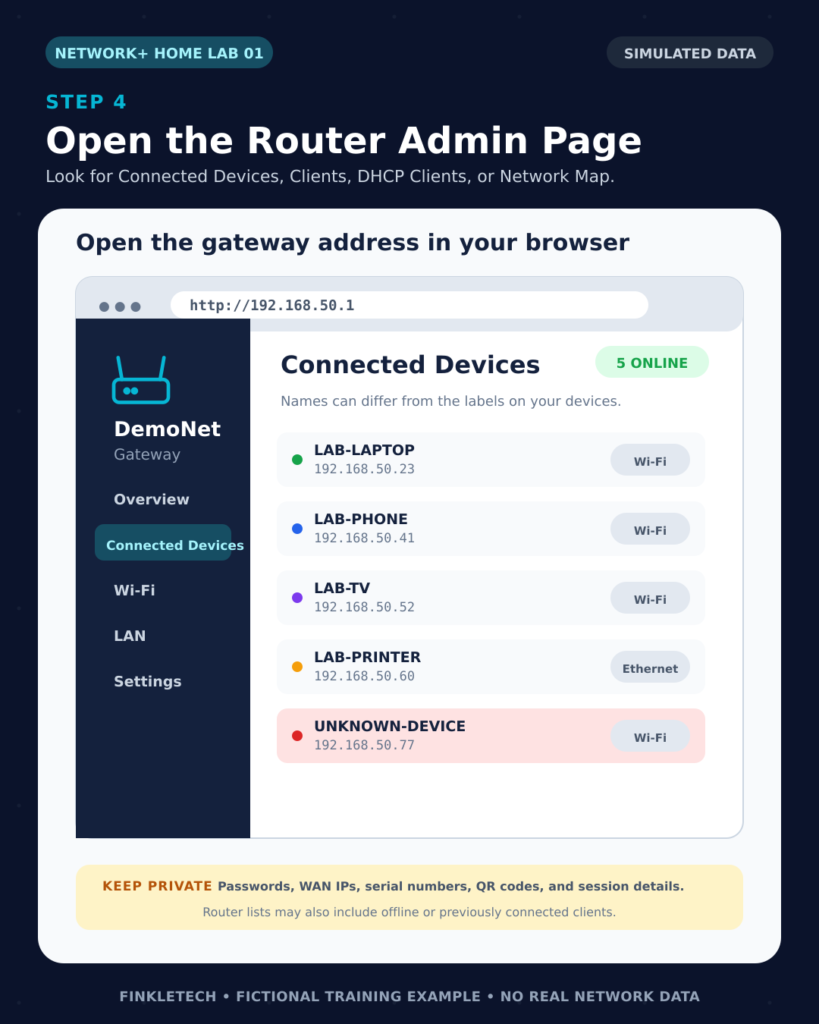
Next, try to access your router’s admin page.
Open a browser and type your default gateway IP address into the address bar. For example, if your default gateway is 192.168.1.1, enter that into the browser.
You may see a router login page. If you know the username and password, log in. If you do not know them, do not worry. You can still continue the lab without router access.
Once inside the router interface, look for a section called something like:
- Connected Devices
- Device List
- Clients
- DHCP Clients
- LAN Devices
- Attached Devices
- Network Map
Every router brand uses different wording. The goal is to find a list of devices currently connected to your network.
Step 5: Record Connected Devices
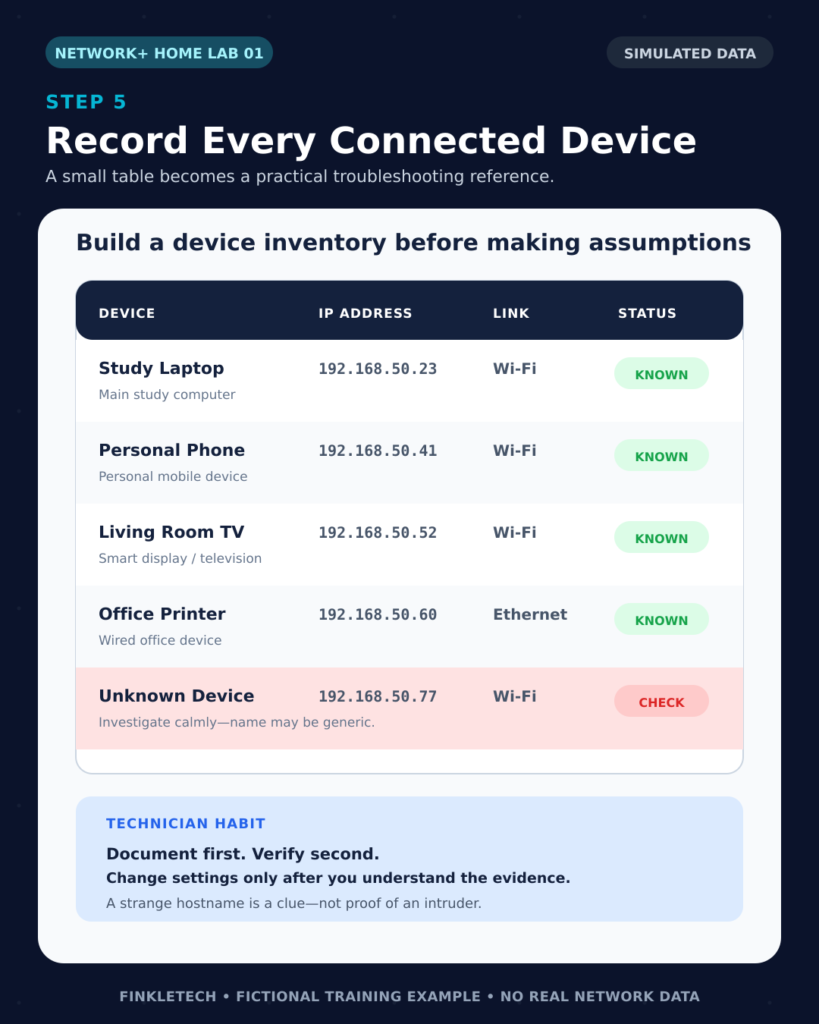
Create a simple table in your notes. You can use a spreadsheet, WordPress table, notebook, or plain text.
Use columns like this:
| Device Name | IP Address | Connection Type | Known Device? | Notes |
|---|---|---|---|---|
| Laptop | 192.168.x.x | Wi-Fi | Yes | Main study computer |
| Phone | 192.168.x.x | Wi-Fi | Yes | Personal phone |
| Smart TV | 192.168.x.x | Wi-Fi | Yes | Living room TV |
| Unknown Device | 192.168.x.x | Wi-Fi | Unsure | Investigate later |
You may not recognize every device immediately. That is normal. Some devices appear with strange names, especially phones, smart TVs, printers, cameras, or IoT devices. Do not panic if you see one unknown device. Make a note and investigate carefully.
This step builds a real troubleshooting habit: document first, assume second. A sloppy technician guesses. A careful technician records what is actually there.
Step 6: Identify Wired vs Wireless Devices
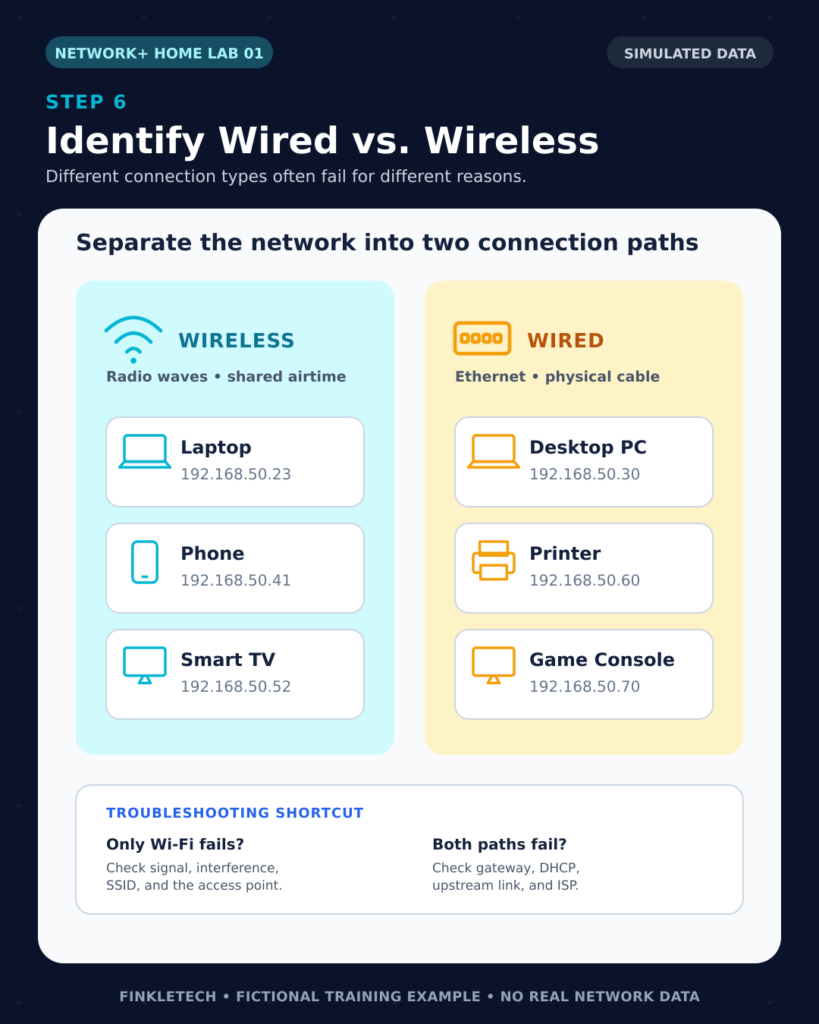
Now separate your devices into wired and wireless categories.
Wired devices use Ethernet cables. These may include desktop computers, game consoles, switches, smart TVs, servers, or network-attached storage. Wireless devices use Wi-Fi. These usually include phones, laptops, tablets, smart speakers, and many smart home devices.
This matters because wired and wireless problems are often different. If only Wi-Fi devices are failing, the issue may involve the wireless radio, signal strength, interference, SSID settings, or Wi-Fi password. If wired devices are failing too, the problem may be closer to the router, modem, DHCP service, or ISP connection.
By separating wired and wireless devices on your map, you make future troubleshooting easier.
Step 7: Draw Your Home Network Map
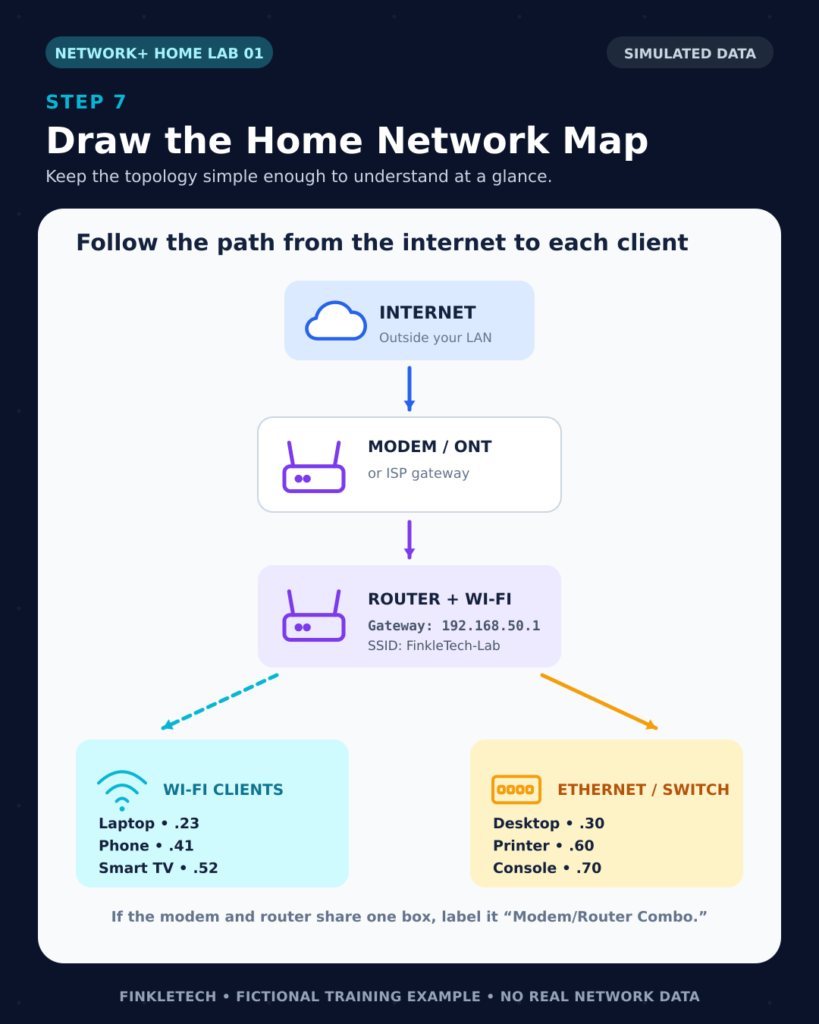
Now create a simple diagram.
At minimum, include:
- Internet
- Modem or ISP gateway
- Router
- Switch, if you have one
- Your main computer
- Wi-Fi devices
- Wired devices
- Printer, smart TV, game console, or other major devices
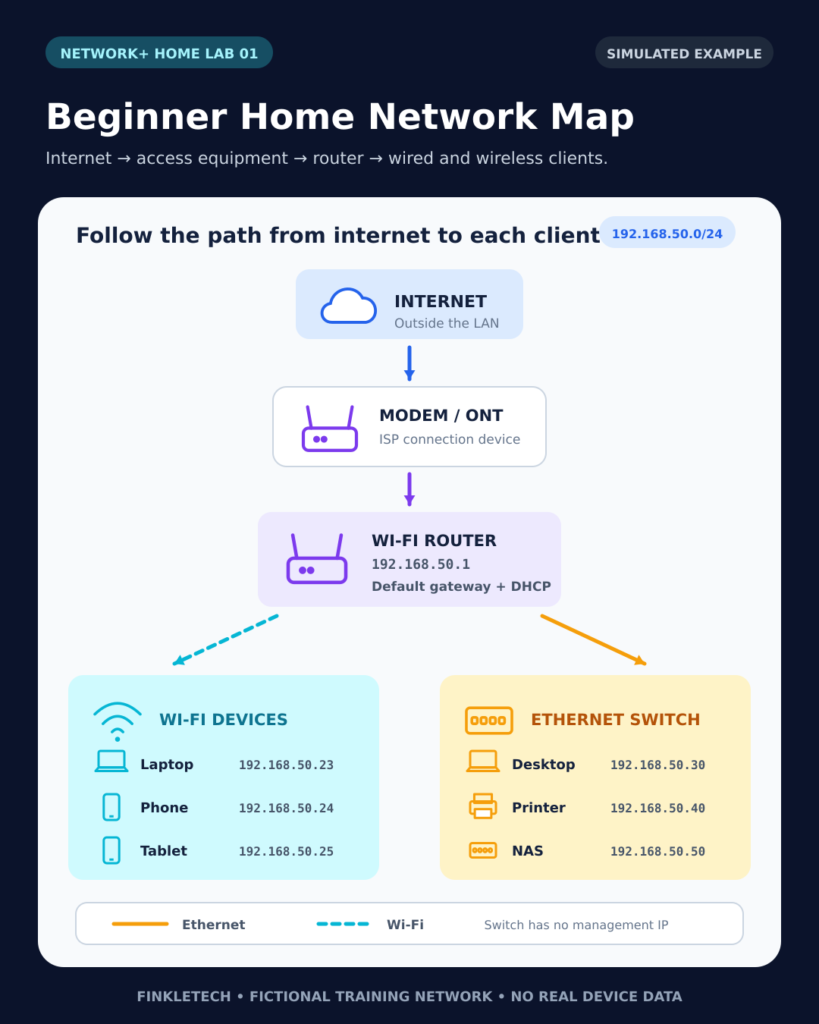
A simple map might look like this:
Internet
↓
Modem / ISP Gateway
↓
Router / Wi-Fi
↓
Laptop, phone, smart TV, printer, desktop PC
If your modem and router are the same physical box, label it as “Modem/Router Combo.” If you have a separate switch, show that between the router and wired devices.
Do not worry about making this perfect. The point is to create a useful map that helps you understand your network.
Step 8: Check for Unknown Devices
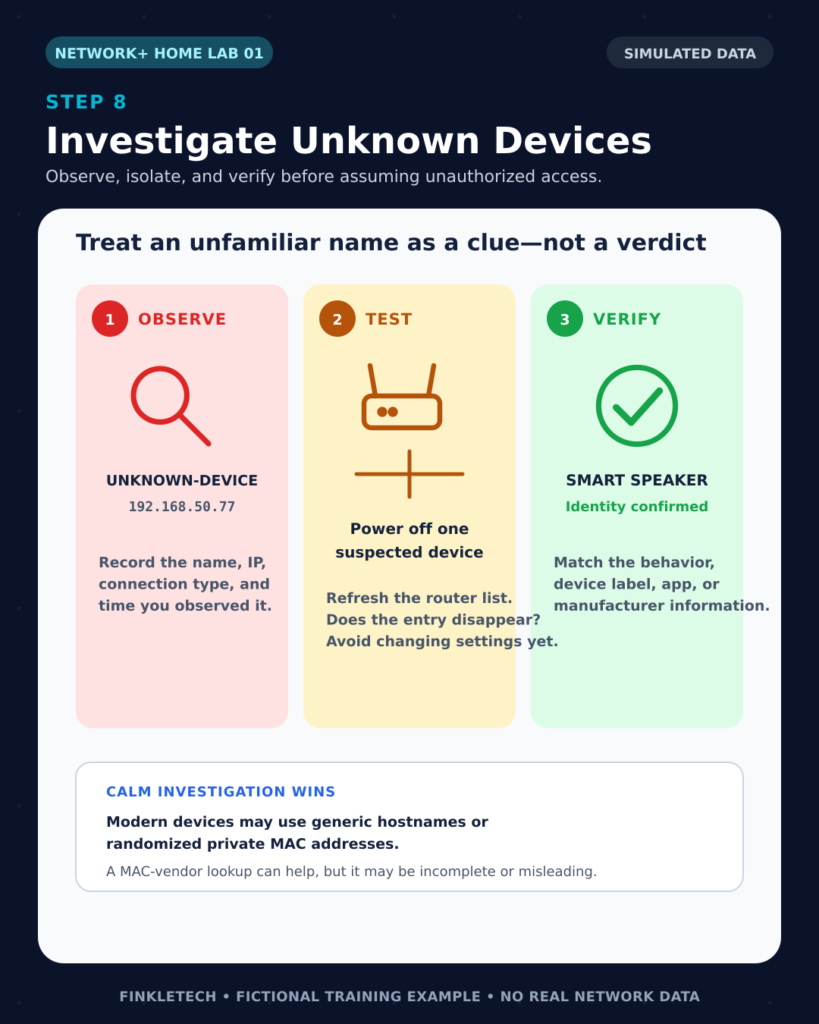
Look at your device list again. Are there any devices you do not recognize?
Before assuming something bad, remember that device names can be confusing. A phone may show up with a manufacturer name. A smart TV may show up as a strange model number. A printer may have a generic hostname. Some devices also randomize MAC addresses for privacy.
If you see an unknown device, write it down and investigate calmly. You can compare the IP address, device name, MAC vendor if visible, and whether the device disappears when you turn off certain electronics.
Do not publish unknown device details publicly. For your page, you can write a short note like:
“During this lab, I found one device name I did not recognize at first. After checking my connected devices, I realized it was likely my smart TV.”
Step 9: Write Your Lab Notes
This is the section that will make your page original.
After completing the lab, write a short personal summary. Do not overthink it. Just explain what you found, what confused you, and what you learned.
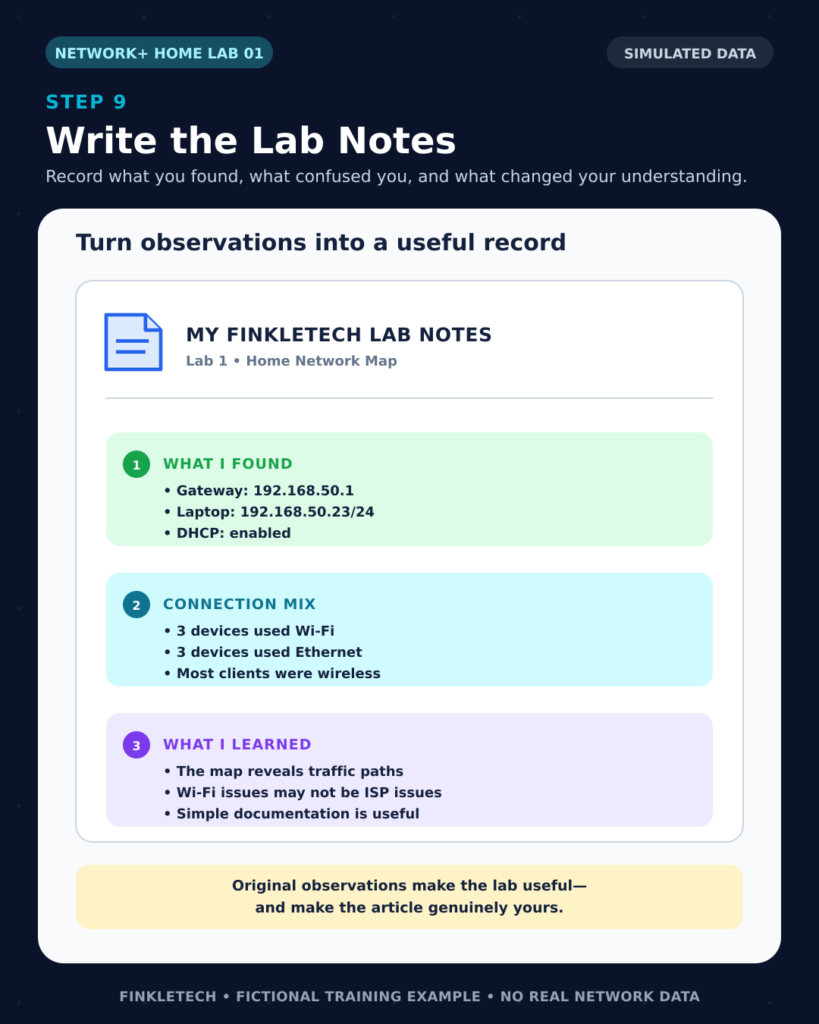
My FinkleTech Lab Notes
During this lab, I mapped my home network and identified my main router, computer, and connected devices. My computer received its IP address through DHCP, and the default gateway pointed to my router.
I found that most of my devices were connected over Wi-Fi, while only a few devices used wired Ethernet. This made me think more carefully about how many home network problems are actually Wi-Fi problems rather than full internet outages.
One useful thing I learned was that network documentation does not need to be fancy to be helpful. Even a basic diagram gives you a better starting point when troubleshooting.
What Your Results Mean
If you successfully found your IP address, default gateway, connected devices, and created a basic diagram, you completed the main goal of this lab.
Your home network map is now a troubleshooting reference. If something breaks later, you can compare the current state of the network to your documented version. You will know which device is supposed to act as the router, which devices normally connect, and whether the problem affects one device or many devices.
This is a simple skill, but it matters. Many real IT problems become easier when you have accurate documentation.

Common Problems
If you cannot log into your router, you can still complete the lab using ipconfig, device settings, and your own observations. Router access is helpful, but not mandatory.
If you cannot identify every device, do not force it. Make a note and come back to it. Some devices have unclear names, especially smart home devices.
If your IP address starts with 169.254, your computer may not have received a valid DHCP address. That usually means it could not get normal network settings from the DHCP server. This would be a separate troubleshooting issue worth investigating.
If your default gateway is blank, your computer may not be properly connected to the network, or the network adapter may not have received complete settings.
Network+ Concepts Practiced
This lab touches several Network+ concepts in a practical way:
- Network documentation
- LAN structure
- IP addressing
- Default gateway
- DHCP
- DNS
- MAC addresses
- Wired vs wireless clients
- Basic router function
- Troubleshooting preparation
The most important lesson is that troubleshooting gets easier when you understand the layout first. A network map gives you context. Without context, you are guessing.
Mini Review Questions
Use these questions to check your understanding after the lab.
- What is the default gateway usually responsible for in a home network?
- Why is it useful to know which devices are wired and which are wireless?
- What does DHCP do for devices on a network?
- Why should you blur MAC addresses or router details before publishing screenshots?
- How can a basic network map help during troubleshooting?
Short Answers
- The default gateway is usually the router. It forwards traffic from the local network toward other networks, including the internet.
- Wired and wireless devices can fail for different reasons. Separating them helps narrow down the source of a problem.
- DHCP automatically gives devices network settings such as an IP address, subnet mask, default gateway, and DNS server.
- MAC addresses, router details, and public-facing information can reveal private network details. It is safer to blur or crop them.
- A network map shows what should be connected and how devices relate to each other, which makes troubleshooting more organized.