
5 Essential Networking Tools Every Network+ Student Should Learn
Learning networking from a textbook is one thing. Actually watching packets move, scanning a subnet, configuring a router, troubleshooting a broken connection, or securely accessing a computer from another network is something completely different. That is where networking tools become incredibly useful. They turn concepts like IP addresses, ports, routing tables, DNS, DHCP, TCP handshakes, VLANs, NAT, VPNs, and subnets from abstract exam material into things you can actually see and interact with.
If you are studying for CompTIA Network+ or trying to move into networking professionally, you do not need to master every networking application ever created. A handful of tools can teach you an enormous amount. Five particularly useful tools are Tailscale, Cisco Packet Tracer, Wireshark, Angry IP Scanner, and Nmap with Zenmap. They approach networking from completely different angles, which is exactly what makes them useful together. Packet Tracer lets you build networks that do not physically exist. Wireshark lets you examine the traffic flowing through a real network. Angry IP Scanner quickly shows you what devices are around you. Nmap goes much deeper into discovering hosts, ports, services, and network behavior. Tailscale shows you how modern private networking can securely connect devices across the Internet.
None of these applications is a substitute for understanding networking fundamentals. In fact, the opposite is true. Their real value comes from helping you understand why networking works the way it does. The more you learn about networking, the more useful these tools become — and the more you use the tools, the easier concepts from Network+ begin to make sense.
This page gives you an introduction to all five tools, along with some practical ideas for using them. Each section can also serve as a starting point for a much deeper FinkleTech guide dedicated to that individual program.
Tailscale: Build Your Own Private Network Across the Internet
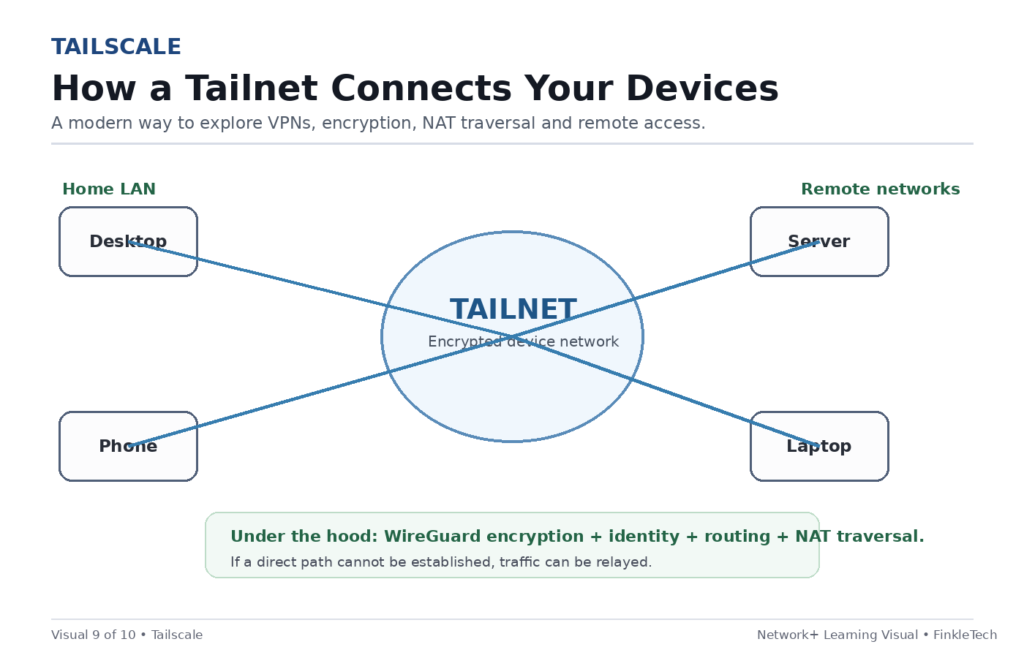
Tailscale is one of the more interesting modern networking tools because it lets you securely connect devices that may be sitting on completely different networks. Your desktop computer could be at home, your phone could be using cellular data several kilometres away, and a small server could be running somewhere else entirely. Once those devices are connected through Tailscale, they can communicate as though they belong to a private network.
Underneath Tailscale is WireGuard, a modern VPN protocol designed around strong encryption and comparatively simple configuration. Traditional VPN setups can involve public IP addresses, firewall rules, certificate management, port forwarding, VPN concentrators, and complicated routing configurations. Tailscale attempts to automate much of that work. You authenticate your devices, they join what Tailscale calls a tailnet, and Tailscale determines how those devices can securely communicate with one another.
This makes Tailscale surprisingly useful for understanding Network+ topics such as VPNs, encryption, routing, IP addressing, DNS, NAT, firewalls, remote access, authentication, and access control. It also exposes you to a concept that becomes extremely important once you start working with real networks: devices are frequently located behind Network Address Translation. Your computer at home normally does not have its own directly reachable public IPv4 address. Instead, your router translates connections between your private network and the public Internet. That makes incoming connections more complicated.
Tailscale attempts to create direct encrypted connections between devices even when NAT is involved. When a direct connection cannot be established, traffic can be relayed. Learning why a direct connection works in one situation and requires a relay in another can lead you straight into concepts such as NAT traversal, firewall rules, UDP, routing, and network topology.
There are some particularly useful Tailscale features worth experimenting with. MagicDNS can allow you to reach devices using names instead of memorizing IP addresses. Subnet routers can make an entire LAN accessible through a Tailscale device instead of requiring Tailscale to be installed on every device. Exit nodes allow another Tailscale device to become the path your Internet traffic travels through. Access-control policies can determine which users or devices are allowed to communicate with particular systems.
One practical home lab is simply to install Tailscale on a computer and smartphone. Run a small web server on the computer, disconnect your phone from Wi-Fi so it is using cellular data, and attempt to reach the server through Tailscale. You have just created a real remote-access networking lab. From there, examine the Tailscale IP addresses, compare them with your normal LAN addresses, ping between devices, look at DNS behavior, and investigate what route the traffic takes.
Another useful experiment is to expose a service only to your private Tailscale network instead of opening a port on your home router. It provides an excellent demonstration of the difference between private remote access and publicly exposing a service to the Internet.
For Network+ students, the important lesson is not simply how to click the Tailscale buttons. Ask what is happening underneath them. Why can two devices communicate? Which IP address are they using? Is the connection direct? Where does encryption occur? What happens when one device changes Wi-Fi networks? What role does DNS play? What happens if a firewall blocks the traffic? Those questions turn Tailscale from a useful app into a networking laboratory.
Continue learning: Tailscale Complete Guide: Private Networking, Remote Access, Subnet Routing and More →
Cisco Packet Tracer: Build an Entire Network Without Buying the Hardware
Cisco Packet Tracer might be the single best place for a networking beginner to start experimenting because you can build a surprisingly complicated network without owning a room full of switches, routers, access points, servers, and PCs. Packet Tracer is a network simulation environment created by Cisco primarily for education. You drag devices onto a workspace, connect them with virtual cables, configure them, and then watch the network behave.
Cisco equipment is extremely common in professional networking, but there is an important distinction for Network+ students: CompTIA Network+ is vendor-neutral. You are learning networking concepts rather than preparing specifically to administer Cisco devices. Packet Tracer is still extremely useful because the fundamental networking concepts remain the same. A subnet is still a subnet. A VLAN is still a VLAN. DHCP still assigns addresses. Routers still move packets between networks. Switches still forward Ethernet frames.
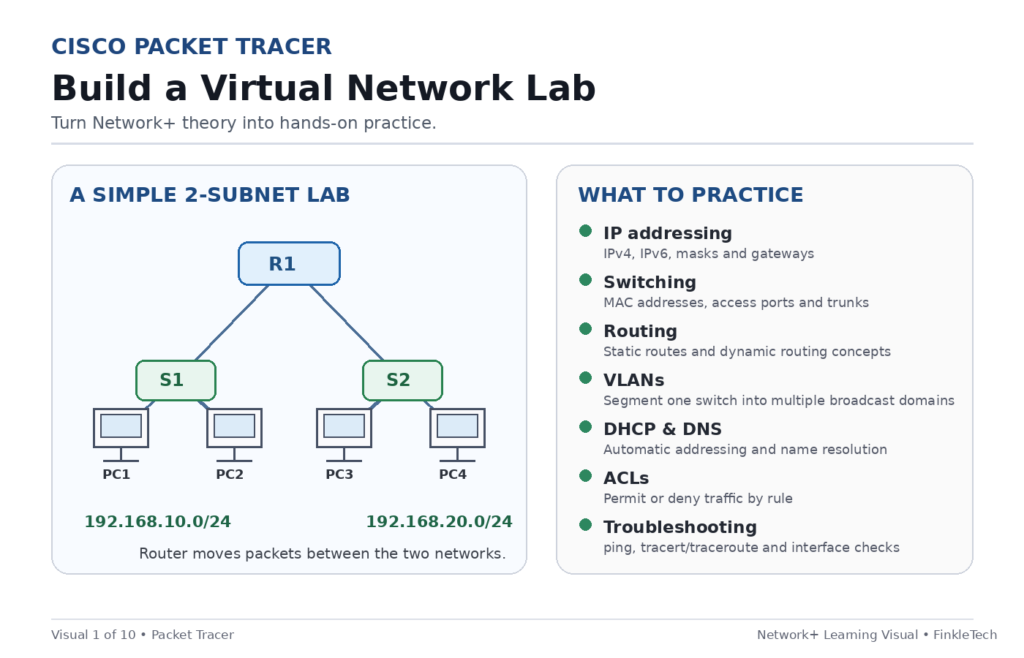
Packet Tracer is especially good for learning network topology. You can build a LAN containing several PCs and a switch, then add another network and connect the two using a router. Suddenly subnetting becomes more than a calculation on paper. If Computer A is 192.168.10.10/24 and Computer B is 192.168.20.10/24, they are on different networks. Something must route traffic between them. Configure the addressing correctly and they communicate. Configure the default gateway incorrectly and they do not. Troubleshooting the mistake is where the real learning happens.
From there, Packet Tracer can become considerably more advanced. You can configure DHCP so computers receive their addresses automatically. You can configure DNS, routing, wireless networks, NAT, access-control lists, VLANs, trunk links, switch ports, and various routing protocols. You can also practise commands in simulated Cisco command-line interfaces, helping you become comfortable with the sort of CLI environment that appears throughout professional networking.
One of Packet Tracer’s most useful educational features is Simulation Mode. Instead of network traffic appearing to happen instantly, you can slow the process down and observe individual events. Send a ping and watch what happens. Before the ICMP Echo Request can even reach another device on the local network, the originating computer may first need to determine a MAC address using ARP. Seeing those individual steps can make the relationship between Ethernet, ARP, IP, and ICMP much easier to understand.
Try deliberately breaking your virtual networks. Give a device the wrong subnet mask. Configure the wrong default gateway. Shut down a router interface. Place two devices in different VLANs. Remove a route. Configure a duplicate IP address. Then diagnose the problem using ping, tracert or traceroute, interface information, routing tables, and switch configurations. This is much closer to what networking work actually feels like than simply memorizing definitions.
Packet Tracer is also an excellent subnetting trainer. Instead of solving ten subnet questions and moving on, build those subnets. Create several departments, assign each one an IP range, configure their gateways, and prove that devices can communicate where they are supposed to. You can even apply ACLs and observe how security policies alter that communication.
If you are working toward Network+, Packet Tracer can help reinforce the OSI model, Ethernet, MAC addressing, IPv4 and IPv6, switching, routing, DHCP, DNS, NAT, VLANs, wireless networking, ports, protocols, troubleshooting, and network security. The software itself does not need to appear on an exam question for the knowledge gained from using it to be valuable.
Continue learning: Cisco Packet Tracer Complete Guide: Build, Configure and Troubleshoot Virtual Networks →
Wireshark: See What Is Actually Happening on the Network
Wireshark is where networking stops being invisible.
Most of the time, your computer communicates with hundreds or thousands of systems without showing you what is happening. You enter a website address, the page appears, and everything between those two events is hidden. Behind the scenes, however, your computer may perform DNS lookups, establish TCP connections, negotiate encrypted TLS sessions, exchange acknowledgements, request resources, and communicate with multiple servers.
Wireshark allows you to capture and inspect that network traffic packet by packet.
That makes Wireshark one of the most powerful educational tools available to someone studying Network+. Concepts such as Ethernet frames, MAC addresses, IPv4, IPv6, TCP, UDP, ICMP, ARP, DNS, DHCP, and ports stop being diagrams in a study guide. You can see the actual fields inside the packets generated by your own computer.
Open Wireshark, start a capture, visit a website, run a ping, perform a DNS lookup, or renew your computer’s DHCP lease. Stop the capture and you may have thousands of packets. At first it looks completely overwhelming. Learning to filter that information is one of the most important Wireshark skills.
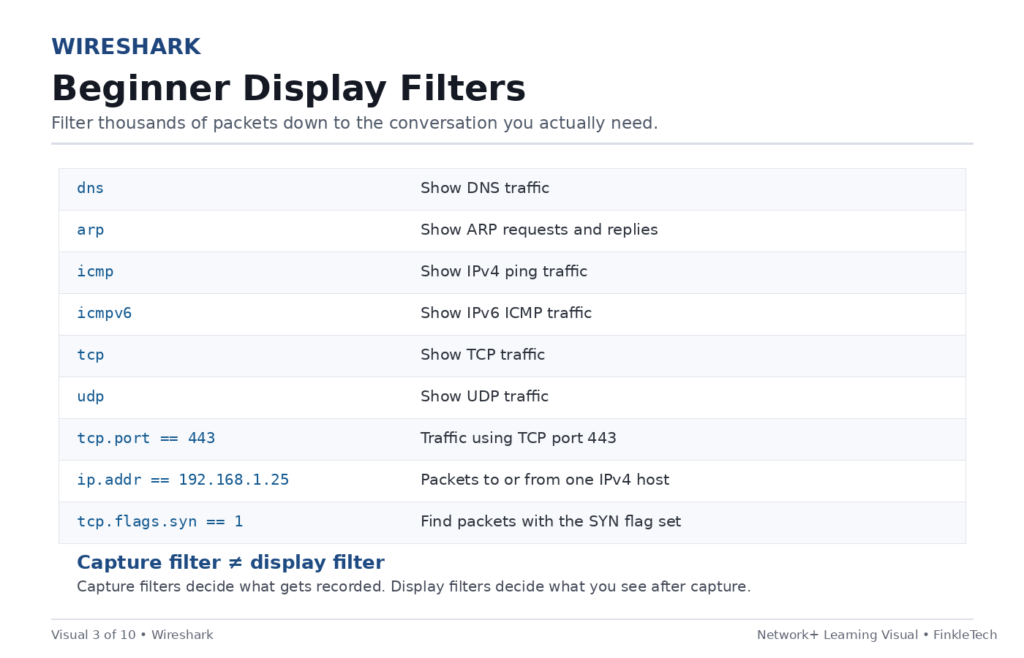
A display filter such as dns can show only DNS traffic. icmp can reveal ping traffic. arp can show Address Resolution Protocol activity. tcp.port == 443 can isolate traffic involving HTTPS’s standard TCP port. ip.addr == 192.168.1.25 can help you investigate traffic to or from a particular IPv4 address. Instead of looking through thousands of packets, you can narrow the capture down to exactly what you want to investigate.
Understanding the difference between capture filters and display filters is worthwhile too. A capture filter controls what Wireshark collects in the first place. A display filter controls which of the already captured packets Wireshark shows you. That distinction becomes important when troubleshooting busy networks.
One fantastic Network+ exercise is examining a TCP three-way handshake. Find a connection and identify SYN, SYN-ACK, and ACK. Instead of memorizing those three steps for an exam question, you are watching a computer actually perform them.
DNS is another great experiment. Clear your DNS cache, start Wireshark, visit a hostname you have not recently accessed, and filter for DNS. Look at the query your computer sends and the response it receives. Compare the hostname with the returned IP address. You have now watched name resolution take place.
DHCP is even more educational. Capture a DHCP address assignment and identify the Discover, Offer, Request, and Acknowledge process commonly remembered as DORA. Examine the offered IP address, lease information, subnet mask, gateway, and DNS information. Suddenly DHCP becomes a conversation instead of an acronym.
Wireshark also includes extremely useful analysis features such as Follow TCP Stream, which reconstructs the conversation associated with a TCP connection. The Statistics menus can show endpoints, conversations, protocols, packet sizes, and traffic patterns. Expert Information can help highlight unusual conditions such as retransmissions and other behavior worth investigating.
There is one misconception beginners should understand. Running Wireshark on a computer does not magically allow you to see everything occurring everywhere on a modern switched network. A switch normally forwards unicast traffic only toward the appropriate destination port. Professional network analysis may therefore involve switch port mirroring, network taps, specialized capture systems, or capturing directly on the affected device.
For troubleshooting, Wireshark can answer questions other tools cannot. Did the DNS query leave the machine? Did the server respond? Is TCP repeatedly retransmitting packets? Is the client attempting to connect to the right port? Is a DHCP server answering? Where does the communication stop?
Once you begin asking those questions, Wireshark becomes much more than a packet viewer. It becomes one of the best tools available for understanding how networks actually communicate.
Continue learning: Wireshark Complete Guide: Packet Capture, Filters, Protocol Analysis and Network Troubleshooting →
Angry IP Scanner: Quickly Discover What Is Connected to Your Network
Angry IP Scanner is much simpler than Wireshark or Nmap, and that simplicity is exactly why it is useful. Give it an IP address range and it can rapidly scan that range to help determine which devices are responding.
Imagine connecting to a network containing laptops, phones, televisions, game consoles, printers, cameras, smart-home devices, access points, and servers. You know they exist, but you may not immediately know their IP addresses. Angry IP Scanner gives you a quick way to begin mapping the network.
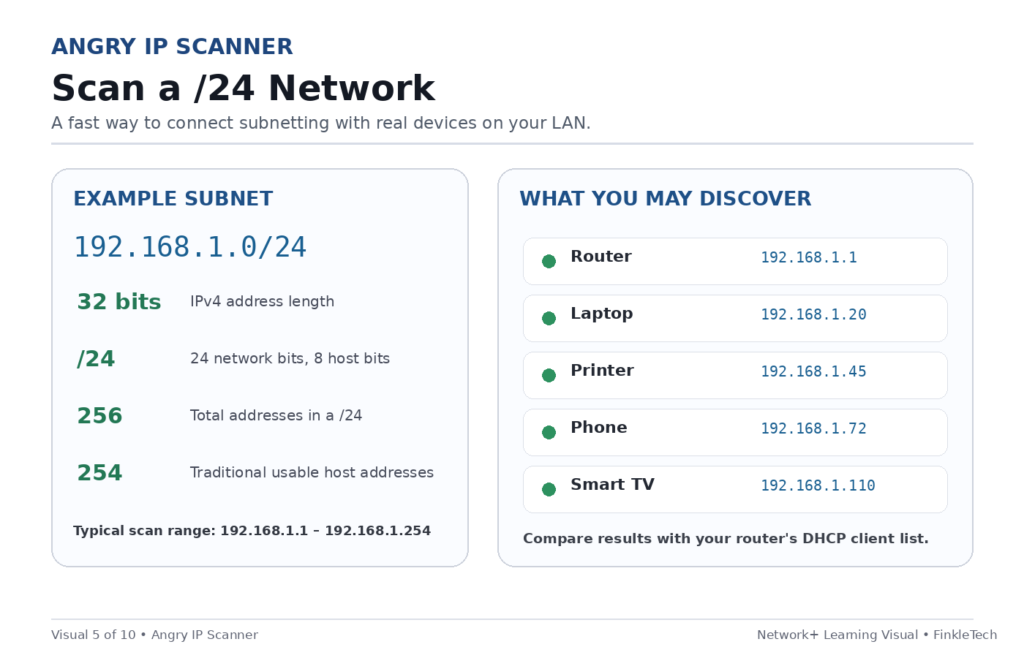
That makes it particularly useful when learning IPv4 addressing and subnetting. Suppose your computer has the address 192.168.1.72 with the subnet mask 255.255.255.0, or /24. You should understand why a range such as 192.168.1.0/24 represents the local subnet and why addresses outside that subnet may require routing. Scanning that network and seeing devices populate the results makes subnetting far less abstract.
Depending on what information can be retrieved from a host, Angry IP Scanner can provide details such as IP addresses, response information, hostnames, MAC-related information, and ports. Results can also be exported, which makes the program useful for creating a basic network inventory.
A great home-lab exercise is to scan your own LAN and try to identify every device. Find your router. Find your laptop. Find your smartphone. Find the television, printer, gaming console, or smart devices. Then open your router’s DHCP-client list and compare it with the scanner results.
You may quickly discover something important about network discovery: not every device responds the same way. A device that does not respond to one discovery technique is not necessarily powered off. Firewalls and host configurations can block or ignore particular traffic. Understanding that distinction matters professionally. A scan result is evidence, not absolute proof that nothing exists at an address.
Angry IP Scanner is also useful for reinforcing the distinction between an IP address, MAC address, hostname, and port. These values represent different layers and purposes within networking. An IP address helps route traffic. A MAC address identifies a network interface at the data-link layer on the local network. A hostname gives humans a more convenient name. A port helps identify an application or service on a host.
One simple experiment is to scan your network, disconnect one device, and scan it again. Then reconnect it and see whether it receives the same IP address. That leads naturally into DHCP leases and address reservations. Reserve an IP address for a device through your router and repeat the experiment. You have now connected a basic scanning utility with DHCP and IP-address management.
You can also use Angry IP Scanner as an early troubleshooting step. If you expect a device at a certain address but cannot find it, you can begin asking useful questions. Is the device connected? Did DHCP give it a new address? Is it on another VLAN? Is its firewall blocking discovery traffic? Is your computer scanning the correct subnet?
Angry IP Scanner does not replace Nmap. Nmap offers dramatically more detailed discovery and analysis capabilities. Instead, think of Angry IP Scanner as the quick flashlight you pull out when you simply want to look around. It is fast, visual, relatively easy to understand, and excellent for beginners.
For Network+ studying, it reinforces IPv4 addressing, CIDR notation, subnet masks, DHCP, DNS, MAC addresses, ARP concepts, ports, device discovery, and network troubleshooting. Those lessons are much more important than memorizing where every button is located in the application.
Only scan networks that you own or have permission to test. Network-scanning tools are legitimate administration tools, but network owners may reasonably treat unauthorized scanning as suspicious activity.
Continue learning: Angry IP Scanner Complete Guide: Find Devices, Scan Networks and Build a Network Inventory →
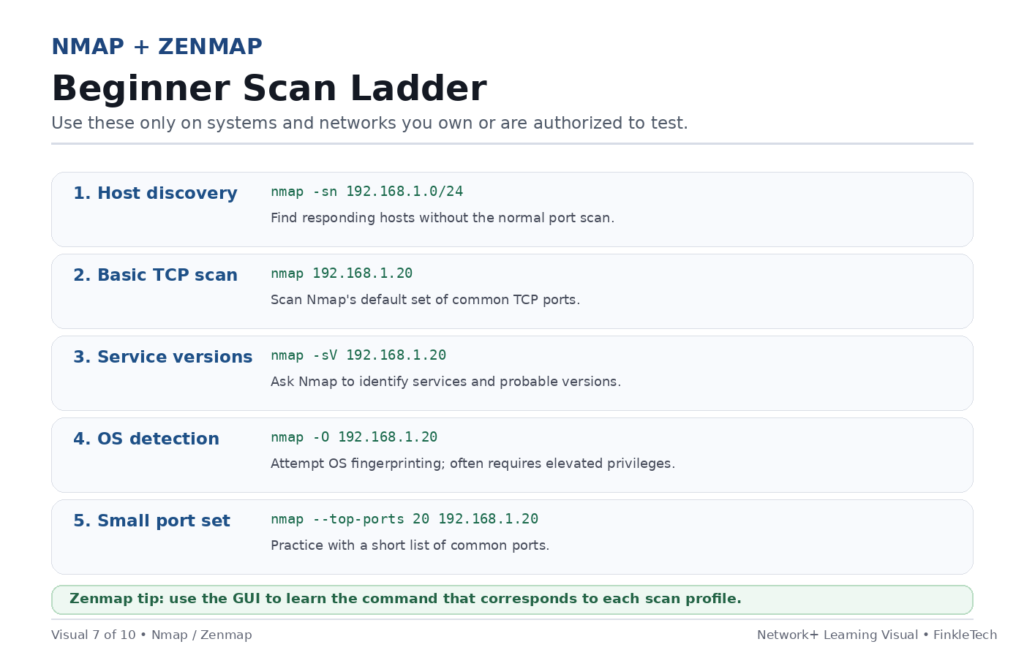
Nmap and Zenmap: Discover Hosts, Ports, Services and the Shape of a Network
If Angry IP Scanner is a flashlight, Nmap is closer to an entire network reconnaissance toolkit.
Nmap stands for Network Mapper. It has been used for decades by network administrators, cybersecurity professionals, system administrators, penetration testers, and researchers. Its primary interface is command-line based, while Zenmap provides a graphical way to work with Nmap commands and results.
Nmap can answer several increasingly detailed questions. Is a particular host reachable? Which devices exist on a network? Which TCP or UDP ports appear to be open? What services seem to be listening on those ports? What software versions might those services be running? What operating system characteristics can be inferred from the host? What path does traffic take to reach the destination?
Those questions connect directly with an enormous portion of Network+.
Start with something extremely simple on your own network. A command such as nmap -sn 192.168.1.0/24 performs host discovery across that subnet without conducting the normal port scan. That single command reinforces CIDR notation, subnets, IP addressing, network discovery, ARP, and ICMP-related concepts.
Once you have identified one of your own machines, a normal Nmap scan can investigate its ports. Suddenly the Network+ port numbers you have been memorizing have a real purpose. Port 22 might indicate SSH. Port 53 relates to DNS. Port 80 commonly represents HTTP. Port 443 commonly represents HTTPS. Port 3389 is associated with Remote Desktop Protocol. Instead of simply knowing that a port number exists, you can discover whether a real system is actually listening on that port.
Nmap also introduces an important concept: port states. You may encounter results such as open, closed, or filtered. An open port indicates that an application is accepting connections there. A closed port may indicate the host is reachable but no service is listening on that port. A filtered result can indicate that something such as a firewall prevents Nmap from determining the port’s state conclusively.
That distinction is extremely valuable for troubleshooting and security.
Service detection can take the investigation further. Using options such as -sV on systems you are authorized to test can help Nmap determine what services and versions appear to be running. OS detection can attempt to infer the operating system based on characteristics of the network responses. Nmap also includes traceroute capabilities and numerous options for controlling how scans are performed.
One of Nmap’s most powerful features is the Nmap Scripting Engine, usually shortened to NSE. Scripts can automate many types of network discovery, configuration checks, information gathering, and security testing. For someone learning networking, you do not need to immediately dive into aggressive security testing. Start with discovery and inventory work and understand exactly what a script does before running it.
Zenmap makes learning Nmap considerably friendlier for people who are not yet comfortable with command-line tools. You can select or create scan profiles, enter targets, view results, and see the Nmap command associated with the selected options. That last part is particularly useful because Zenmap can act as a bridge between graphical networking tools and the command line. Instead of memorizing dozens of switches immediately, you can see how GUI choices translate into Nmap commands.
A very useful learning workflow is to start with Angry IP Scanner and identify your devices. Then run Nmap against one of your own computers. Compare what each program tells you. Angry IP Scanner might quickly establish that the device exists. Nmap can begin explaining what that device is actually offering to the network.
You can go even further by combining Nmap with Wireshark. Start a Wireshark capture and then run an Nmap scan against your own lab machine. Now inspect the traffic created by the scan. You are no longer simply reading the Nmap result — you are watching the packets responsible for producing it.
That is an excellent example of why these five tools belong together.
Network+ concepts reinforced through Nmap include IP addressing, subnetting, TCP, UDP, ICMP, ports, protocols, client-server architecture, firewalls, routing, DNS, service discovery, troubleshooting, network security, reconnaissance, and network documentation.
As with any scanner, authorization matters. Experiment freely on your own equipment and purpose-built labs, but do not scan networks or systems you do not own or have permission to test.
Continue learning: Nmap & Zenmap Complete Guide: Host Discovery, Port Scanning, Service Detection and Network Mapping →
These Tools Are Better When You Use Them Together
The real power of these networking tools appears when you stop treating them as five unrelated applications.
Imagine building a small network inside Cisco Packet Tracer to understand how subnets, switches, routers, DHCP, and VLANs fit together. Then move to your real home network and use Angry IP Scanner to discover the devices connected to it. Use Nmap to investigate the ports and services running on one of your own machines. Start Wireshark and inspect the packets produced while your devices communicate. Finally, use Tailscale to securely reach one of those devices from outside your local network.
You have now moved through network design, device discovery, port and service discovery, packet analysis, routing, encryption, VPN connectivity, and troubleshooting.
That is a lot of Network+ knowledge packed into five free or readily accessible applications.
Most importantly, resist the temptation to simply follow tutorials and celebrate when something works. Break things. Ask questions. Change an address. Block a port. Remove a route. Disconnect a cable. Give something the wrong gateway. Capture the traffic before and after. Run a scan. Look at the routing table. Try to predict what will happen before pressing Enter.
That troubleshooting mindset is one of the most valuable skills you can develop in networking.
A certification can prove that you studied networking concepts. These tools give you a place to experience those concepts for yourself. And once you start connecting what Network+ teaches with what your computer is actually doing on a network, the subject becomes much easier to understand — and considerably more fun.