
Cisco Packet Tracer for Beginners: Build Your First Virtual Network
Cisco Packet Tracer is one of the best tools a new networking student can use.
It gives you a virtual workspace where you can build networks with PCs, switches, routers, servers, wireless access points, cables, and even IoT devices. You can connect everything together, configure the devices, send traffic across the network, break things on purpose, and learn how to troubleshoot the problem without spending hundreds or thousands of dollars on physical hardware.
That is what makes Packet Tracer so useful. It is not just a diagram tool. It is a safe place to practice the thinking behind real networking.
When you first open it, though, Packet Tracer can feel intimidating. There are device categories, dozens of router models, different cable types, tabs, commands, flashing lights, and a large blank workspace staring back at you. The trick is not to learn every button at once. The trick is to understand the basic workflow that applies to almost every lab:
Build the network. Connect the devices. Assign addresses. Configure the devices. Test connectivity. Troubleshoot what fails.
Once that process becomes familiar, Packet Tracer stops feeling like a complicated simulator and starts feeling like a networking playground.
What Is Cisco Packet Tracer?
Cisco Packet Tracer is a network simulation program designed to help people learn networking concepts and Cisco-style device configuration without requiring physical routers, switches, cables, racks, or servers.
You can use it to practice topics such as:
- Basic IP addressing
- Ethernet switching
- Router configuration
- VLANs
- DHCP
- DNS
- Static routing
- Default routes
- Wireless networking
- Access control lists
- Network troubleshooting
- Basic cybersecurity and IoT scenarios
For someone studying Network+, CCNA material, IT support, or basic networking, Packet Tracer is valuable because it turns abstract concepts into visible systems.
You do not just read that a router connects different networks. You build two networks, place a router between them, assign IP addresses, configure the router interfaces, and watch the traffic move. You also learn what happens when one small part is wrong.
That last part matters.
Most networking skill is not memorizing definitions. It is learning how to calmly isolate a problem when something does not work.
Why Beginners Should Use Packet Tracer Early
A lot of people make the mistake of waiting until they “know enough” networking before opening Packet Tracer.
Do the opposite.
Open it early, even when you barely understand IP addresses. A simple visual lab can make a confusing textbook concept click much faster than rereading the same paragraph five times.
For example, an IP address can feel like a random string of numbers until you assign one to two PCs and use ping to test whether they can communicate. A default gateway can feel vague until you put two PCs on separate networks, connect them through a router, and see that nothing crosses the router until the gateway is configured correctly.
Packet Tracer gives you instant feedback. A connection either works, partially works, or fails. Each result teaches you something.
The best mindset is this: do not try to build perfect labs right away. Build small labs, make mistakes, and fix them.
That is how networking becomes practical knowledge instead of trivia.
Understanding the Packet Tracer Workspace
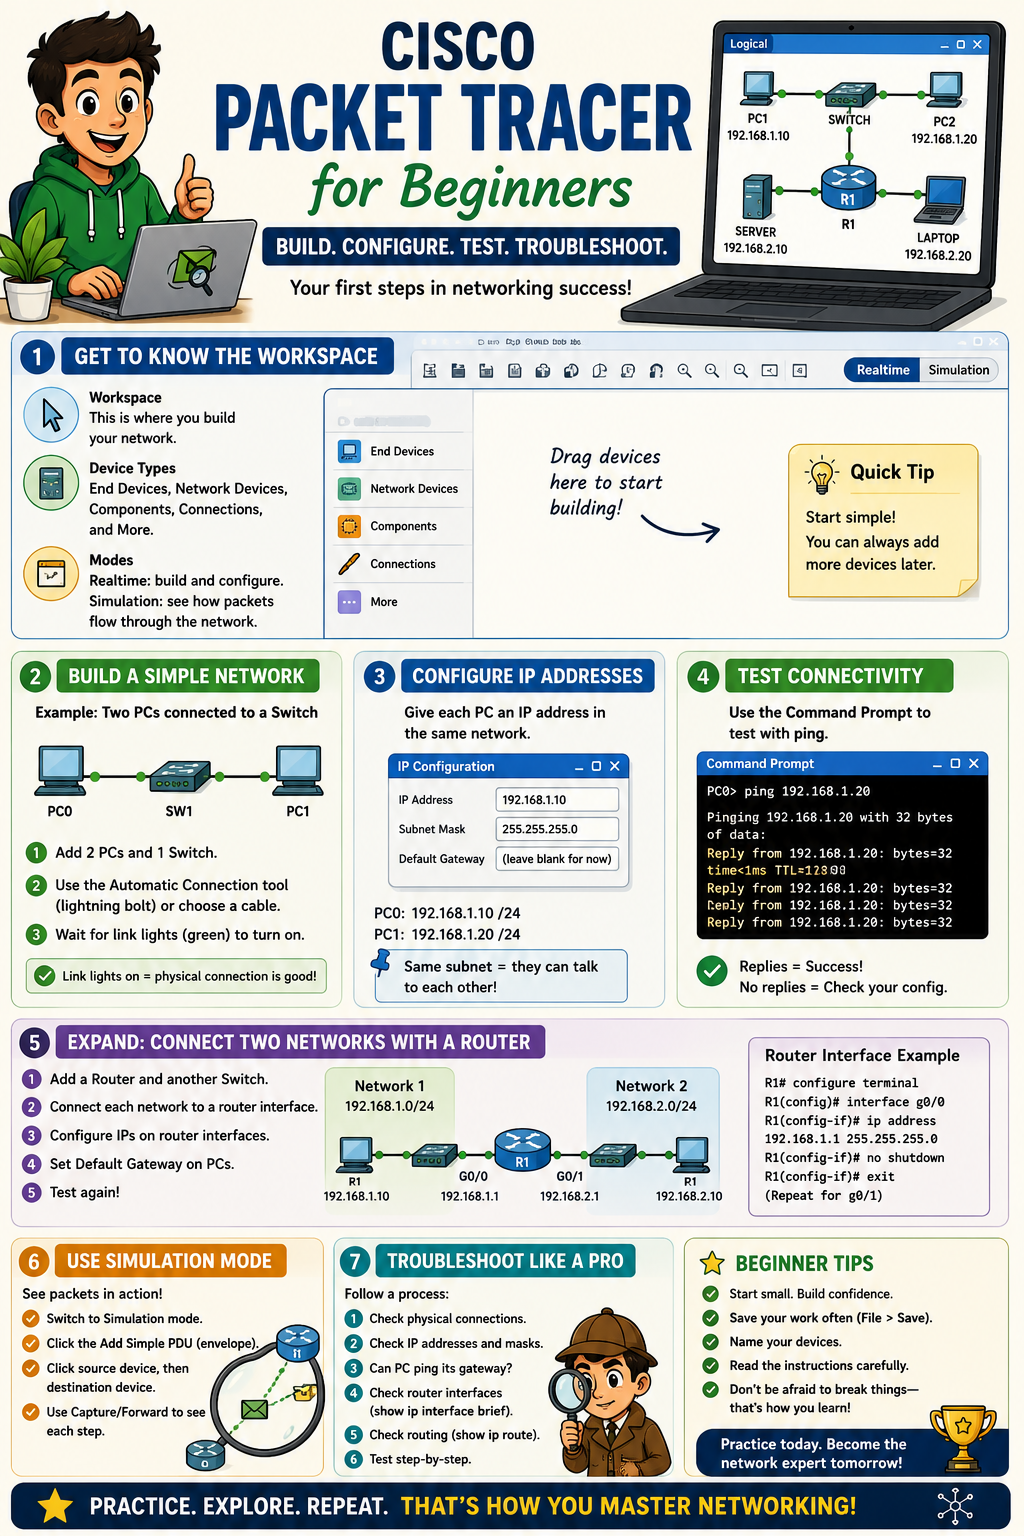
When Packet Tracer opens, most of the screen is the workspace. This is where you drag devices into place and create your topology.
At the bottom-left area, you will find categories for different device types. You can choose end devices such as PCs, laptops, printers, and servers. You can choose network devices such as routers, switches, wireless access points, hubs, firewalls, and cloud devices.
You will also find the connections category. This is where you select cable types or use the automatic connection option.
For your first few labs, do not overthink router models or cable standards. Start with simple equipment:
- PCs for end devices
- A 2960 switch for a basic local area network
- A basic router when you are ready to connect two networks
- Copper Ethernet connections or the automatic connection tool
Packet Tracer also gives you two important operating views: Realtime and Simulation mode.
Realtime mode is the normal working view. You configure your network and devices while the virtual network runs in the background.
Simulation mode slows the action down. You can send packets step by step and watch them move between devices. This is one of Packet Tracer’s most useful learning features because it lets you see what usually happens invisibly inside a network.
Your First Lab: Two PCs and One Switch
The best first Packet Tracer lab is simple: connect two computers to one switch and make them communicate.
This lab teaches you the basic relationship between devices, cables, IP addresses, subnet masks, and ping.
Start by placing these devices into the workspace:
- One 2960 switch
- Two PCs
Next, connect each PC to the switch.
You can use the automatic connection tool, which lets Packet Tracer choose an appropriate cable, or you can choose a copper straight-through cable manually. Connect each PC’s FastEthernet port to an available FastEthernet port on the switch.
After connecting them, give the devices a moment. The link indicators should eventually show that the connection is active. On a switch, some ports may take a short moment to transition into a forwarding state.
Now configure the IP addresses.
Click the first PC, open the Desktop tab, and select IP Configuration. Enter these values:
PC0 IP address: 192.168.10.10
Subnet mask:   255.255.255.0
Default gateway: Leave blank for now
Configure the second PC like this:
PC1 IP address: 192.168.10.20
Subnet mask:   255.255.255.0
Default gateway: Leave blank for now
The important part is that both PCs are in the same network.
With the subnet mask 255.255.255.0, both devices are part of the 192.168.10.0/24 network. Because they are in the same subnet and connected through the same switch, they should be able to communicate directly.
Open the first PC, select Desktop, then choose Command Prompt. Type:
ping 192.168.10.20
If everything is configured correctly, you should receive replies from the second PC.
Do not panic if the first ping occasionally fails and the next one works. The devices may need a moment to learn MAC address information through ARP, which stands for Address Resolution Protocol. ARP helps a device discover the physical hardware address associated with an IP address on the local network.
That is your first real networking lesson: before a PC sends data across Ethernet, it needs to know where that data should physically go.
What the Switch Is Doing Behind the Scenes
A switch is not just a box that gives you more Ethernet ports.
When PC0 sends traffic to PC1, the switch receives the Ethernet frame and learns which MAC address is connected to the incoming port. As it sees more traffic, it builds a table of which devices are connected to which ports.
This lets the switch send traffic more intelligently instead of blindly sending every frame everywhere.
In your first lab, you do not need to configure the switch. It can forward traffic using its default behavior. Later, you will configure switches with VLANs, management IP addresses, port security, trunk ports, and other features.
For now, the main point is simple: a switch connects devices inside the same local network.
Add a Router: Connect Two Different Networks
Once you understand two PCs on one switch, the next step is to connect two separate networks with a router.
A router is required when devices need to communicate across different IP networks.
For this lab, build the following topology:
PC0 → Switch 1 → Router → Switch 2 → PC1
Use these addresses:
PC0: 192.168.10.10 /24
PC0 default gateway: 192.168.10.1

Router interface facing PC0’s network: 192.168.10.1 /24

Router interface facing PC1’s network: 192.168.20.1 /24

PC1: 192.168.20.10 /24
PC1 default gateway: 192.168.20.1
The router interfaces may have different names depending on the router model you choose. Many Packet Tracer routers use names such as GigabitEthernet0/0 and GigabitEthernet0/1.
Click the router, open the CLI tab, and configure it with commands similar to these:
enable
configure terminal

hostname R1

interface gigabitEthernet 0/0
ip address 192.168.10.1 255.255.255.0
no shutdown
exit

interface gigabitEthernet 0/1
ip address 192.168.20.1 255.255.255.0
no shutdown
exit

end
copy running-config startup-config
The no shutdown command is one of the most important commands for beginners.
On Cisco routers, interfaces are often administratively disabled by default. You can assign an IP address correctly and still have no connectivity because the interface has not been turned on. The no shutdown command activates that interface.
Once both router interfaces are configured, test the network in stages.
From PC0, first ping its own gateway:
ping 192.168.10.1
Then ping the router’s second interface:
ping 192.168.20.1
Finally, ping PC1:
ping 192.168.20.10
Testing one hop at a time is a powerful troubleshooting habit. Do not immediately ping the farthest device and guess why it failed. Start close, confirm each step works, and move outward.
The CLI Commands Every Beginner Should Know
Packet Tracer gives you two main ways to configure many devices: graphical settings through tabs and the command-line interface, also called the CLI.
The graphical tabs are useful when you are brand new. The CLI is essential because it teaches you the command structure used on Cisco networking devices.
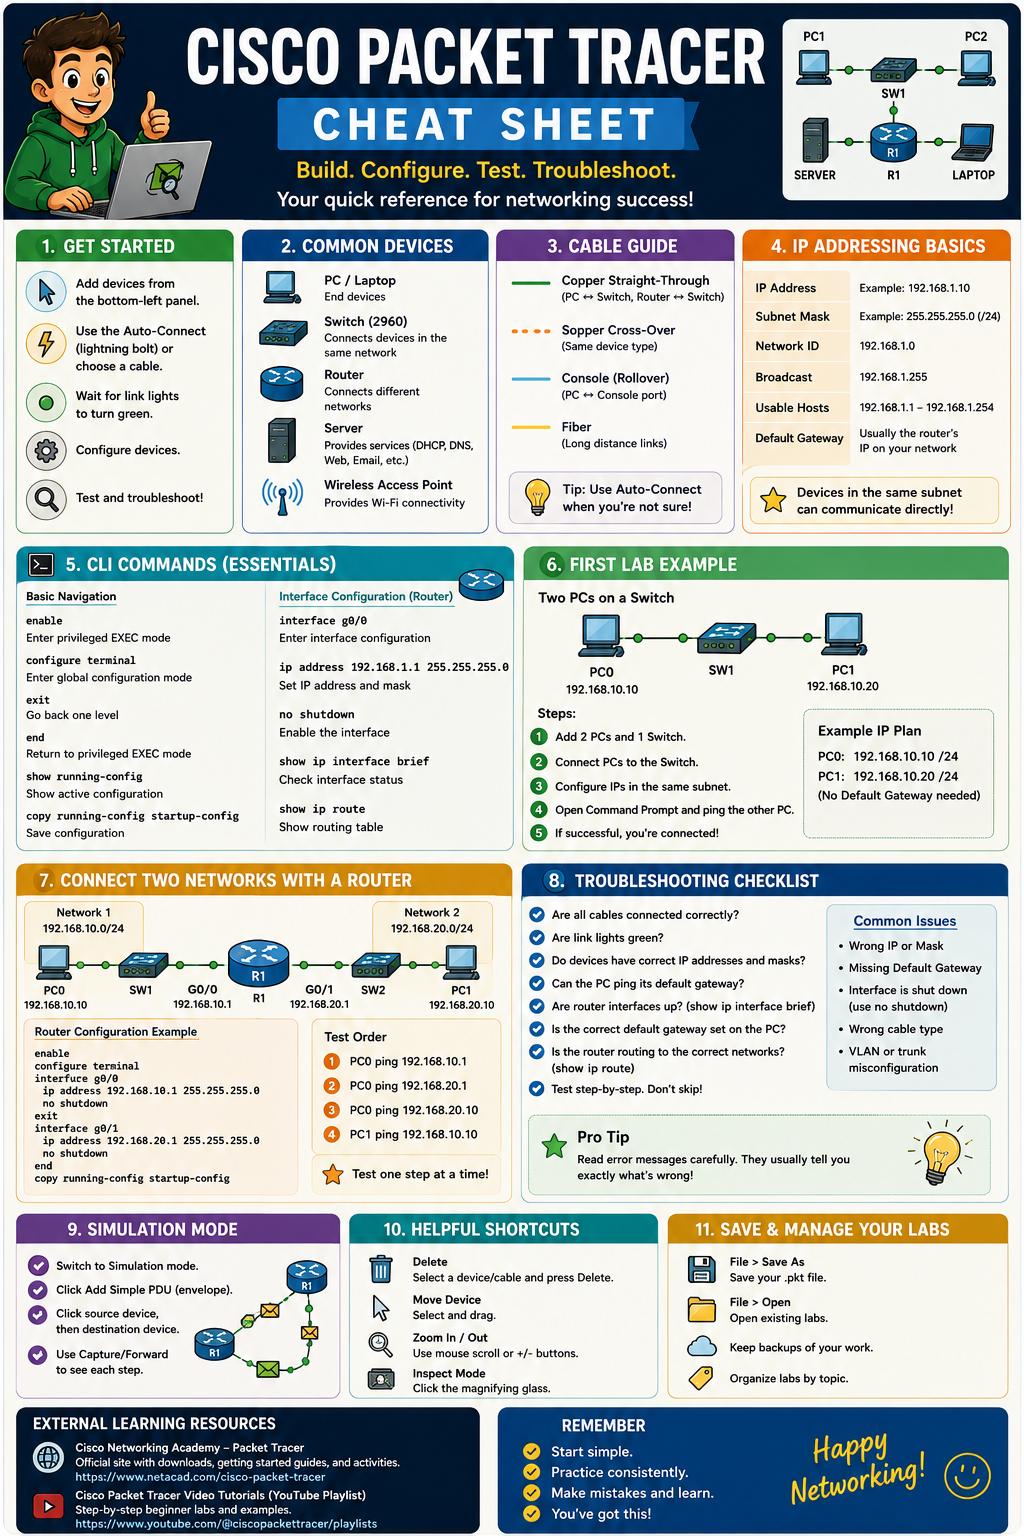
You do not need to memorize hundreds of commands immediately. Start with a small practical set:
enable
Moves from user EXEC mode to privileged EXEC mode.
configure terminal
Moves into global configuration mode, where you can make changes to the device.
hostname R1
Changes the router’s name.
interface gigabitEthernet 0/0
Moves into the configuration mode for a specific interface.
ip address 192.168.10.1 255.255.255.0
Assigns an IPv4 address and subnet mask to the selected interface.
no shutdown
Enables an interface that is administratively down.
show ip interface brief
Displays a quick summary of interfaces, their IP addresses, and whether their status is up or down.
show running-config
Displays the active configuration currently stored in memory.
show ip route
Displays the router’s routing table.
copy running-config startup-config
Saves the active configuration so it remains after the device restarts.
The good news is that Cisco command structure becomes repetitive. Once you understand the pattern of entering a mode, selecting an interface, applying a command, and exiting, future configurations become much easier.
Use Simulation Mode to See What Ping Actually Does
Simulation mode is where Packet Tracer becomes more than a virtual wiring diagram.
Switch from Realtime mode to Simulation mode in the lower-right area of the program. You can then create a simple PDU, which is Packet Tracer’s way of sending a test packet from one device to another.
Click the envelope icon for a simple PDU, click the source device, then click the destination device. Packet Tracer will create a packet event.
Use Capture/Forward to move the packet through the network one step at a time.
You may see ARP traffic happen before the ping succeeds. That is normal. The source device needs to learn the MAC address of the next destination on the local network before it can send the Ethernet frame correctly.
Simulation mode can help you understand:
- How ARP works
- How switches forward frames
- How routers move packets between networks
- Where a packet stops when a configuration is wrong
- Which protocols are active during a network task
Do not feel pressured to understand every colored packet event right away. Start by following one ping and asking one question: where did the packet go, and why?
Common Cisco Packet Tracer Beginner Mistakes
Everybody makes the same early mistakes. That is normal. The goal is to recognize them quickly.
The first common mistake is using incorrect IP addresses or subnet masks. Devices in the same local network must use compatible addressing. If one PC is 192.168.10.10/24 and another is 192.168.20.10/24, they are on different networks and need a router to communicate.
The second common mistake is forgetting the default gateway. A PC only needs a default gateway when it needs to communicate with another network. The gateway should be the IP address of the router interface on that PC’s local network.
The third common mistake is forgetting no shutdown on a router interface. If show ip interface brief says an interface is administratively down, you have found the problem.
The fourth common mistake is using the wrong cable or connecting to the wrong port. Packet Tracer’s automatic connection tool can help when you are still learning, but it is worth gradually learning which connections are appropriate.
The fifth mistake is trying to troubleshoot everything at once. Use a sequence instead:
- Are the cables connected?
- Are the port lights active?
- Do devices have correct IP addresses and subnet masks?
- Can each PC ping its own default gateway?
- Are router interfaces configured and enabled?
- Can the router see both connected networks?
- Can the destination device reply?
This process turns a frustrating failed lab into a checklist.
What Packet Tracer Cannot Fully Replace
Packet Tracer is excellent, but it is still a simulator.
It does not reproduce every feature, command, behavior, hardware limitation, cable issue, or software version you may find in a real network. It also cannot replace the experience of physically connecting devices, labeling cables, using a console cable, hearing a server fan spin up, or diagnosing a real faulty port.
That is okay.
Packet Tracer is not meant to replace real equipment forever. It is meant to help you build the confidence to use real equipment more intelligently when you get the chance.
For a beginner, it is one of the fastest ways to get hundreds of small practice repetitions. You can build a lab in ten minutes, make a mistake, fix it, delete everything, and start again.
That kind of repetition builds skill.
A Smart Packet Tracer Learning Path
After you complete your first switch-and-PC lab, do not jump straight into giant enterprise network diagrams.
Build your skills in layers.
Start with a basic LAN using two PCs and a switch. Then connect two networks with one router. After that, learn DHCP so devices can receive addresses automatically. Move on to VLANs, trunk ports, inter-VLAN routing, wireless networking, static routes, default routes, ACLs, and basic server services.
A simple progression might look like this:
- Lab 1: Two PCs and one switch
- Lab 2: Two networks connected by one router
- Lab 3: Configure DHCP for a small office
- Lab 4: Create two VLANs on one switch
- Lab 5: Route traffic between VLANs
- Lab 6: Add a wireless router and clients
- Lab 7: Build a small business network and troubleshoot it
Save your labs as you go. Months later, those old .pkt files become proof of your progress and useful practice material when you need a refresher.
Final Thoughts
Cisco Packet Tracer for beginners is not about becoming an expert overnight.
It is about learning to think like a network technician: build a small system, understand what each device is supposed to do, test the result, and methodically solve the problem when something fails.
Your first Packet Tracer lab may feel basic. Good. Basic labs are where strong networking habits begin.
Do not rush to build a massive network full of routers, servers, VLANs, wireless clients, and security devices. Build one small network that works. Then make it a little more complicated. Then break it on purpose and fix it.
That is how Packet Tracer gives you an advantage.
You are not simply reading about networking. You are practicing it.
Cisco Packet Tracer Resources
Getting Started with Cisco Packet Tracer — Cisco’s free beginner course for learning the interface and basic simulation workflow.
Cisco Packet Tracer Resources — Cisco’s central resource page for introductory courses, downloads, and learning materials.
For anyone wanting to learn networking cisco packet tracer is the simulation and wireshark is networking in real time with real hardware. Learning and mastering both will help you become the networking guru you always thought you could be!